Original Link: https://www.anandtech.com/show/13137/the-asrock-x399-taichi-motherboard-review
The ASRock X399 Taichi Motherboard Review: Cost-Effective Threadripper
by E. Fylladitakis on October 26, 2018 8:00 AM EST- Posted in
- AMD
- ASRock
- Motherboards
- ThreadRipper
- X399
_678x452.png)
It has been over a year after the introduction of the Ryzen Threadripper processor and still the available compatible motherboards number around a dozen. ASRock is the company that offers the largest number of AMD X399 motherboards and they are merely three.
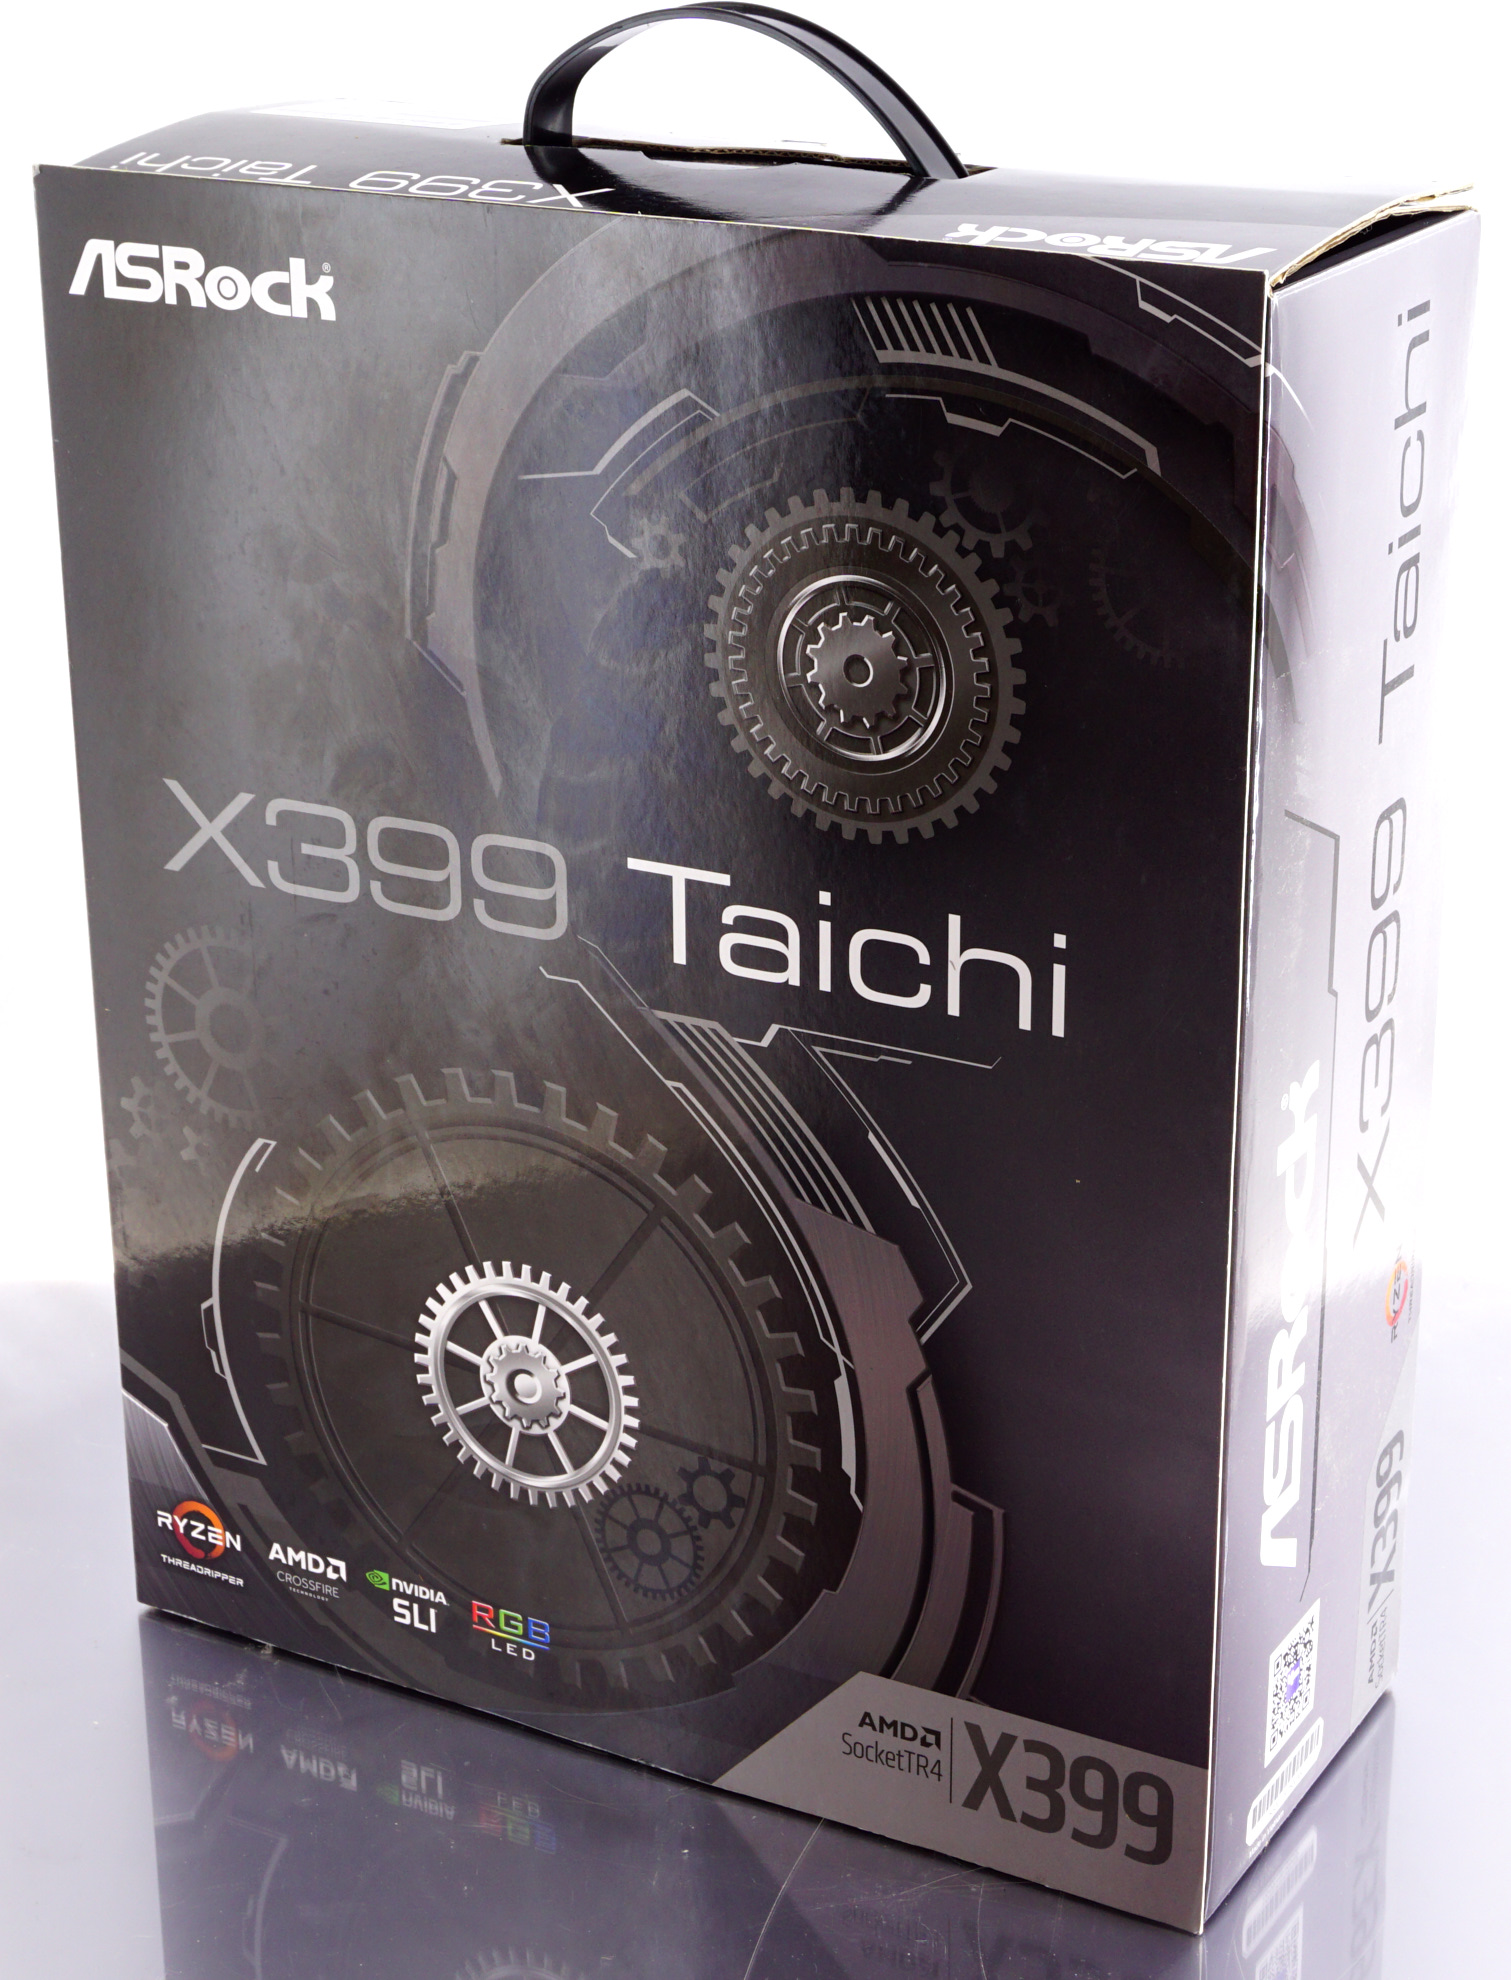
It is the ASRock X399 Taichi that we will be having a look at today. The ATX version of the Taichi is the most affordable AMD X399 motherboard available at the time of this review, retailing for $320 ($280 after rebate). Although the retail price of the ASRock X399 Taichi is nearly $100 lower than the second least expensive X399 motherboard we reviewed to this date, the specifications of the motherboard remain impressive. We are having a closer look at the motherboard and identify how ASRock managed to achieve this low price and what the X399 Taichi is missing compared to the competition.
| Recommended Reading on AMD Ryzen | |||
| 2700X and 2600X CPU Review |
2400G and 2200G APU Review |
Threadripper 2 2990WX Review |
Best CPUs |
 |
 |
%20-%20Copya_678x452.jpg) |
 |
ASRock X399 Taichi Overview
Unlike most motherboards, ASRock does not focus the marketing of the X399 Taichi on any specific group of users. The company's marketing efforts are generalized, hinting that their intent is to promote the X399 Taichi as a general-purpose design that would satisfy the widest user base.
A quick look at the motherboard's features and specifications suggests that the X399 Taichi is hardly different than its more expensive counterparts. It still has four full-size PCIe slots that support up to quad SLI/Crossfire, eight SATA connectors, three M.2 connectors, and even an U.2 port. We also find that it is using the same main subsystem chipsets, such as the Realtek ALC 1220 codec for sound and the Intel I211-AT NICs for dual LAN. Even the power circuitry is basically the same as that used in more expensive models, with an eight plus three phase power delivery design for the CPU and its SoC.
ASRock obviously did not manage to reduce the retail price of the motherboard by means of witchcraft, nor they are selling it at a loss. A closer look at the motherboard reveals that it does not have any of the newest features that we have seen on more advanced models. There is dual Gigabit LAN but no 10G NIC. There is 802.11ac Wi-Fi but no 802.11ad WiGig. There are headers for common 12V RGB LED strips but not for digital LED products. By avoiding the implementation of top-of-the-line features, ASRock's engineers managed to reduce the manufacturing cost of the X399 Taichi significantly without removing any of its core features and/or reducing the motherboard's quality or capacity.
The ASRock X399 Taichi is not the fastest AMD X399 motherboard that we have tested to this date either. As we will see in the following pages of this review, the main reason behind that is that the automated overclocking features of the motherboard are not as aggressive as they are on other motherboards. The ASRock X399 Taichi still does boost the processor's frequency by default but is more conservative in doing so, making it slightly slower than other products out-of-the-box. ASRock's engineers probably wanted to favour stability over performance on this particular implementation. Nevertheless, it is still just as capable as its more expensive counterparts when manual overclocking takes place.
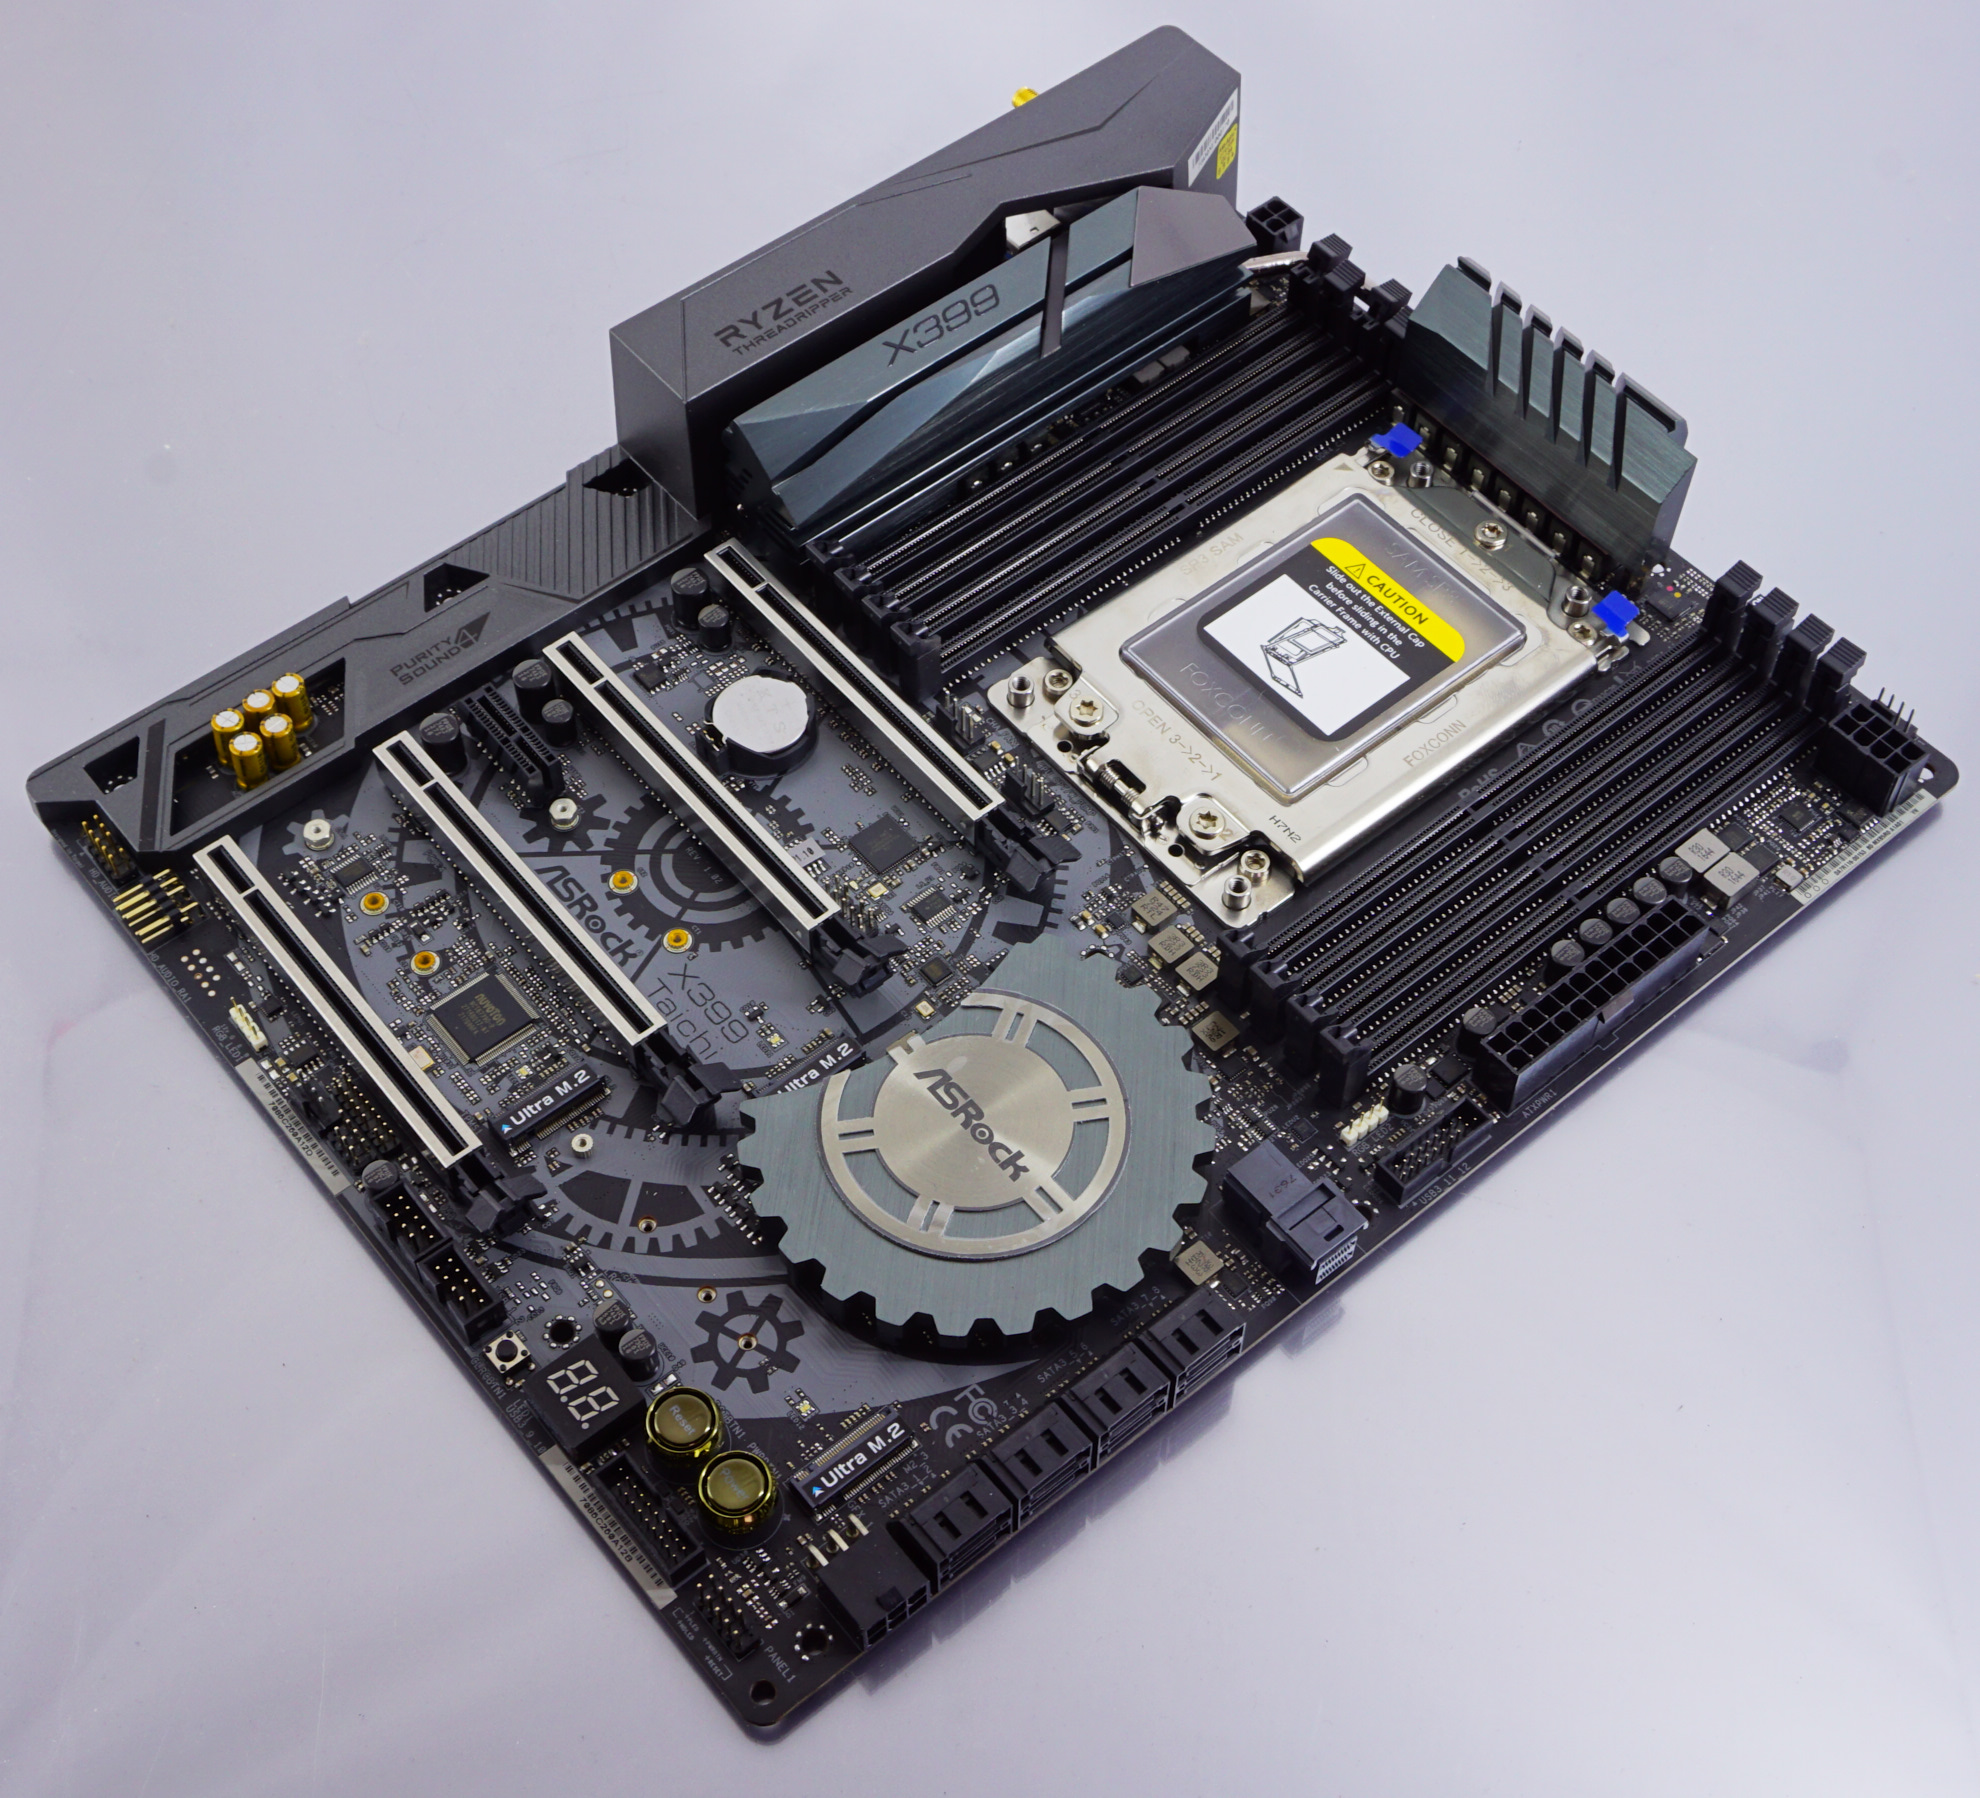
Visual Inspection
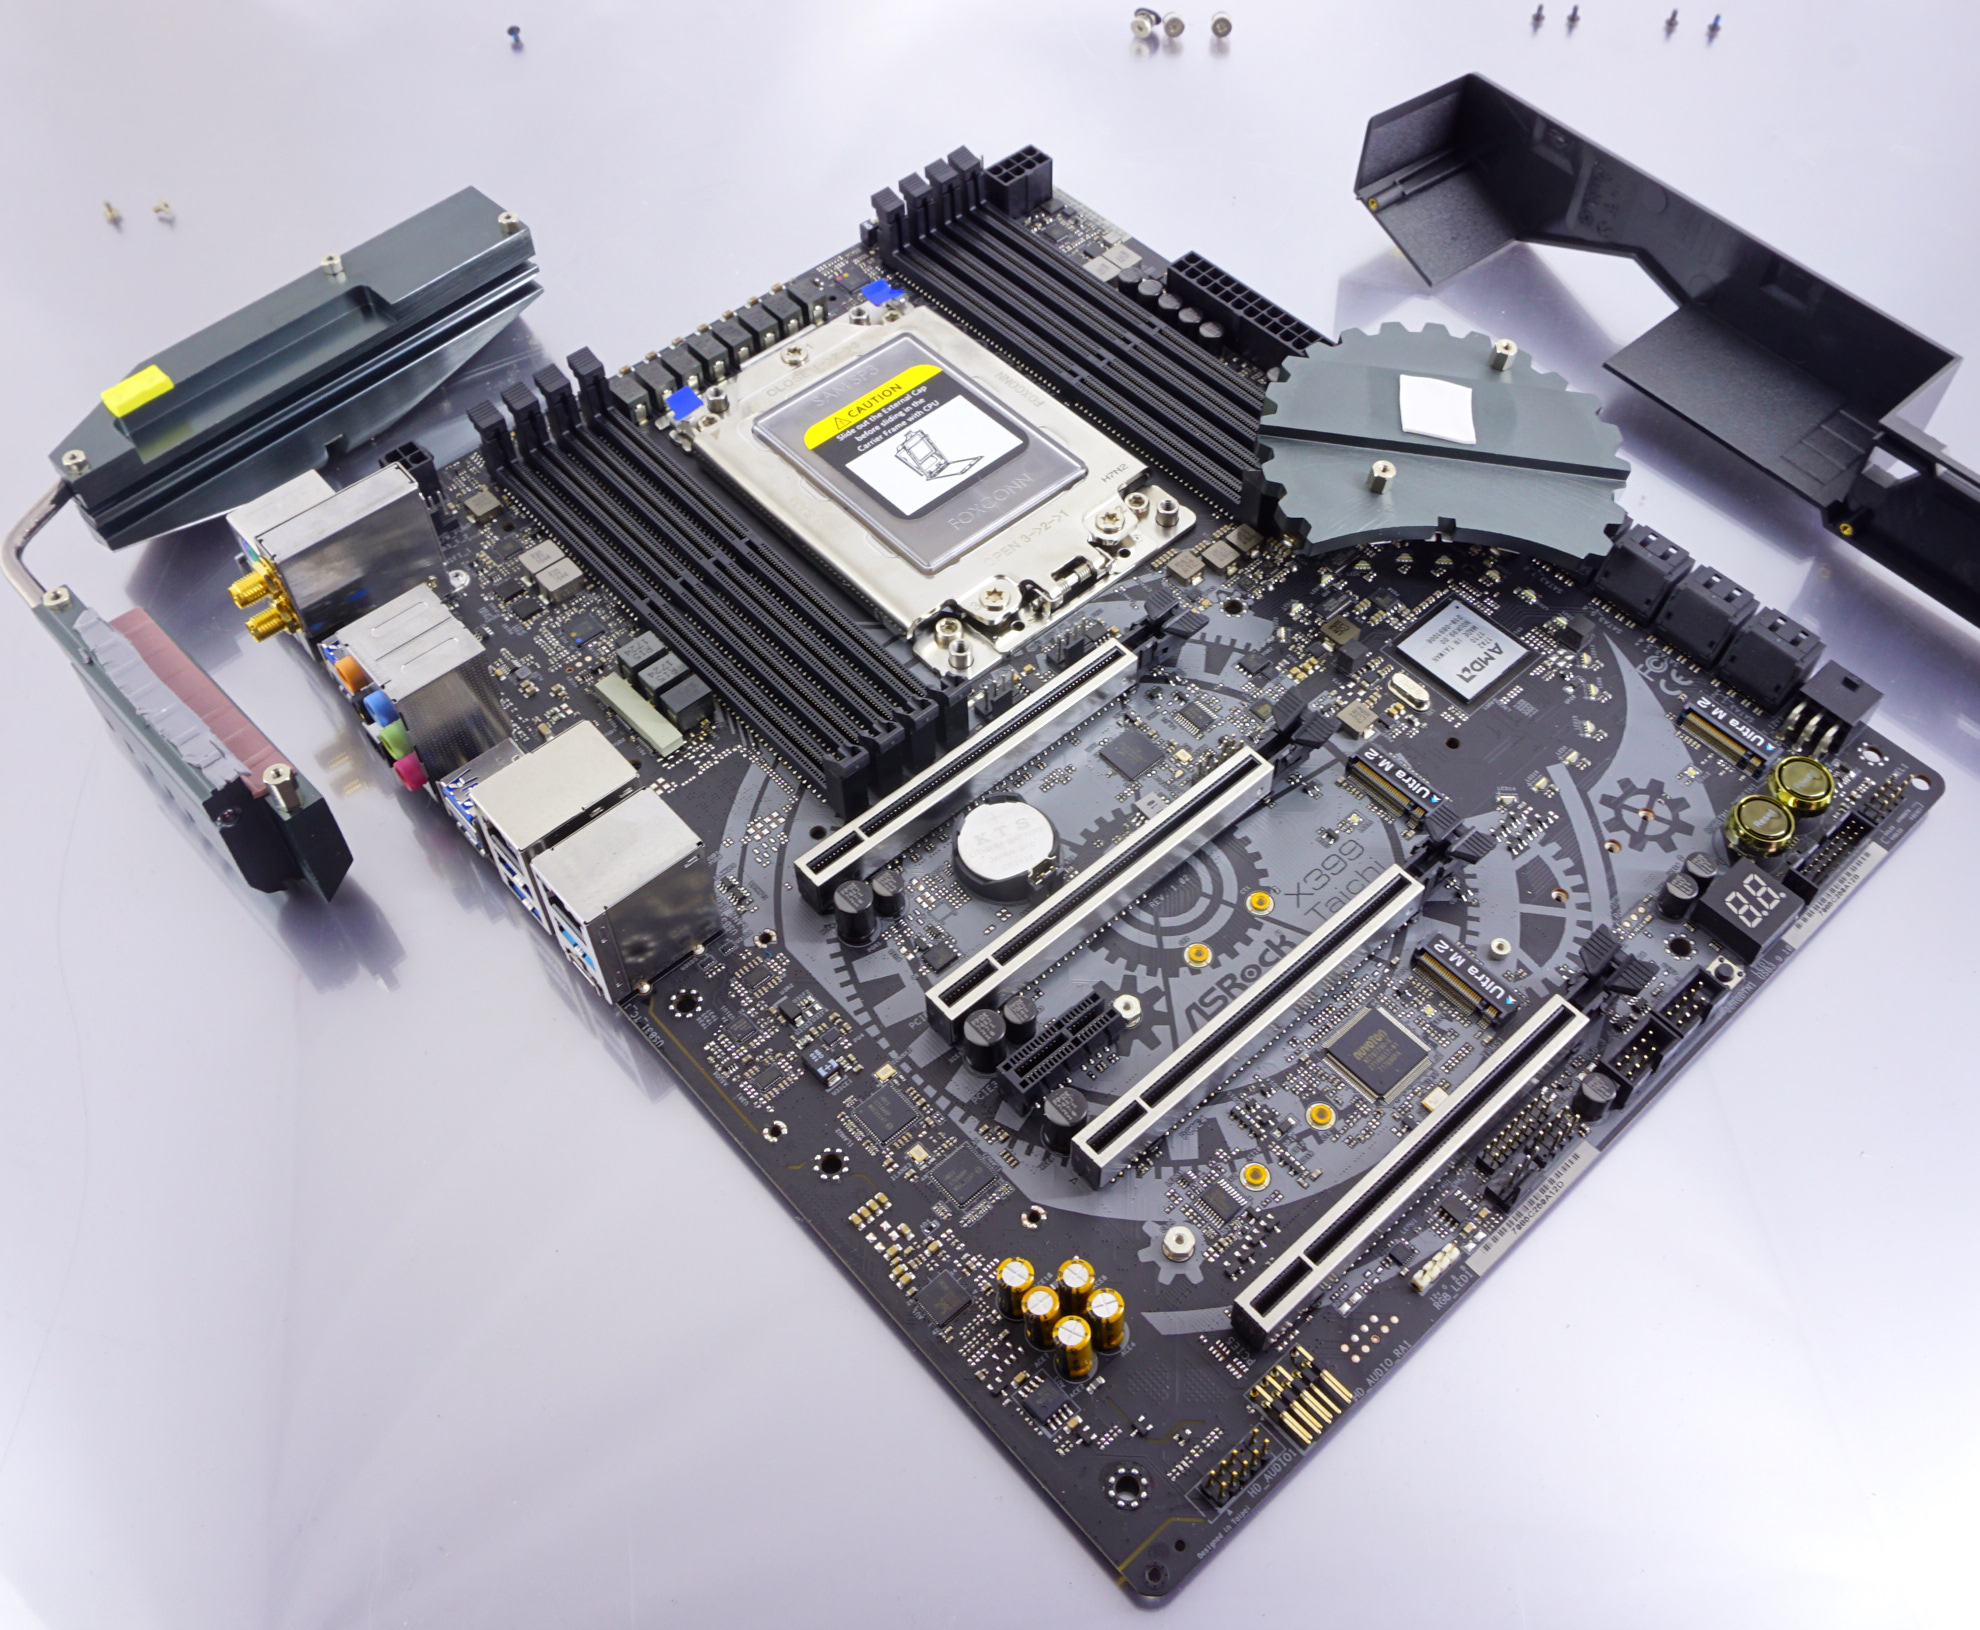
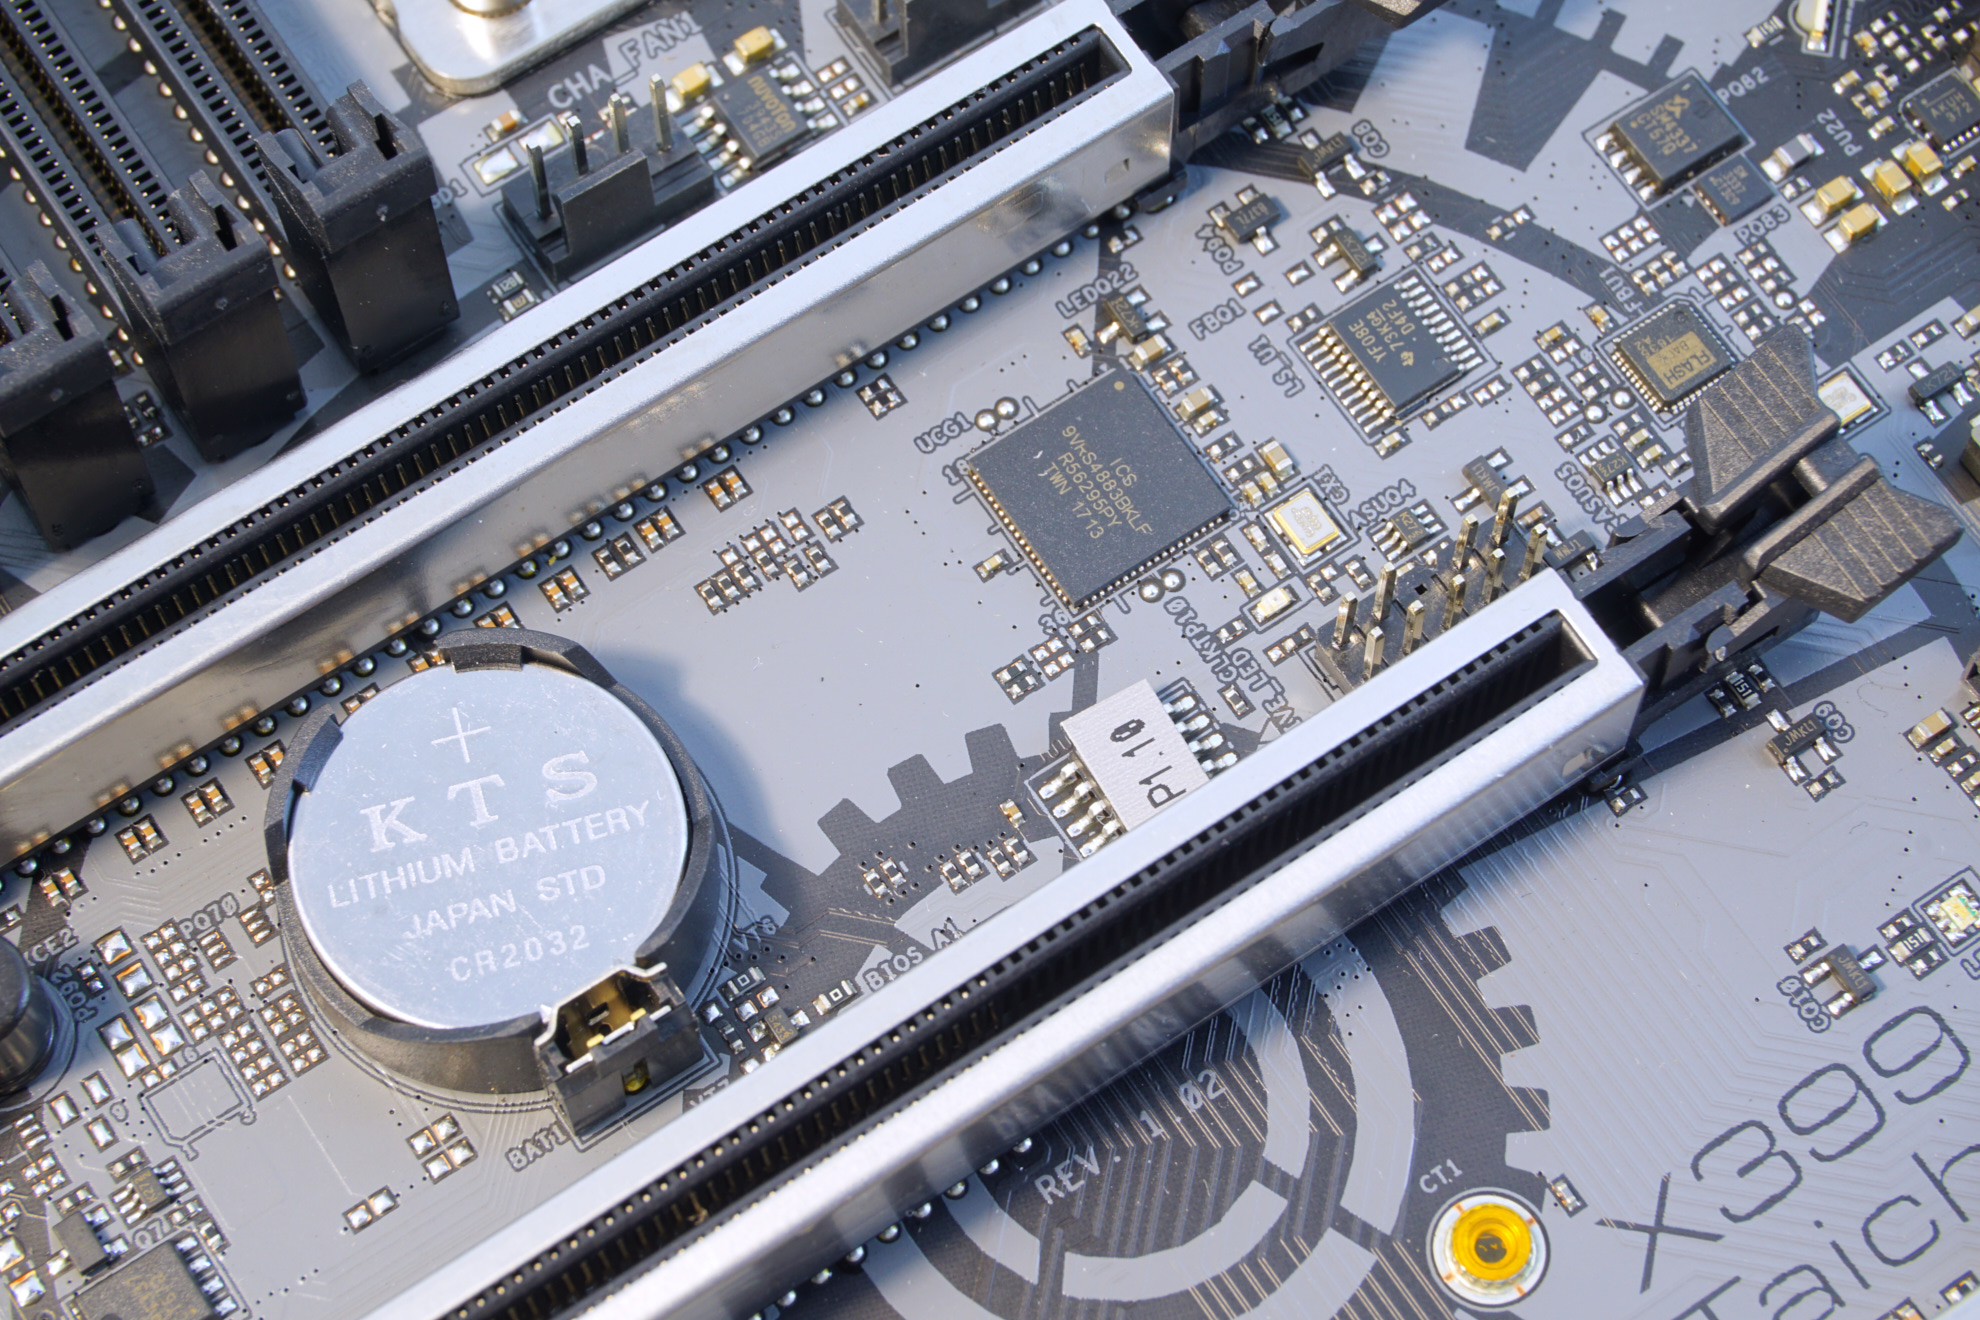
Aesthetically, the ASRock X399 Taichi has little to be envious of more expensive implementations. The design is simple, symmetric, and elegant, with black plastic and gunmetal grey parts creating a subtle visual antithesis. A gear works pattern is dyed on the motherboard's PCB and the gear-shaped chipset heatsink perfectly fits into the theme. There are two additional heatsinks that cool the motherboard's VRM circuitry that are connected via a heatpipe. No active cooling is present. ASRock's design also includes RGB lighting surrounding the gear-like chipset heatsink, with two headers for common 12V RGB strips. There is no support for RGBW or digital RGBW/UV LED products.
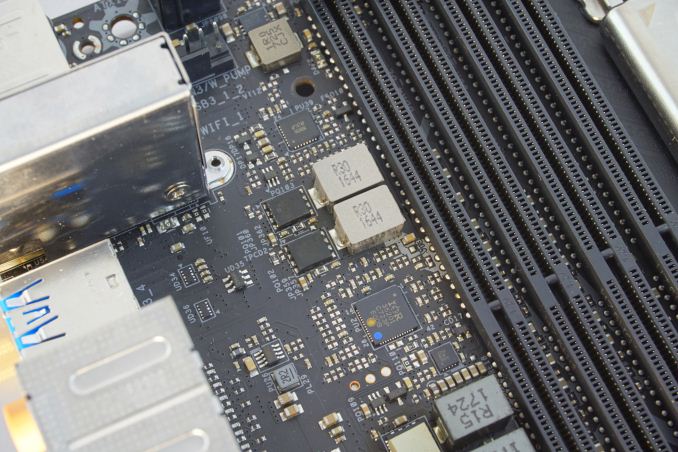
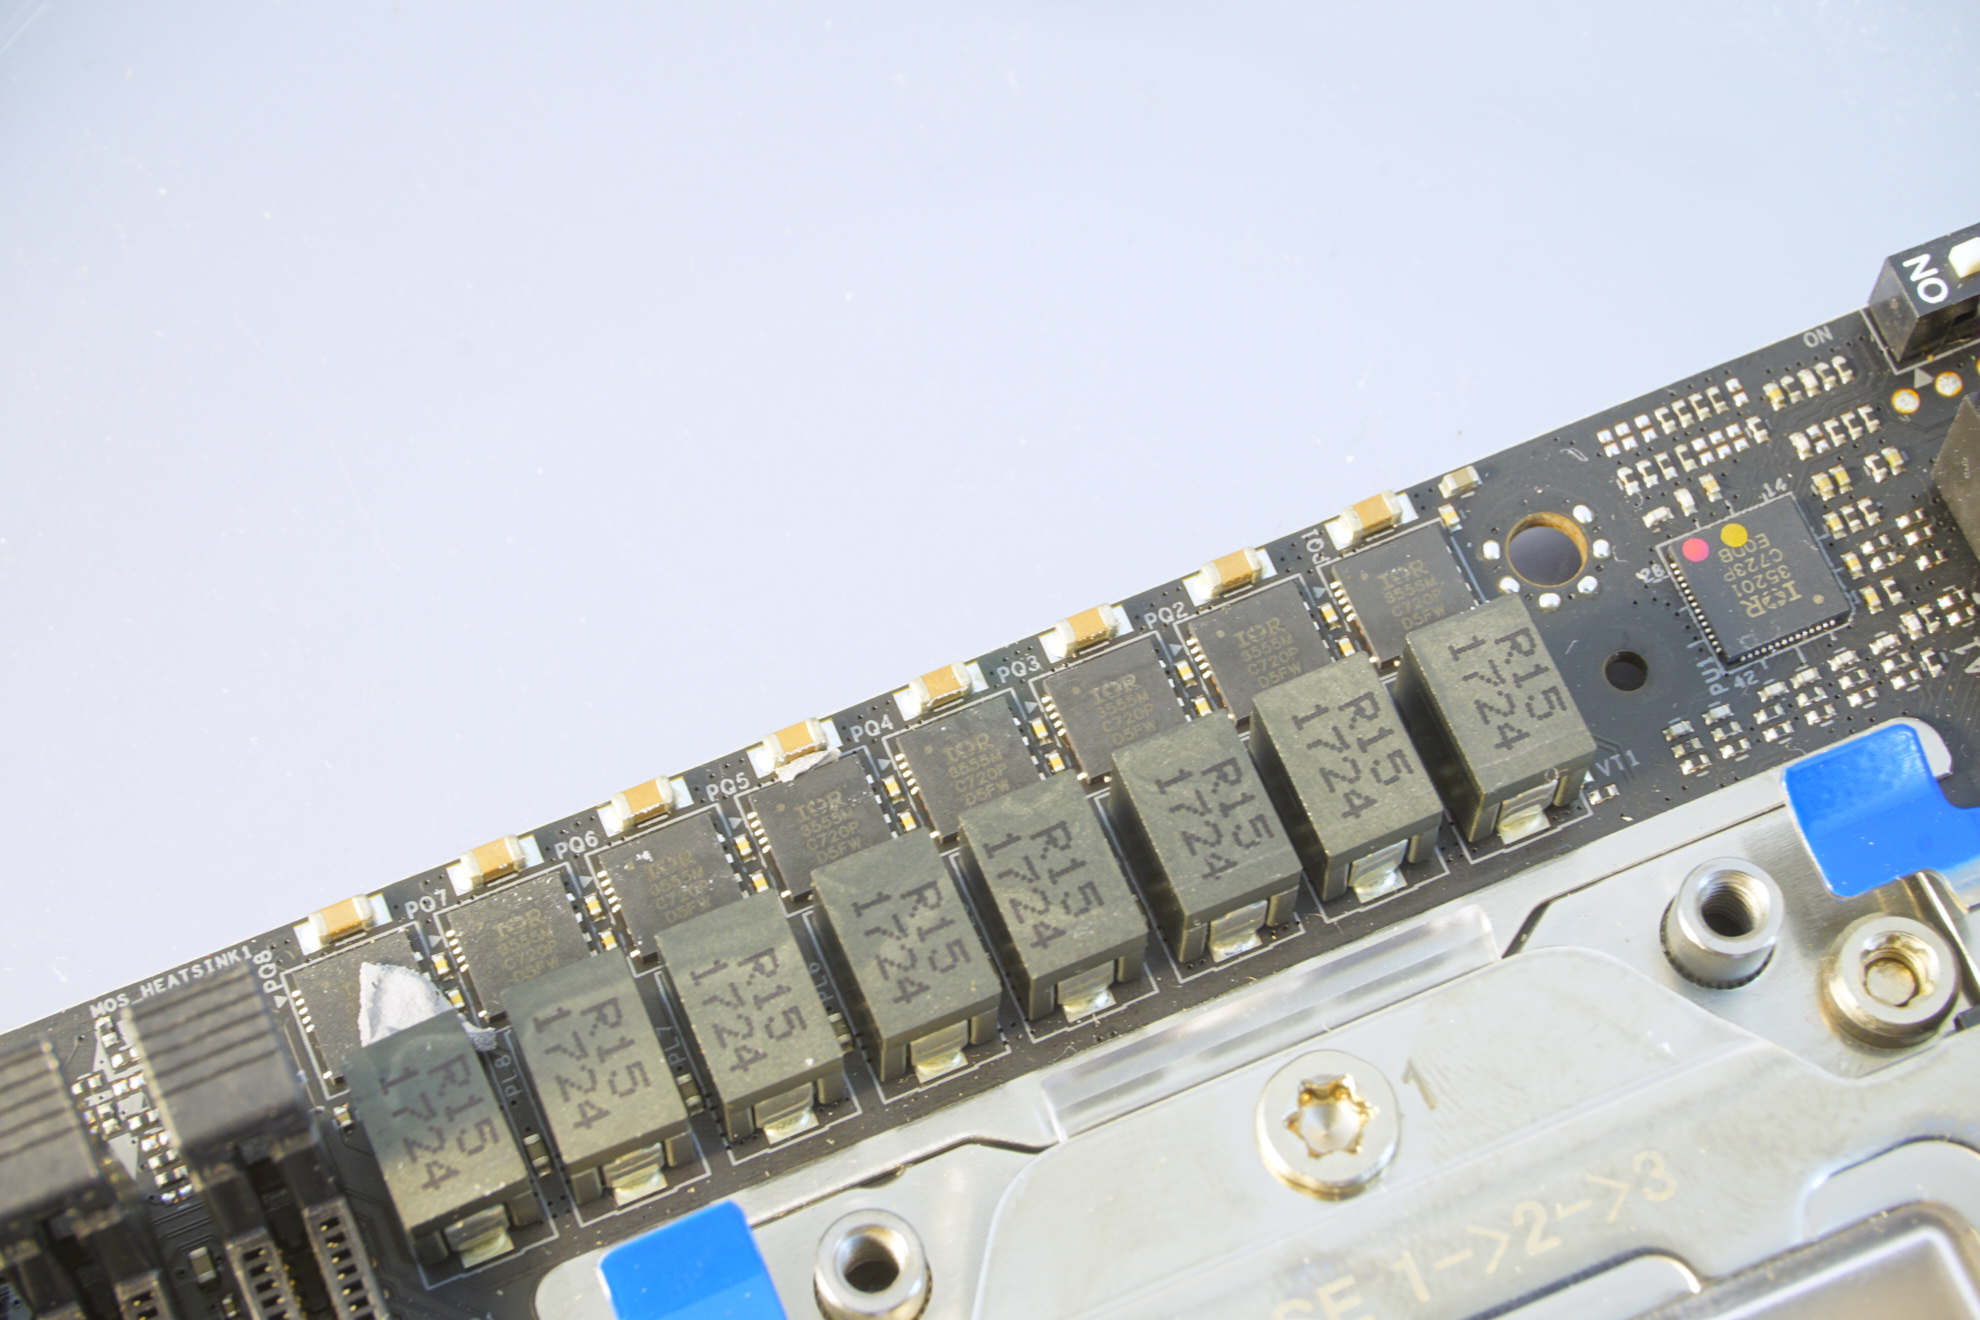
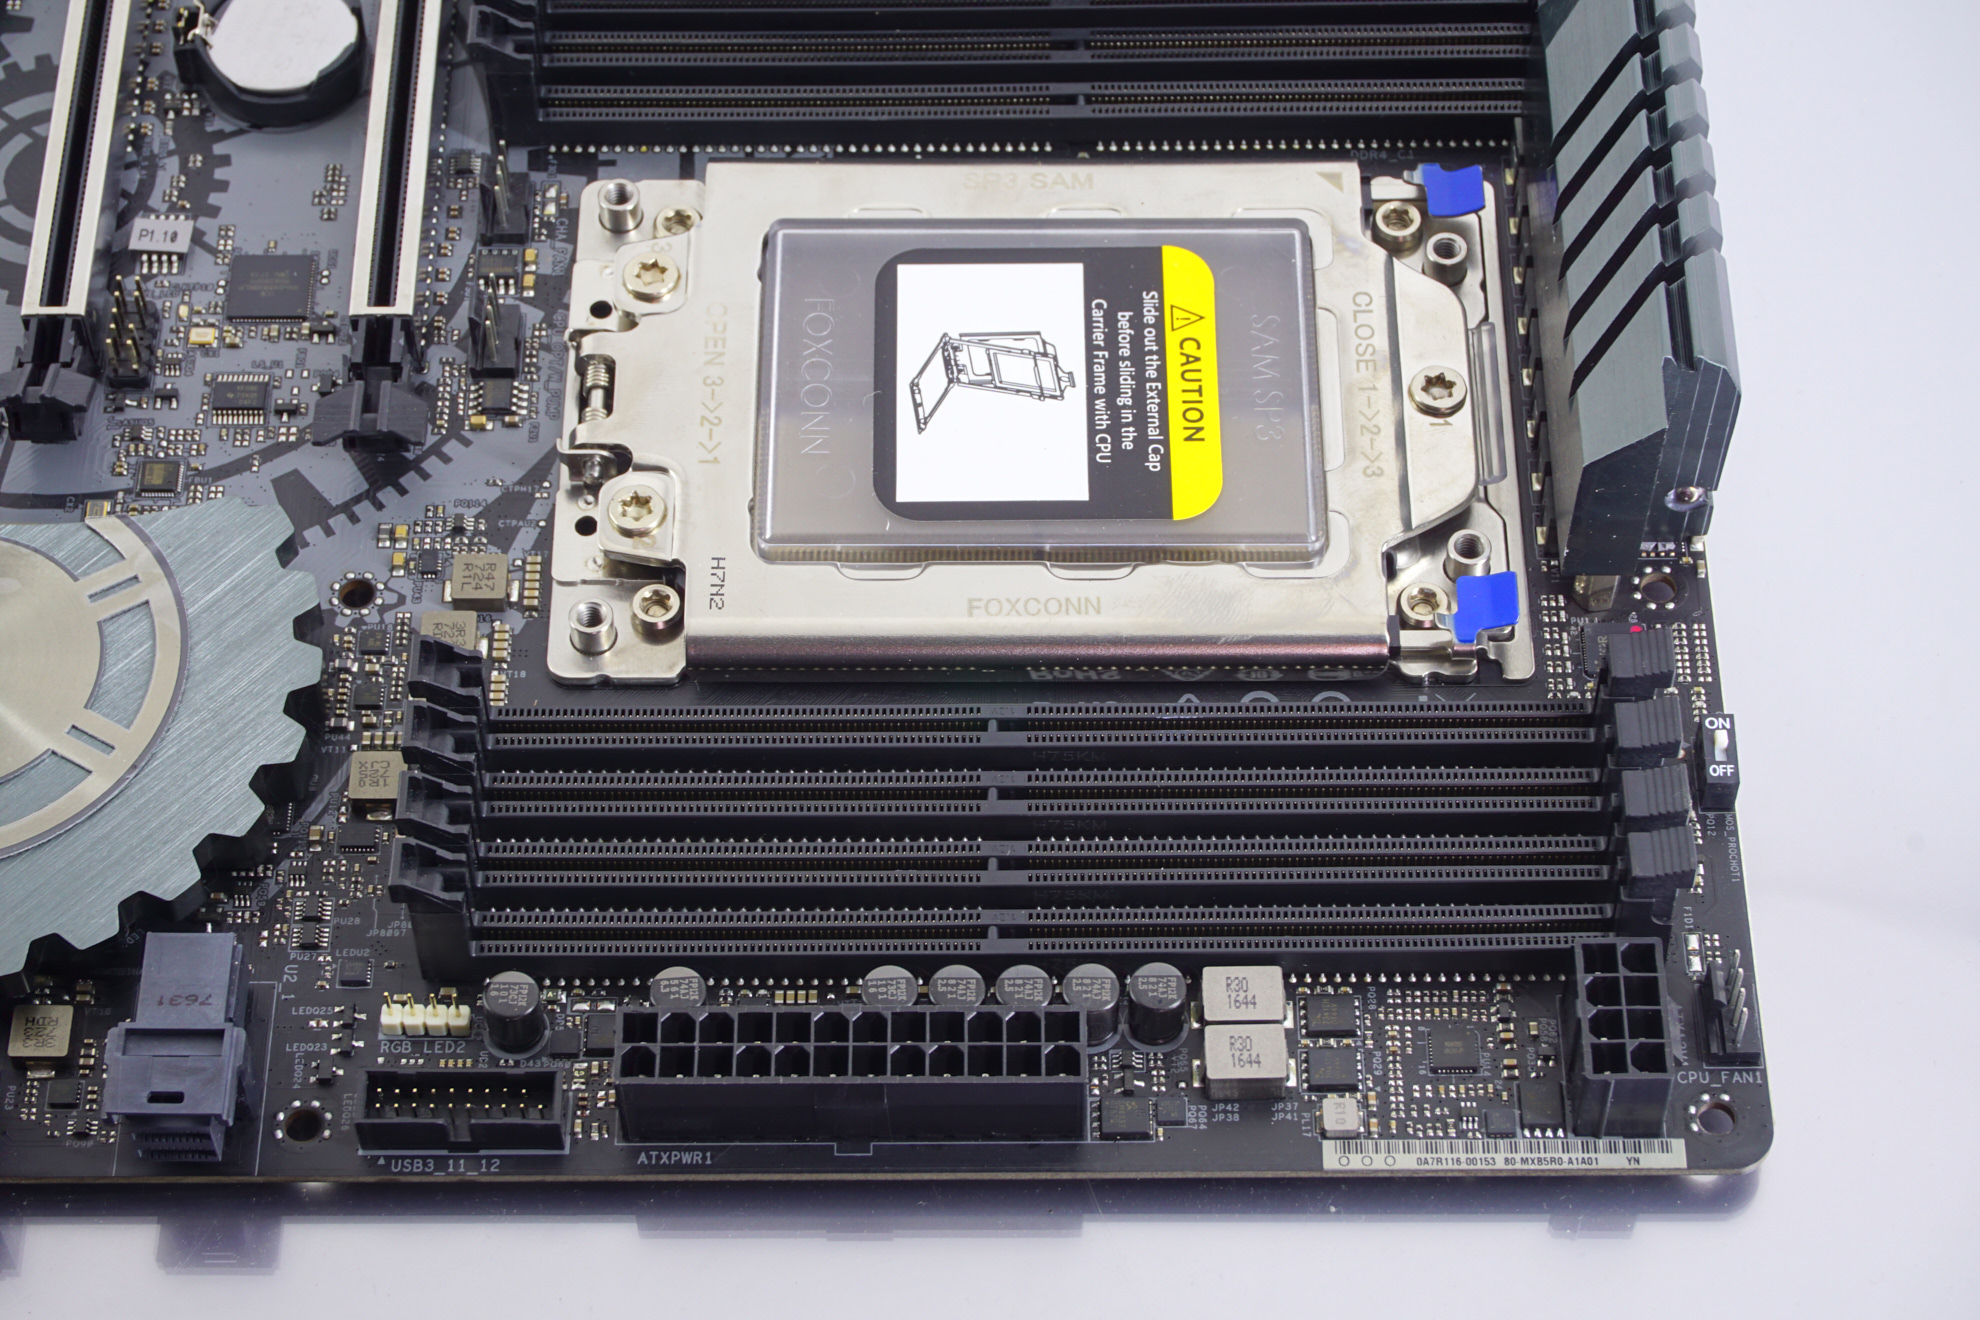
ASRock advertises the X399 Taichi as having an 11-phase design. The motherboard actually has an eight-phase VRM circuit for the CPU, plus an additional three-phase VRM for the SoC. The International Rectifier (Infineon) IR35201 digital controller is handling the eight main phases, with International Rectifier 3555 60A MOSFET drivers and 60A inductors. A second IR35201 controller is present to the left side of the DIMM slots and controls the SoC phases. The power circuitry is practically no different than that of the premium ASRock X399 Professional Gaming and is better, in terms of current capacity, than that of the significantly more expensive GIGABYTE X399 Designare EX.
The ASRock X399 Taichi shares almost the same layout as the ASRock X399 Professional Gaming and, thus, the same design choices. Most of the internal headers are placed across the bottom edge of the motherboard. From left to right, there are two front panel audio headers, one standard and one vertical, a COM port header, a header for a 12V RGB strip, a standard 4-pin fan header, a TPM header, an extra power LED/system speaker header, two headers for USB 2.0 ports, a small CMOS reset switch, a debugging LCD, one USB 3.1 Gen 1 header, two gold-colored power/reset buttons, and the system switch/LED header.
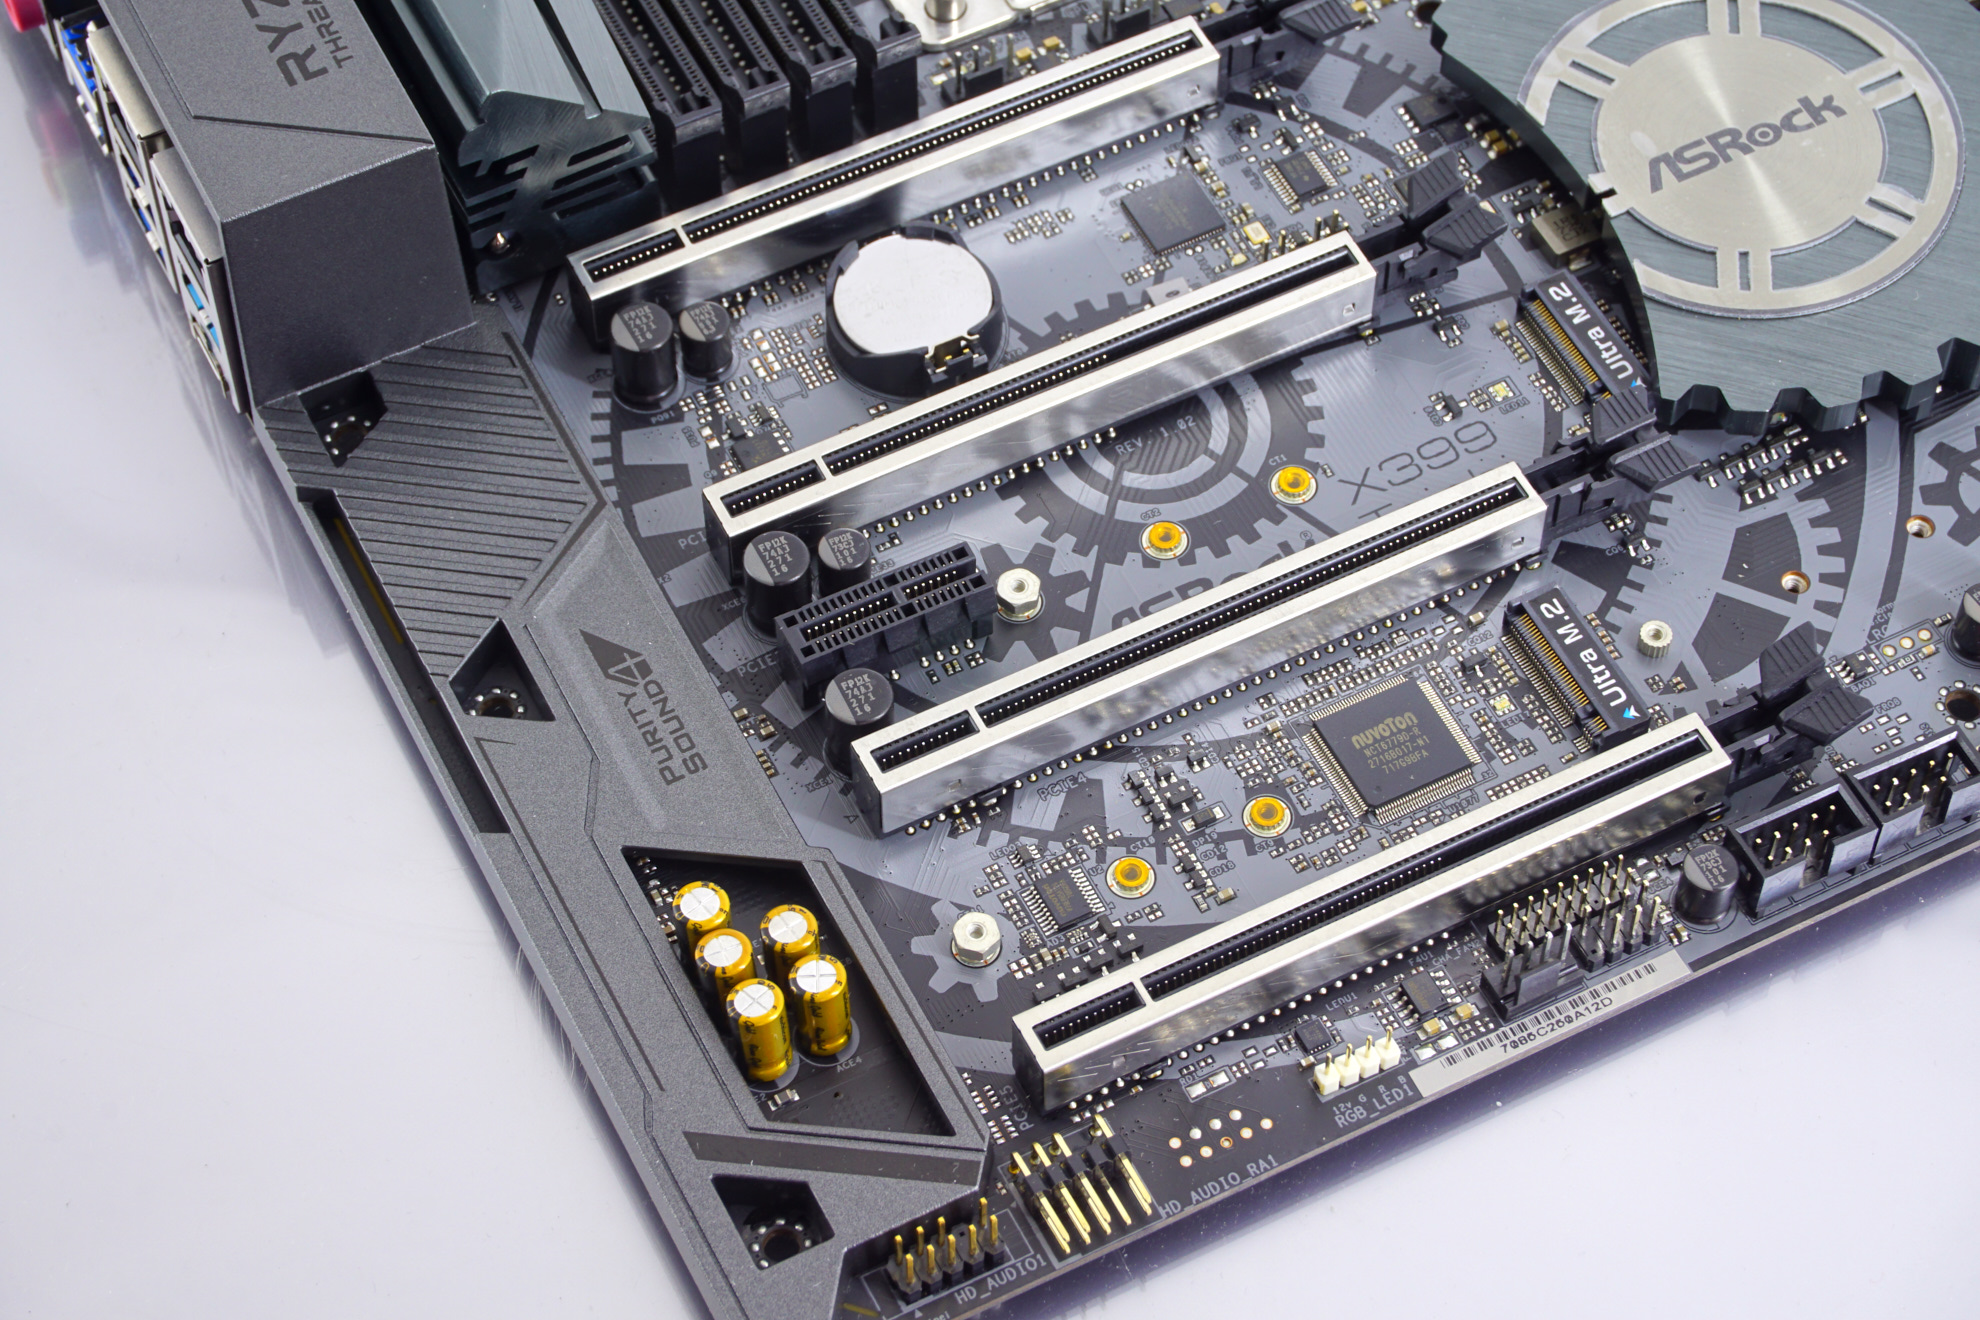
Moving to the right side of the motherboard, we can see eight SATA connectors at the lower right side, followed by a U.2 PCIe ×4 connector. The ASRock X399 Taichi has three M.2 PCIe ×4 slots, one of which is sharing lanes with the U.2 connector. Installing a U.2 device will disable the first M.2 slot. There is no support for 110 mm M.2 devices as all three M.2 slots support drives up to 80 mm long. A second USB 3.1 Gen 1 header can be seen between the U.2 port and the ATX 24-pin power connector.
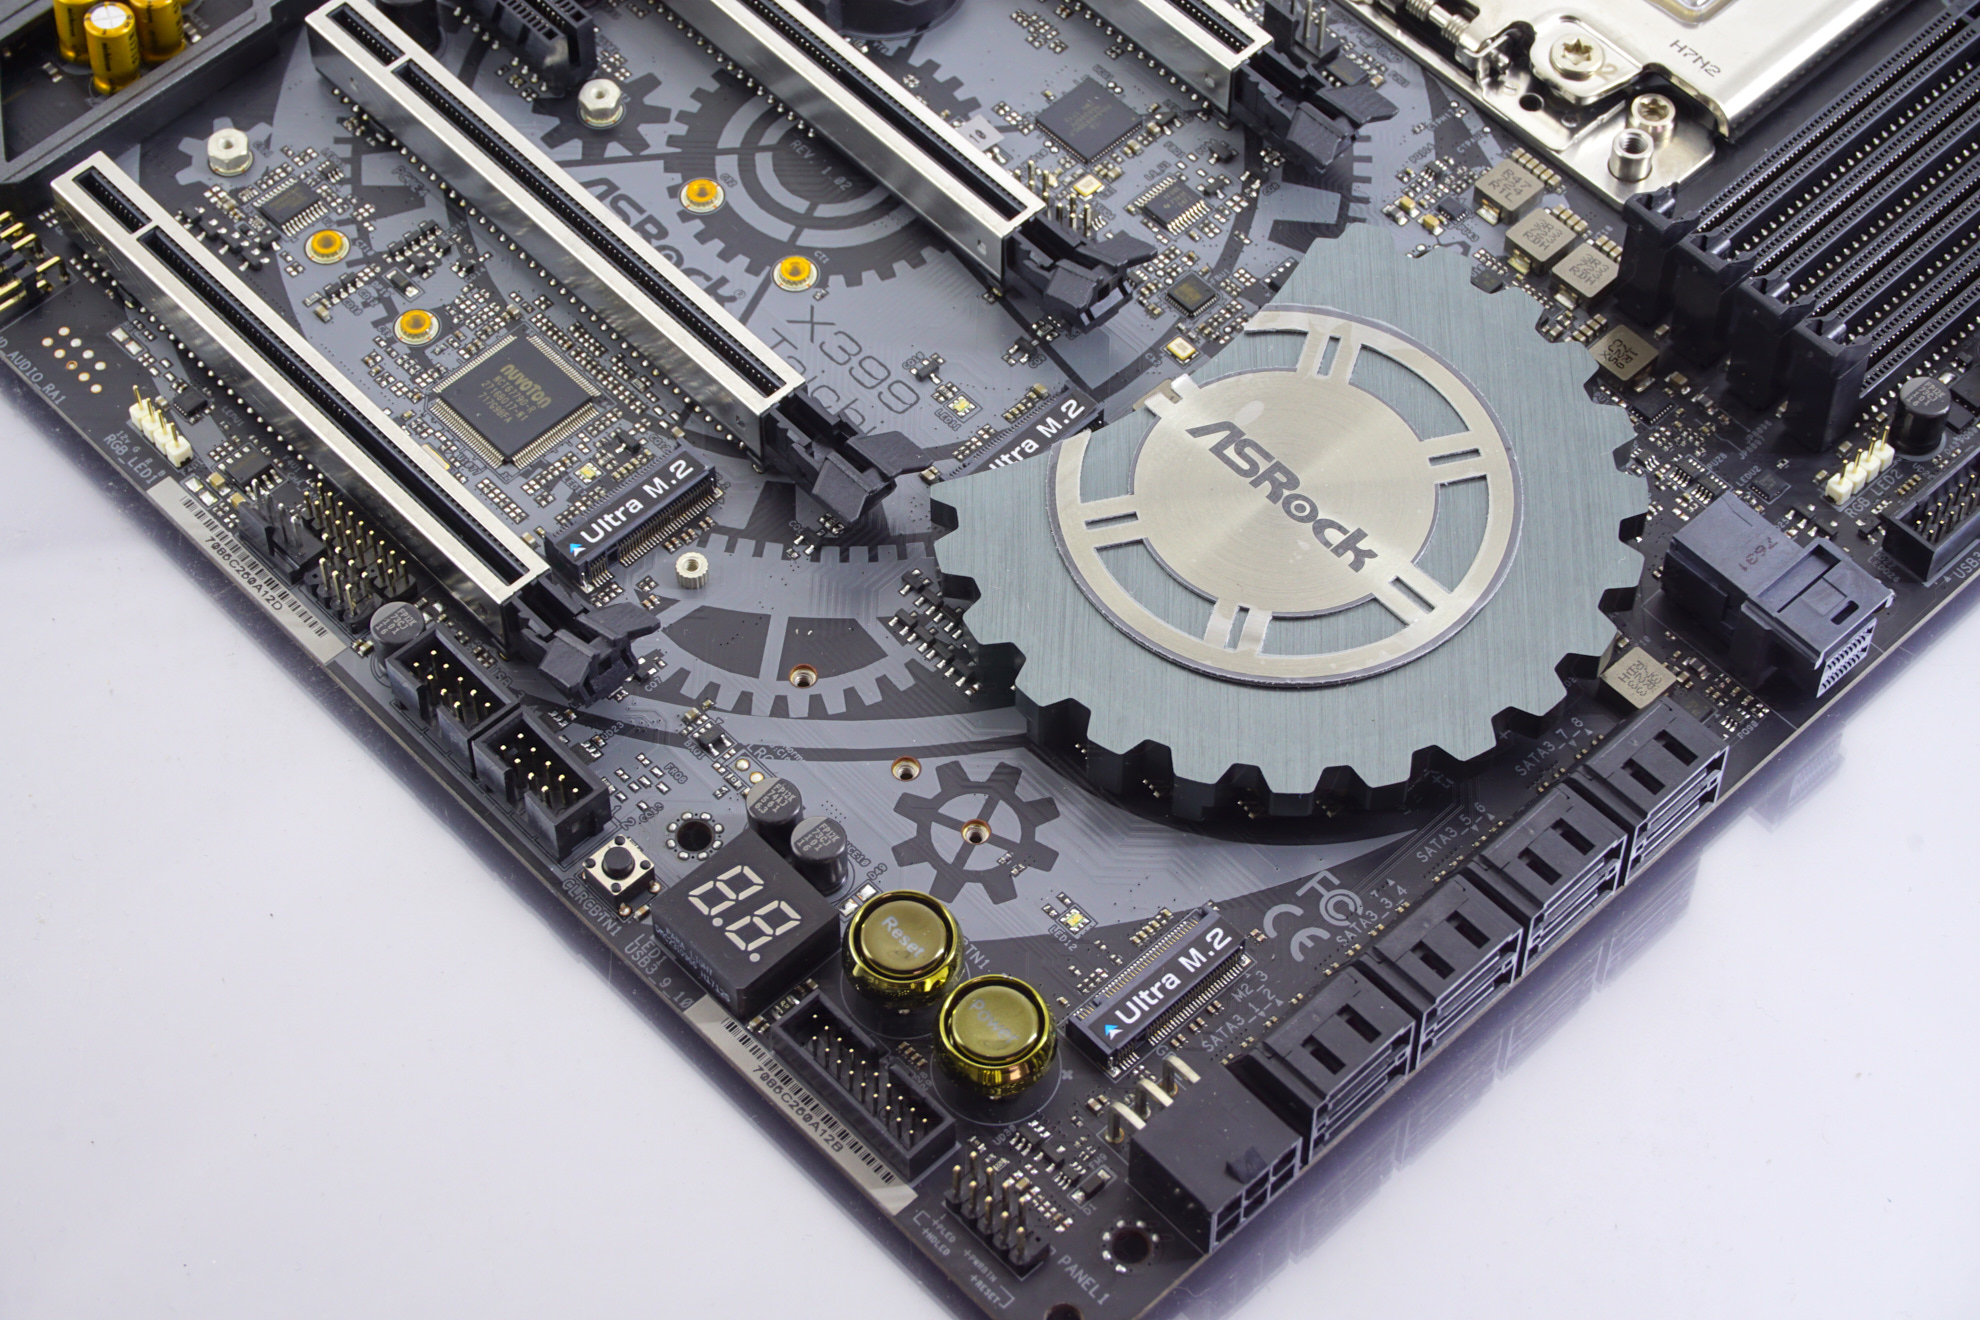
The major questionable design choices are two. The first is the use of a 6-pin PCIe connector on the lower right edge of the motherboard that serves as an additional power source. The use of an extra power connector is not strange on AMD X399 motherboards that support quad SLI but the choice of this particular connector is, as it would force users who want to use four graphics cards to use an adaptor on Molex connectors because almost all power supplies stop at eight PCIe connectors. The second is the placement of the CPU's power headers, which are split between the left and right top side of the motherboard. ASRock advertises this as an advantage, as it creates a wider trace for the CPU's VRMs. The concept is technically sound from an engineering point of view but it also could create compatibility problems because several PSUs have both CPU 12V connectors on a single cable, meaning that an extension would be necessary to reach the second connector on the motherboard. A thicker copper layer would certainly produce better results but, since ASRock is already using a 2oz copper PCB, a thicker copper layer would greatly increase the motherboard's manufacturing cost. Finally, the placement of two fan headers between the CPU's socket and the first PCIe slot, where they will be practically inaccessible after a CPU heatsink and a graphics card are installed, is another odd design choice, albeit a minor one.
As with most newer motherboards, USB connectors dominate most of the rear panel of the ASRock X399 Taichi. There is a small button that can be used to initiate the BIOS "flashback" feature, allowing the user to flash a BIOS even if there is no CPU and/or RAM installed on the motherboard. From top to bottom, we can see two USB 3.1 Gen 1 connectors and a PS/2 combo connector, two wireless antenna connectors, two USB 3.1 Gen 1 connectors, five gold-plated 3.5 mm audio jacks and one optical SPDIF connector, four USB 3.1 Gen 1 connectors and the first I211-AT NIC, and, finally, the two USB 3.1 Gen 2 10 Gbps connectors (one Type-A and one Type-C) and the second I211-AT NIC.
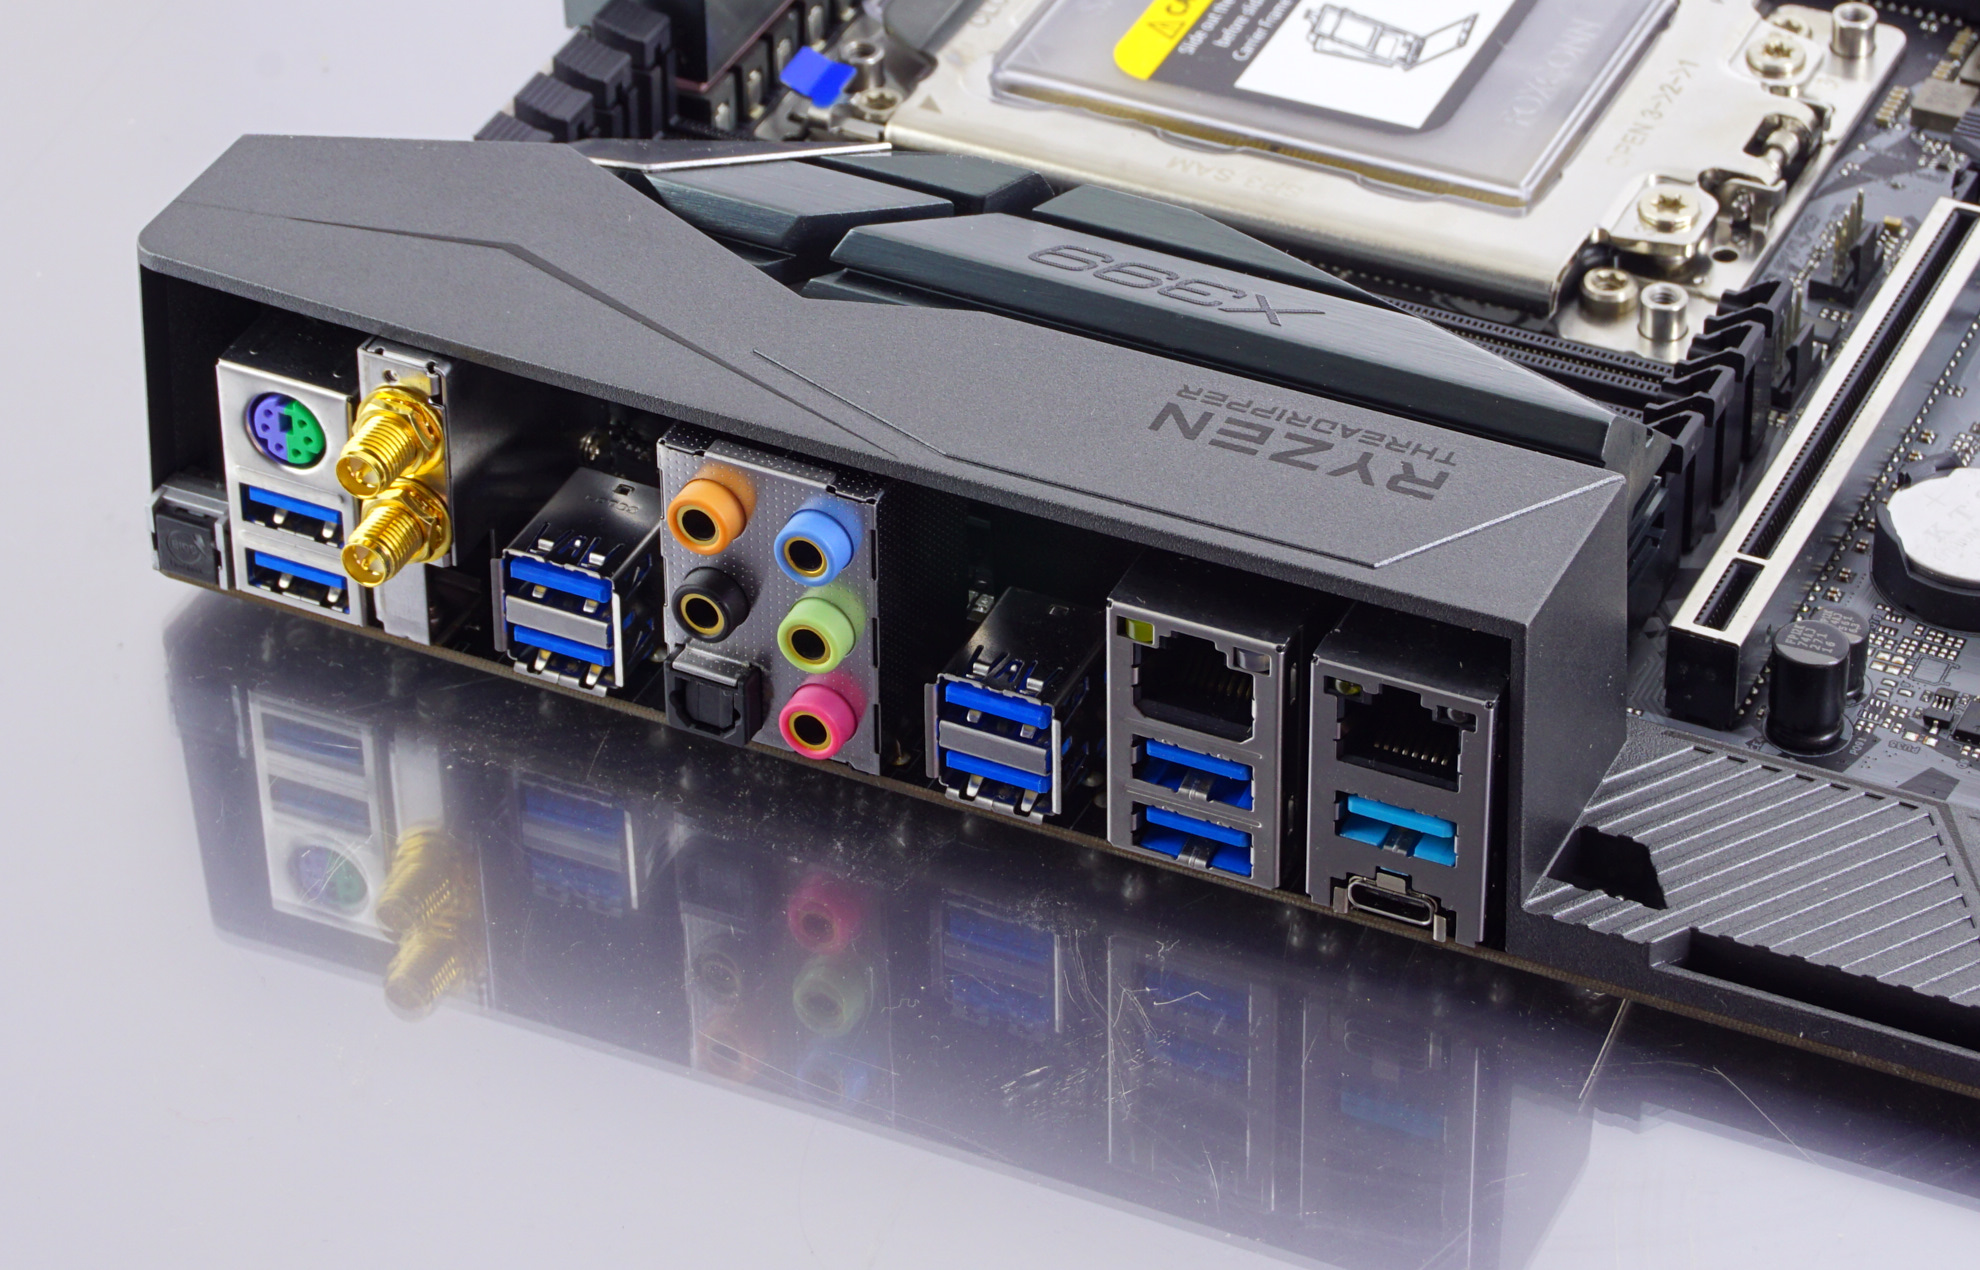
ASRock's engineers placed a significant amount of carefulness on the audio circuitry. The ASRock X399 Taichi is using the Realtek ALC 1220 codec, the same chip that every other AMD X399 motherboard is currently using at the time of this review. However, they physically isolated the left/right channels on individual layers, plus they isolated the audio circuitry from the rest of the motherboard. ASRock is using Nichicon's known audio-specific golden capacitors and also installed a Texas Instruments NE5532 amplifier for the headphones.

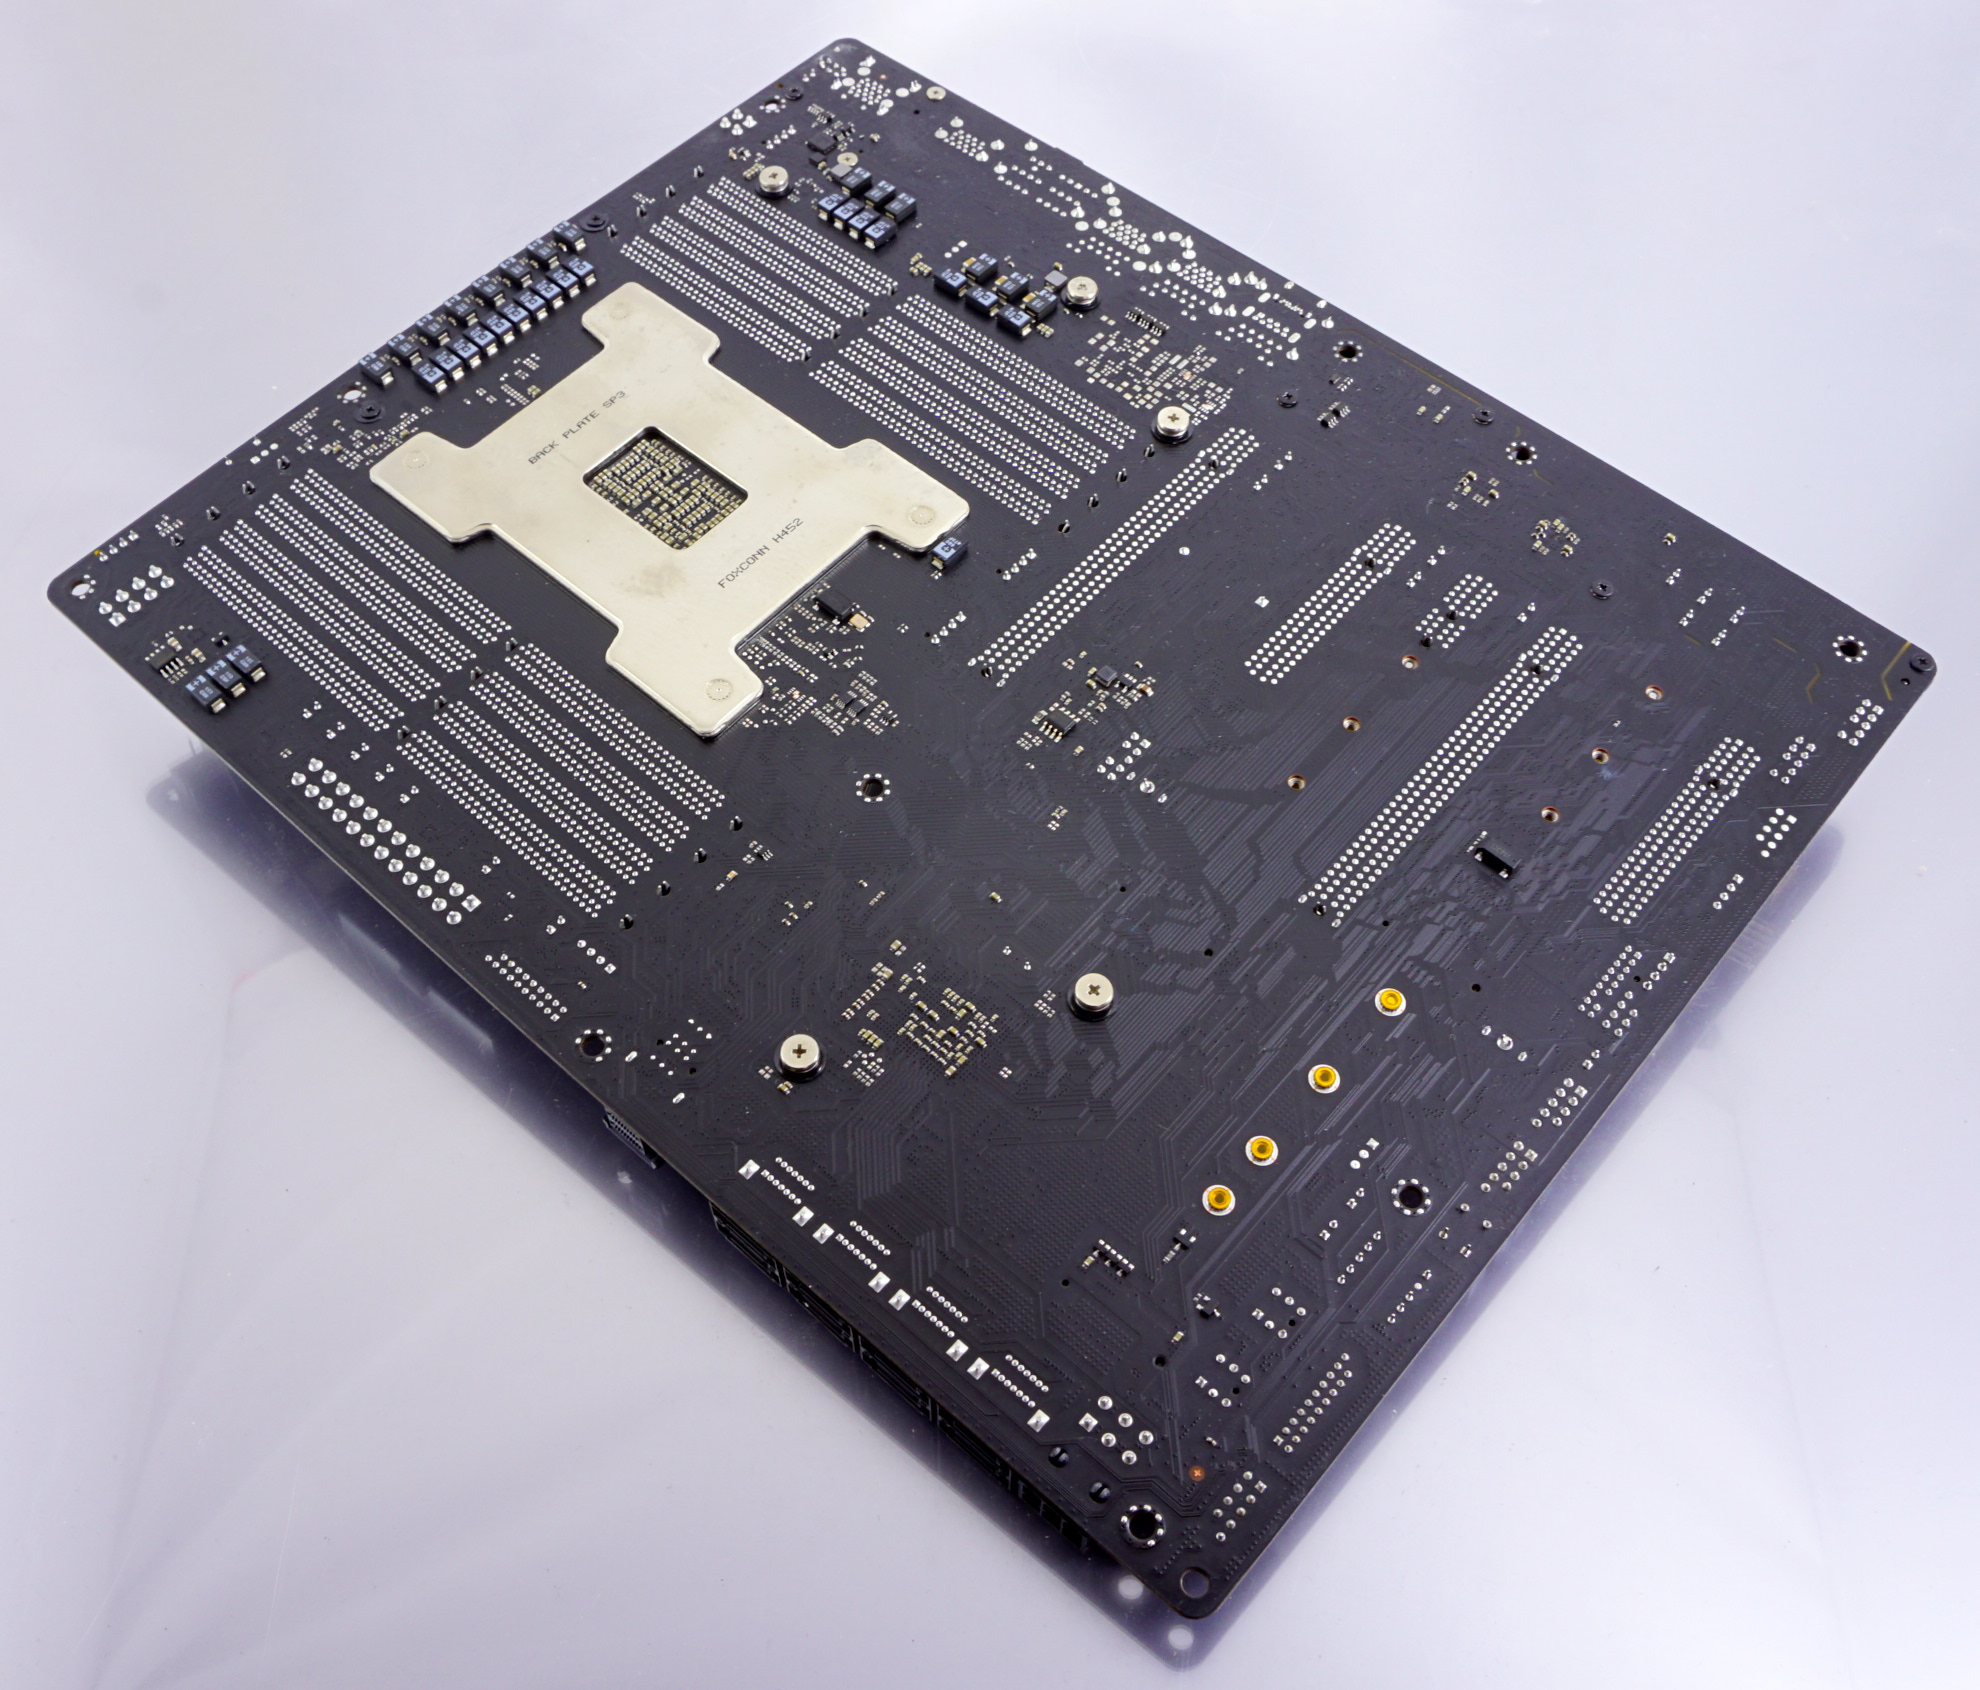
A quick glance at the back of the motherboard reveals that the X399 Taichi does not have any metal supports/braces, aesthetic or otherwise, beyond what the standard CPU socket offers. The standard CPU socket is adequate for even the heaviest CPU cooler but will not withstand severe mishandling.
Board Features
The ASRock X399 Taichi is a motherboard that was designed to cover the needs of as many users as possible, without explicit focus on any precise user's group, such as gamers, overclockers, or professionals. It has an excellent audio circuitry, dual Gigabit LAN and USB 3.1 Gen 2 ports, as well as three M.2 slots, one U.2 port, and eight SATA ports. What it does not have is any of the latest features that we see on top-tier motherboards, like 10G LAN and 802.11ad WiGig, which are what significantly increases the manufacturing cost and, ultimately, the retail price of those motherboards.
| ASRock X399 Taichi | |
| Warranty Period | 3 Years |
| Product Page | Link |
| Price | Link |
| Size | ATX |
| CPU Interface | TR4 / SP3r2 |
| Chipset | AMD X399 |
| Memory Slots (DDR4) | Eight DDR4 Supporting 128GB Dual Channel Up to 3600+ MHz |
| Video Outputs | N/A |
| Network Connectivity | 2 x Intel I211-V 1 x Intel 3168 802.11ac |
| Onboard Audio | Realtek ALC 1220 |
| PCIe Slots for Graphics (from CPU) | 4 × PCIe 3.0 (×16 / ×8 / ×16 / ×8) |
| PCIe Slots for Other (from PCH) | 1 × PCIe 2.0 (×1) |
| Onboard SATA | Eight, RAID 0/1/5/10 |
| Onboard SATA Express | None |
| Onboard M.2 | 3 × PCIe 3.0 (×4) |
| Onboard U.2 | 1 × U.2 Connector (×4) |
| USB 3.1 Gen 2 | 1 × Type-C + 1 × Type-A (Rear panel) |
| USB 3.1 Gen 1 | 8 × Type-A Rear Panel 4 × Type-A via headers |
| USB 2.0 | 4 × via headers |
| Power Connectors | 1 x 24-pin ATX 1 x 8-pin CPU 1 x 4-pin CPU 1 × 6-pin PCIe |
| Fan Headers | 1 x CPU (4-pin) 1 x Pump/Aux (4-pin) 2 x System (4-pin) 1 x System (4-pin) w/ liquid cooling pump support |
| IO Panel | 8 x USB 3.0 (USB 3.1 Gen 1) 1 x USB 3.1 Type-A 1 x USB 3.1 Type-C 2 x Network RJ-45 2 x Antenna connectors 5 x 3.5 mm Audio Jacks 1 x Optical SPDIF Out Port 1 x Flashback CMOS button |
In The Box
We get the following:
- Driver Disk
- Quick Installation Guide
- User's manual
- Case Badge
- Four black SATA cables (two straight, two with a 90° connector)
- SLI/Crossfire bridges (2, 3, and 4-Way)
- Wireless antennas
- I/O Shield
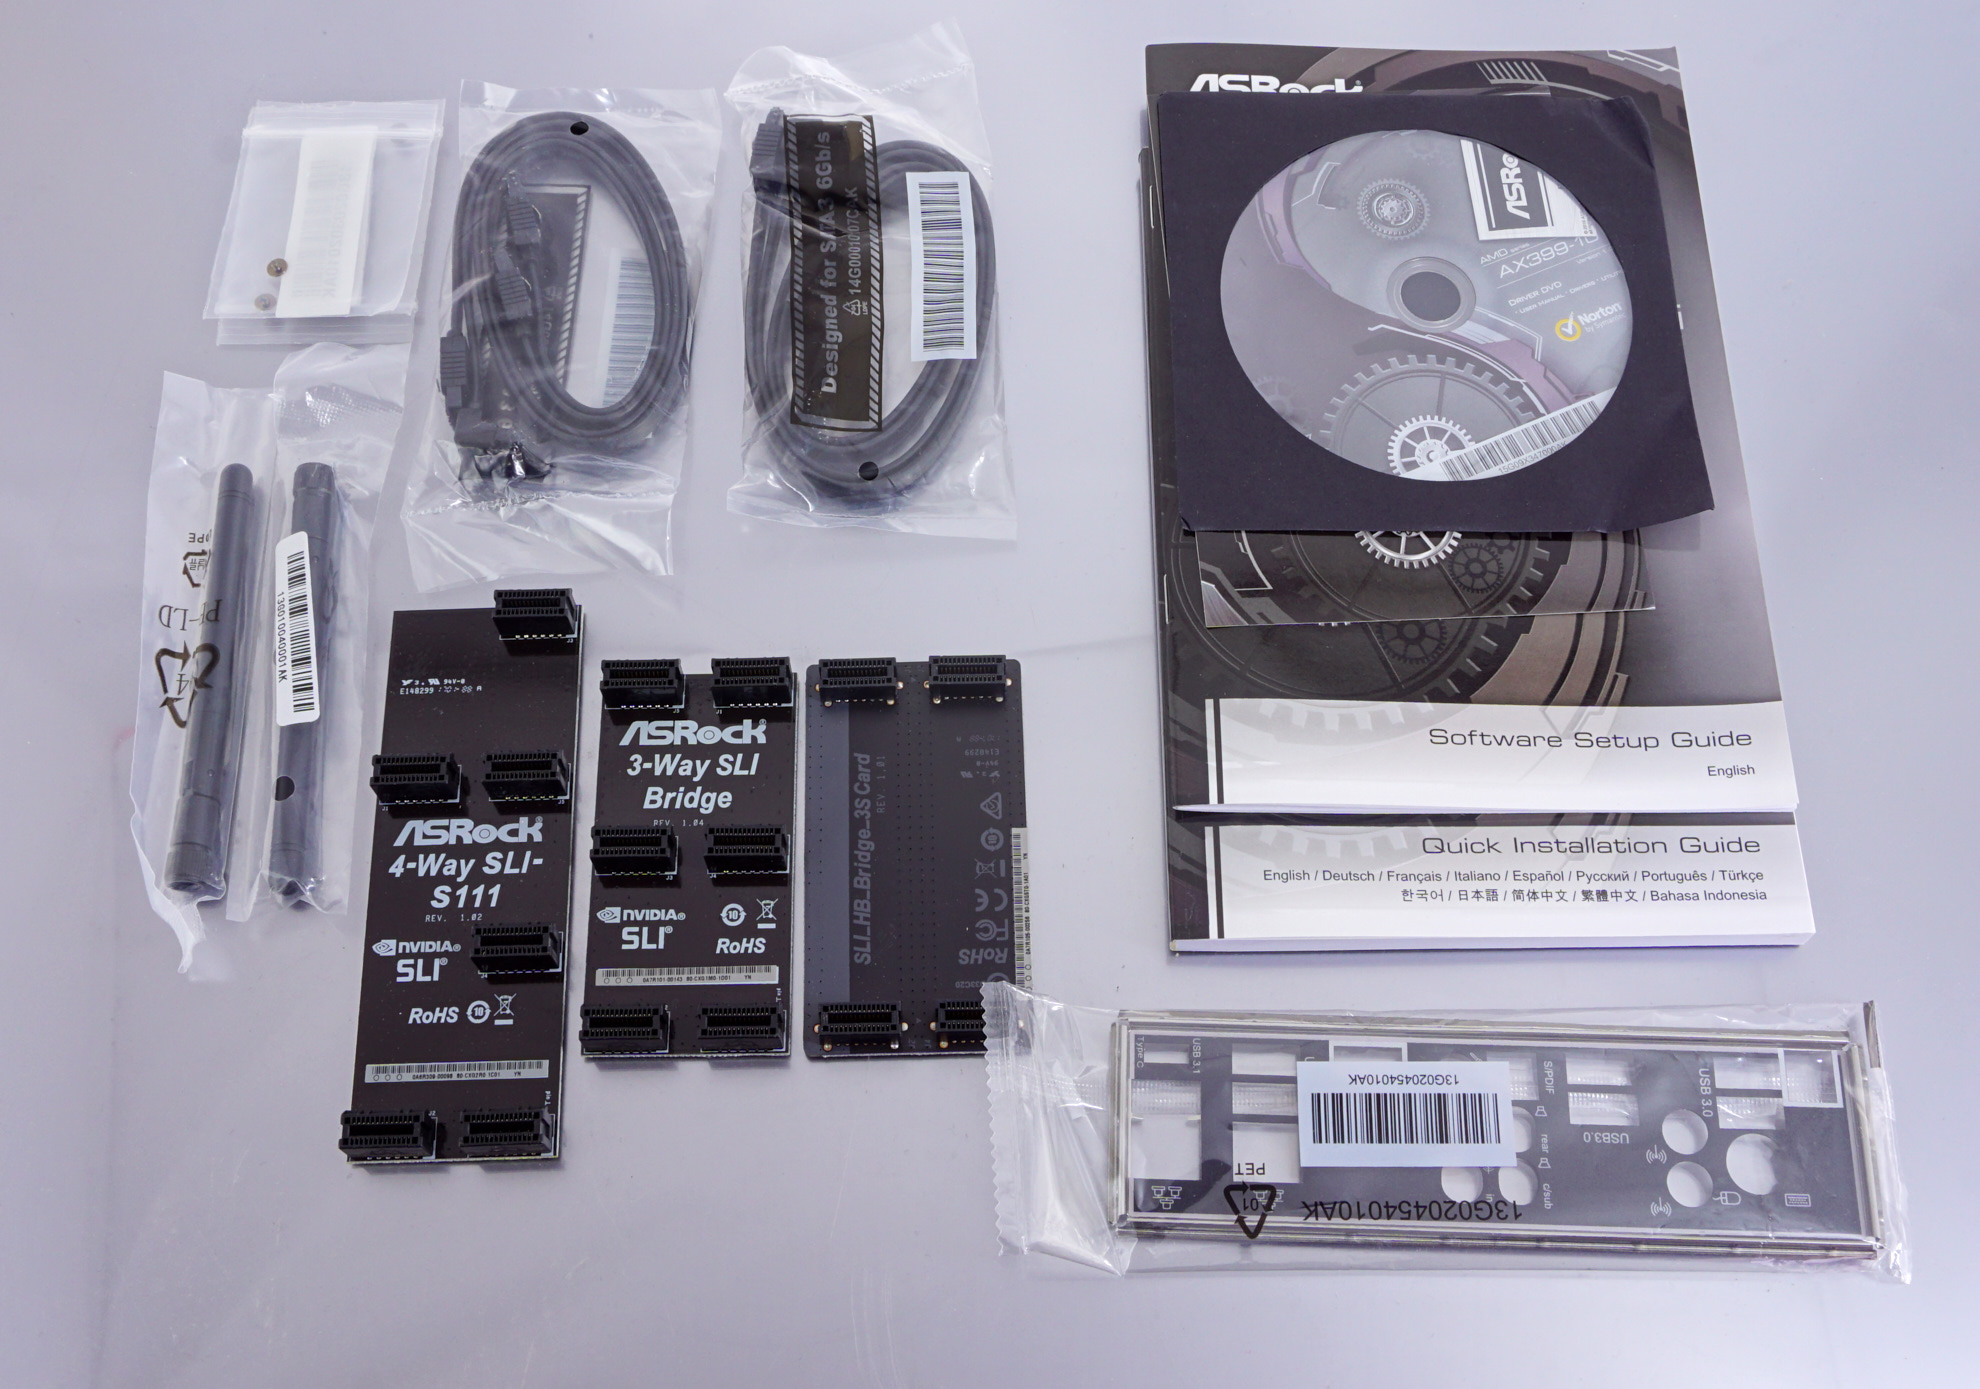
The bundle of the ASRock X399 Taichi is simple and straightforward, without superfluities. Inside the box, we found a simple manual and a quick installation guide, only four SATA cables, two simple wireless antennas without extension cords, the I/O shield, and three SLI bridges for two/three/four-way SLI configurations. Users will have to purchase their own SATA cables in order to use more than four SATA devices. There are no cable straps, quick connectors, stickers, or any other luxuries included.
BIOS
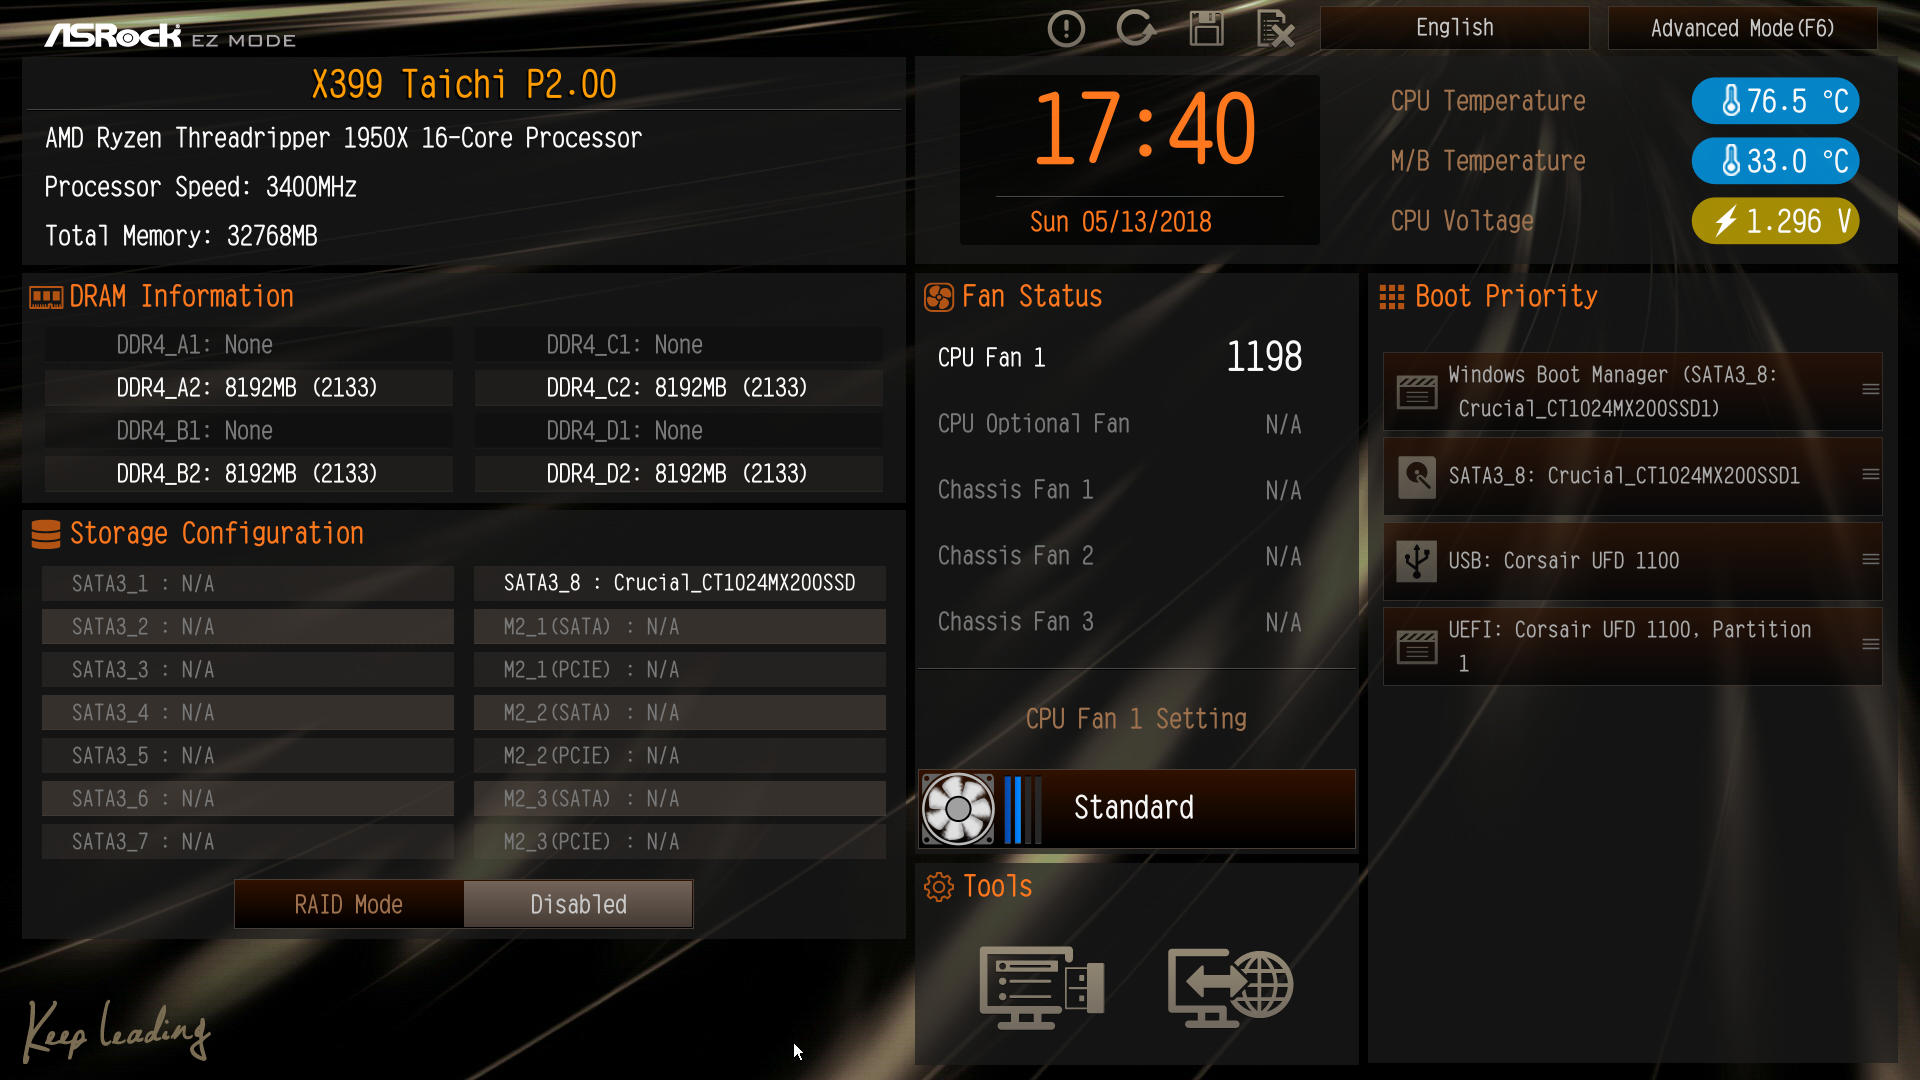
As with almost every modern motherboard, the ASRock X399 Taichi features a graphical BIOS with mouse input support. It defaults to the "EZ Mode", a single-page interface that only shows basic configuration settings and informative dials. All that a user can do from this page is to change the CPU's fan speed setting, configure RAID arrays, switch the boot device priority, and use BIOS flashing tools.
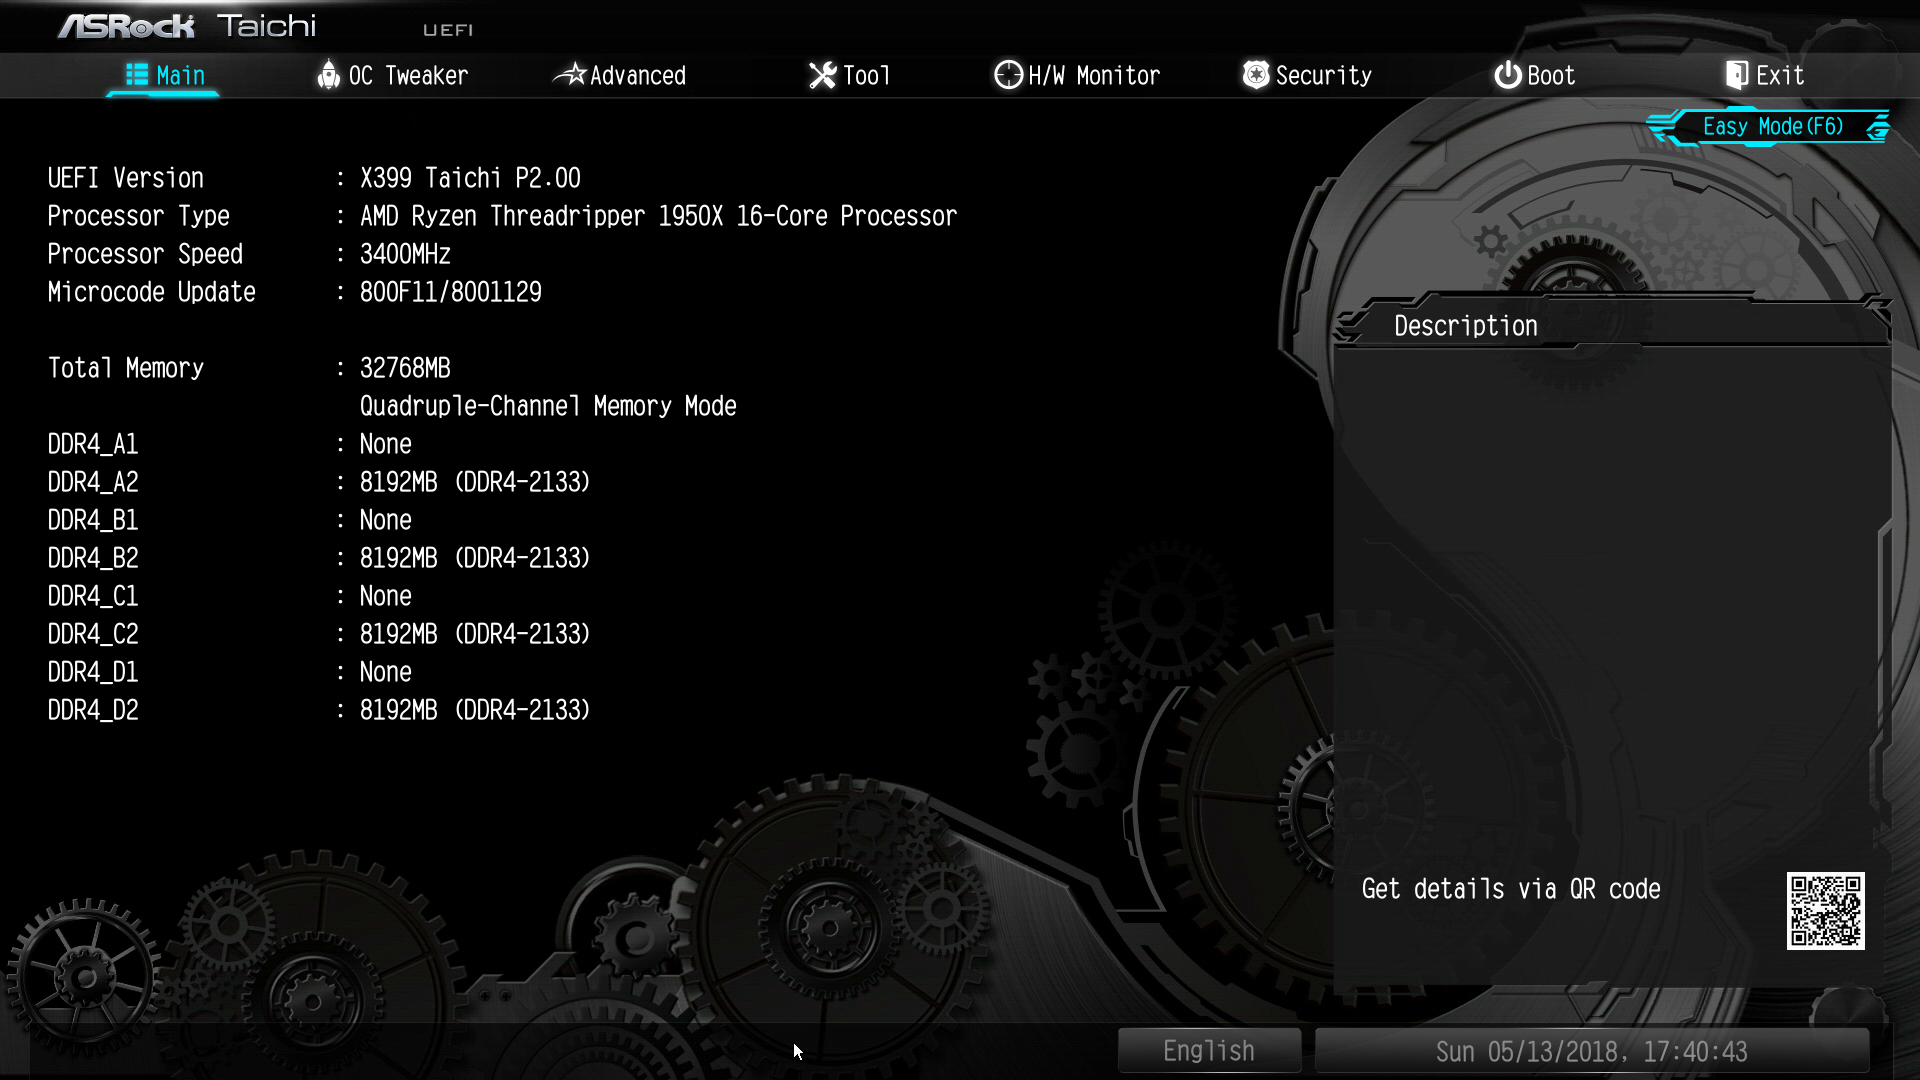
Pressing the F6 key brings up the full version of the BIOS, with a graphical theme that matches the gear works concept of the Taichi series. The settings are divided under eight main tabs but most of the important options can be found under two of them.
The "Main" tab is deceptively named and purely informative, without a single adjustable setting. Most of the BIOS settings can be found under the "OC Tweaker" and the "Advanced" tabs. The “OC Tweaker” tab includes the CPU, RAM, and Voltage settings. By default, the BIOS is set to the Auto CPU overclock, frequency, and voltage mode, temporarily boosting the Ryzen Threadripper 1950X up to about 4.0 GHz. Switching any of these settings to manual mode exposes new adjustable options. This approach can make the main page a little messy when everything is set to manual mode but the advanced settings for each device are organized into separate submenus, making it relatively easy to find and tweak specific options.
The “Advanced” tab includes all of the configuration options for the motherboard’s features and onboard devices. What is of interest here is the AMD CBS submenu that hides the Zen CPU settings, which includes the thermal throttling, fan control, and Core/Thread settings. A lot of advanced DRAM-related options can be found under the "UMC Common Options" submenu as well, including power options. The rest of the submenus hide advanced options that should be of no interest to most users.


The "Tool" tab holds the RGB configuration tool, the Instant/Internet BIOS flash tools and the RAID installer tool. The RGB LED configuration is very simple but at least each of the three channels (one for the motherboard's chipset area, one for each LED strip header) can be programmed individually.
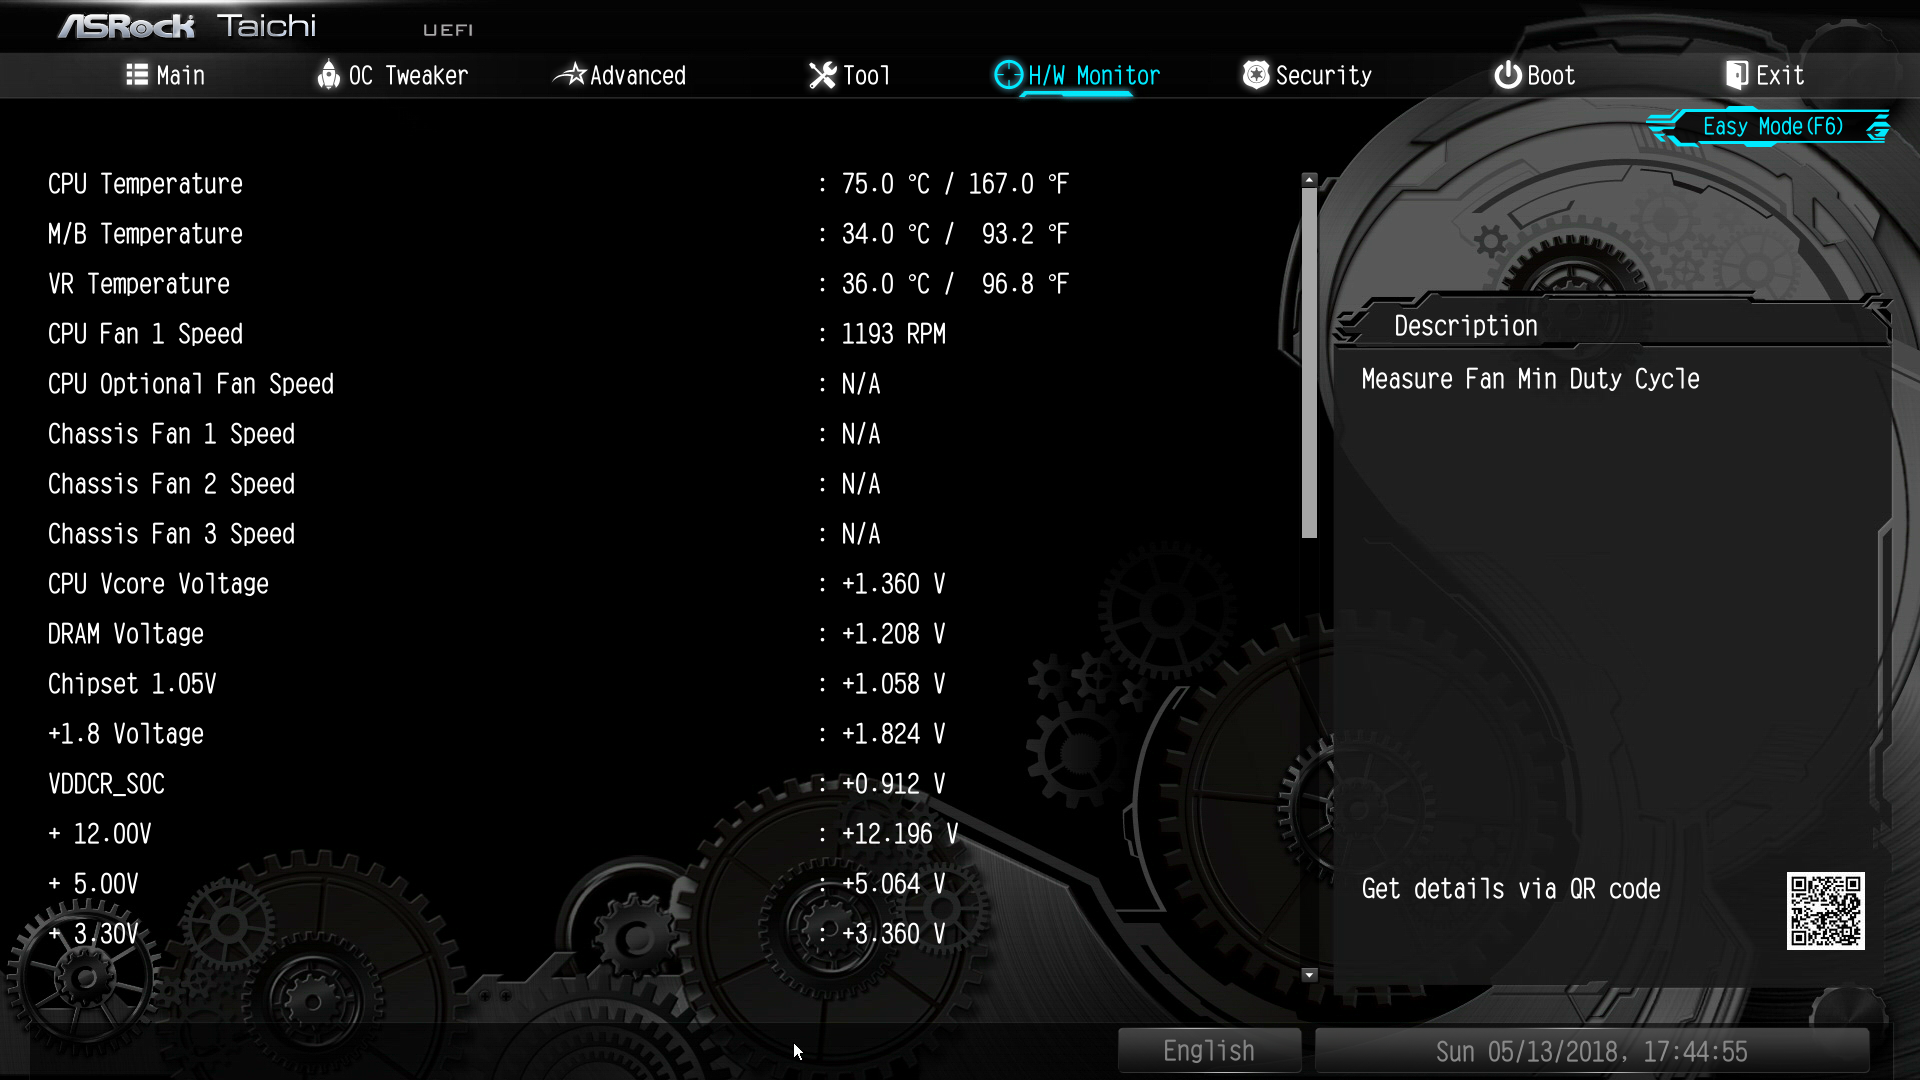
Another deceptively named tab is the "H/W Monitor" tab. Most users would be misguided to thing that it is a purely informative tab, listing the voltage and temperature sensor readings. Entering the tab brings up a long list of sensor readings but with a lot of fan control options hidden below them. Scrolling down the page, we find thorough control options per motherboard header. The user can also switch the two headers that support liquid pumps between PWM and DC control, maximizing compatibility with some liquid cooling pumps and certain fans. The user can also tie each fan header to any given temperature sensor of the motherboard.
The rest of the submenus are simple and without any hidden surprises. The "Security" tab contains the password and Secure Boot settings, and the "Boot" tab all boot-related options, except from the temporary boot override options that can be found under the "Exit" tab.
Software
The bundled DVD comes with a basic autorun software that includes a simple automated installer. It has five tabs, with the automated installer in the first tab. The automated installer will install all of the drivers and software for this motherboard's subsystems, plus Google’s Chrome Browser and Toolbar (even though the fifth tab is also dedicated to them).
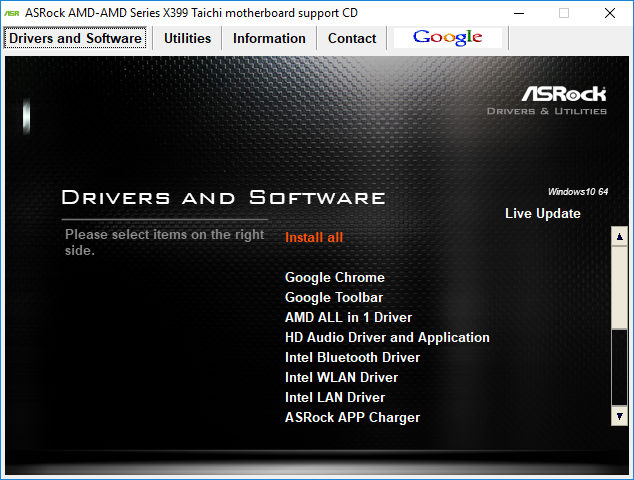


The second tab, the "utilities" tab, includes the software that are not necessary for the proper operation of the motherboard, which are the ASRock RGB LED software and the simple "Restart to UEFI" utility. The "Restart to UEFI" is a mere shortcut that restarts the system and automatically enters the BIOS. Manuals and guides can be found under the Information tab and, finally, the company’s contact information is all that can be seen under the Contact tab.
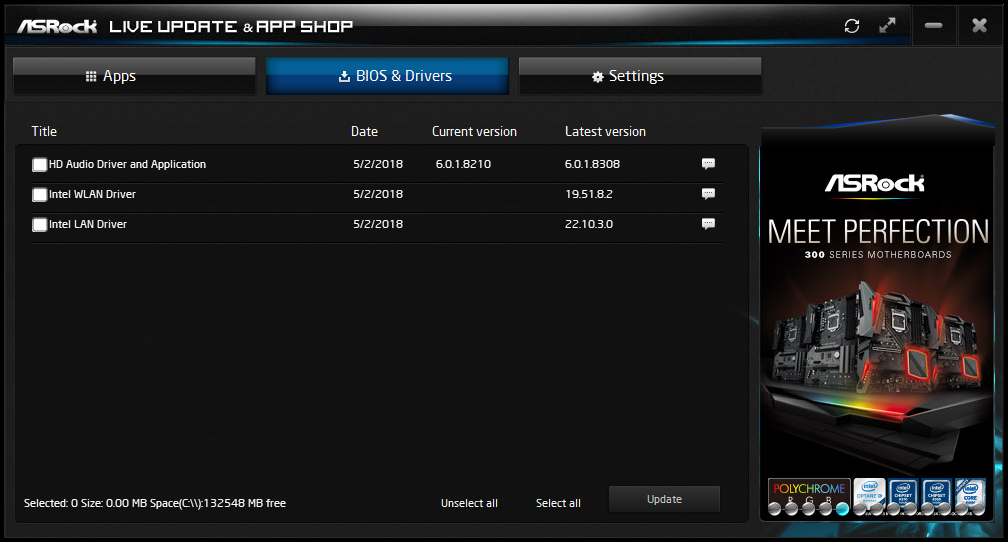
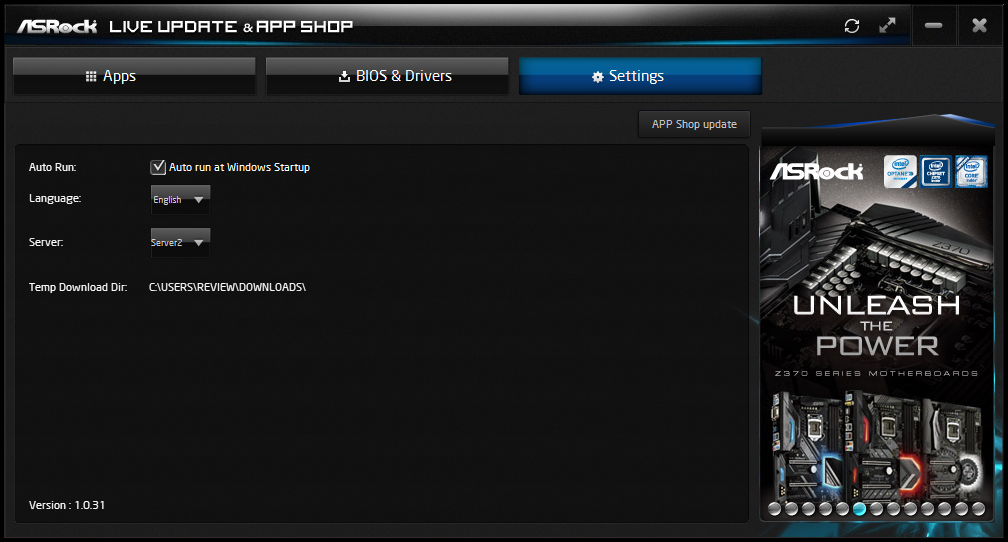
ASRock's main software is the "Live Update & App Shop" utility, from which other secondary utilities can be installed and be kept up-to-date. The software also monitors the installed subsystem drivers and the BIOS version. By default, it will auto-start after the OS boots but this option can be manually disabled.
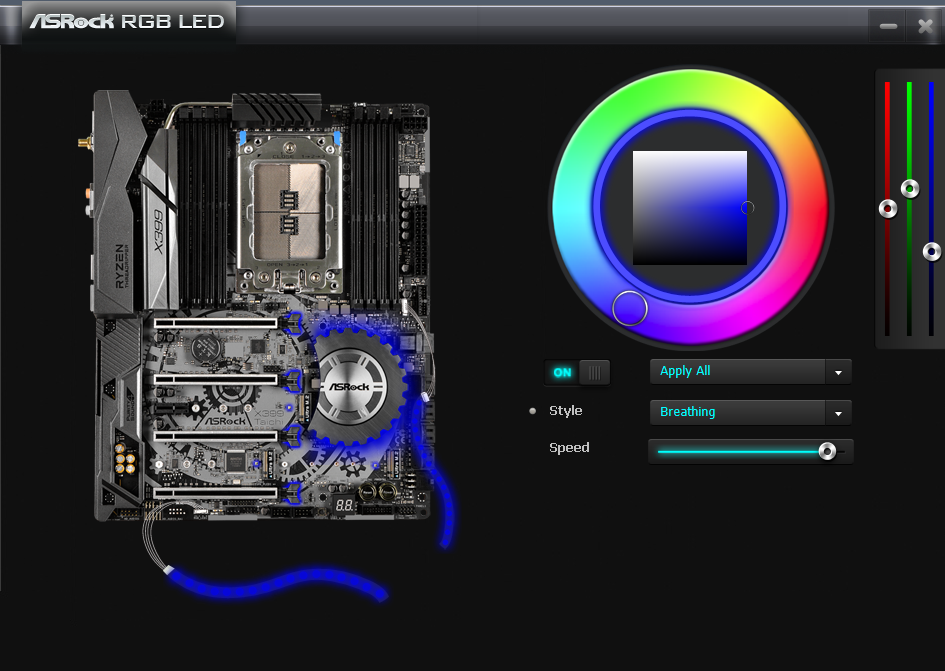
The ASRock RGB LED software is simple but very clean and easy to use. All of the options are gathered into a single page, where the user can simply choose a color and a visual effect and apply it to any of the motherboard's three LED zones. LED lighting can also be disabled from here. Unfortunately, there are no options to tie different lighting mode profiles to applications/games.
ASRock's A-tuning utility is a remade version of the F-stream utility that we find accompanying their more advanced motherboards. There is virtually no difference between the A-Tuning and the F-Stream utilities other than the theme. The A-tuning software still allows almost full control of the motherboard’s BIOS options via the OS. In its “OC Tweaker” tab we found most of the settings that are accessible via the BIOS screen, allowing for casual overclockers to experiment with minimal risk, as the settings reset when the system restarts. It is also handy for people who do not want a permanent overclock forced via the BIOS but prefer to boot with stock settings and force an overclock whenever they want or after the OS has booted. The A-Tuning software contains the "FAN-Tastic" utility as well, which allows for the graphical programming of fan cooling profiles.


Test Bed and Setup
As per our testing policy, we take a high-end CPU suitable for the motherboard that was released during the socket’s initial launch and equip the system with a suitable amount of memory running at the processor maximum supported frequency. This is also typically run at JEDEC subtimings where possible. It is noted that some users are not keen on this policy, stating that sometimes the maximum supported frequency is quite low, or faster memory is available at a similar price, or that the JEDEC speeds can be prohibitive for performance. While these comments make sense, ultimately very few users apply memory profiles (either XMP or other) as they require interaction with the BIOS, and most users will fall back on JEDEC supported speeds - this includes home users as well as industry who might want to shave off a cent or two from the cost or stay within the margins set by the manufacturer. Where possible, we will extend out testing to include faster memory modules either at the same time as the review or a later date.
| Test Setup | |
| Processor | AMD Ryzen Threadripper 1950X, 16 Cores, 32 Threads, 3.4 GHz (4.0 GHz Boost) |
| Motherboards | ASRock X399 Taichi (BIOS P2.00) |
| Cooling | Noctua NH-U14S TR4-SP3 |
| Power Supply | Corsair AX1200i Platinum PSU |
| Memory | Corsair Vengeance LPX 32GB (4 x 8GB) DDR4 DRAM 2666MHz |
| Memory Settings | XMP @ 2666 |
| Video Cards | ASUS ROG Strix Radeon RX 570 |
| Hard Drive | Crucial MX200 1TB |
| Case | Open Test Bed |
| Operating System | Windows 10 Build 1803 64-bit |
Readers of our motherboard review section will have noted the trend in modern motherboards to implement a form of MultiCore Enhancement / Acceleration / Turbo (read our report here) on their motherboards. This does several things, including better benchmark results at stock settings (not entirely needed if overclocking is an end-user goal) at the expense of heat and temperature. It also gives in essence an automatic overclock which may be against what the user wants. Our testing methodology is ‘out-of-the-box’, with the stock BIOS installed and XMP enabled, and thus subject to the whims of this feature. It is ultimately up to the motherboard manufacturer to take this risk – and manufacturers taking risks in the setup is something they do on every product (think C-state settings, USB priority, DPC Latency / monitoring priority, overriding memory sub-timings at JEDEC). Processor speed change is part of that risk, and ultimately if no overclocking is planned, some motherboards will affect how fast that shiny new processor goes and can be an important factor in the system build.
The ASRock X399 Taichi has the "Overclock Mode" setting in BIOS set to "Auto" by default. "Auto" means that it is turned on, as the motherboard was temporarily boosting our Ryzen Threadripper 1950X processor up to about 4.0 GHz. The Extreme Memory Profile (X.M.P.) is set to "Auto" by default, which does not use any profile but safe settings for the RAM. Our DDR4-2666 modules were set to 2133 MHz by default. We enabled the X.M.P. profile manually.
Users will note that we are using an RX 570 graphics card here, which is not 'the best of the best' for a high-end platform like Threadripper. This was ultimately down to logistics at the time of testing; our gaming tests rarely become more than a checkbox to ensure that no fishy business is going on.
Many thanks to...
We must thank the following companies for kindly providing hardware for our multiple test beds. Some of this hardware is not in this test bed specifically, but is used in other testing.
| Hardware Providers | |||
| Sapphire RX 460 Nitro | MSI GTX 1080 Gaming X OC | Crucial MX200 + MX500 SSDs |
Corsair AX860i + AX1200i PSUs |
 |
 |
 |
 |
| G.Skill RipjawsV, SniperX, FlareX |
Crucial Ballistix DDR4 |
Silverstone Coolers |
Silverstone Fans |
 |
 |
 |
 |
System Performance
Not all motherboards are created equal. On the face of it, they should all perform the same and differ only in the functionality they provide - however this is not the case. The obvious pointers are power consumption, but also the ability for the manufacturer to optimize USB speed, audio quality (based on audio codec), POST time and latency. This can come down to manufacturing process and prowess, so these are tested.
Power Consumption
Power consumption was tested on the system while in a single ASUS AMD RX 570 GPU configuration with a wall meter connected to the Corsair AX1200i power supply. This power supply is Platinum rated, and as I am on a 230 V supply, leads to ~75% efficiency > 50W, and 90%+ efficiency at 250W, suitable for both idle and multi-GPU loading. This method of power reading allows us to compare the power management of the UEFI and the board to supply components with power under load, and includes typical PSU losses due to efficiency. These are the real-world values that consumers may expect from a typical system (minus the monitor) using this motherboard.
While this method for power measurement may not be ideal, and you feel these numbers are not representative due to the high wattage power supply being used (we use the same PSU to remain consistent over a series of reviews, and the fact that some boards on our test bed get tested with three or four high powered GPUs), the important point to take away is the relationship between the numbers. These boards are all under the same conditions, and thus the differences between them should be easy to spot.
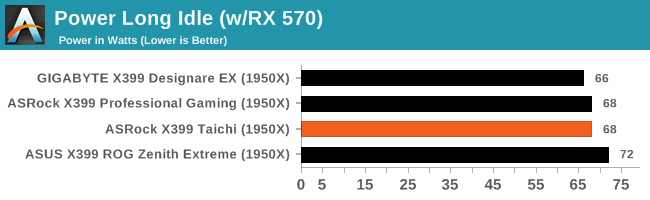
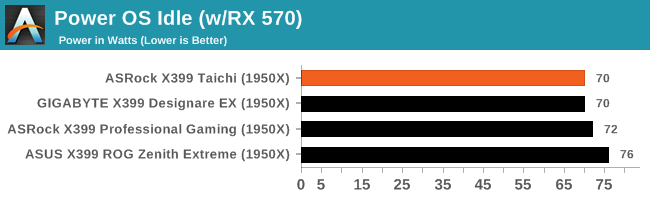
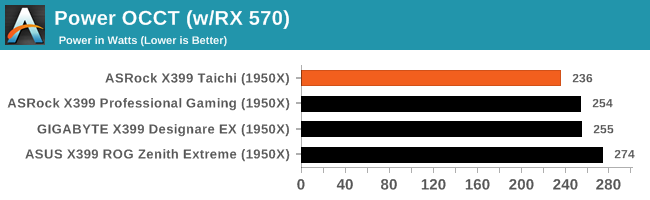
The ASRock X399 Taichi gave us interesting energy consumption figures. While the system's consumption at idle is virtually no different than that of any other AMD X399 motherboard, it displayed the lowest energy consumption under maximum load by a significant margin. This hints that the ASRock X399 Taichi handles the Ryzen Threadripper 1950X CPU like every other motherboard does at idle but does not boost the processor as aggressively as other motherboards do when under load.
Non UEFI POST Time
Different motherboards have different POST sequences before an operating system is initialized. A lot of this is dependent on the board itself, and POST boot time is determined by the controllers on board (and the sequence of how those extras are organized). As part of our testing, we look at the POST Boot Time using a stopwatch. This is the time from pressing the ON button on the computer to when Windows starts loading. (We discount Windows loading as it is highly variable given Windows specific features.)
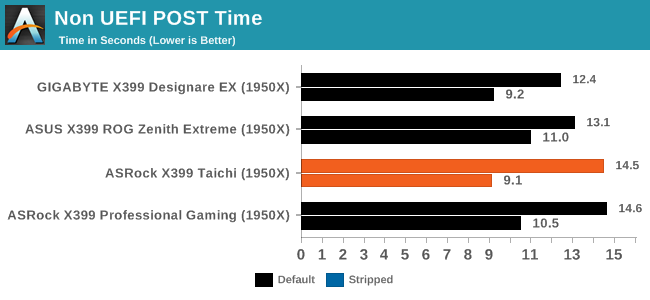
The default boot time of the ASRock X399 Taichi is the second slowest of every AMD X399 motherboard that we have tested to this date but, from a practical point of view, the difference between the four motherboards is unimportant. Enabling the Fast Boot BIOS option turns the ASRock X399 Taichi into the fastest AMD X399 motherboard as far as the boot time is concerned but, again, the difference between the motherboards are a couple of seconds at most.
USB Backup
For this benchmark, we transfer a set size of files from the SSD to the USB drive using DiskBench, which monitors the time taken to transfer. The files transferred are a 1.52 GB set of 2867 files across 320 folders – 95% of these files are small typical website files, and the rest (90% of the size) are small 30 second HD videos. In an update to pre-Z87 testing, we also run MaxCPU to load up one of the threads during the test which improves general performance up to 15% by causing all the internal pathways to run at full speed.
Due to the introduction of USB 3.1, as of June 2015 we are adjusting our test to use a dual mSATA USB 3.1 Type-C device which should be capable of saturating both USB 3.0 and USB 3.1 connections. We still use the same data set as before, but now use the new device. Results are shown as seconds taken to complete the data transfer.
At this point we should also note that manufacturers nowadays advertise their motherboards as having "USB 3.1 Gen 1" and "USB 3.1 Gen 2" ports. The USB 3.1 Gen 1 ports are limited to 5 Gbps, which means that they are USB 3.0 ports. USB 3.1 Gen 2 ports are rated for up to 10 Gbps.
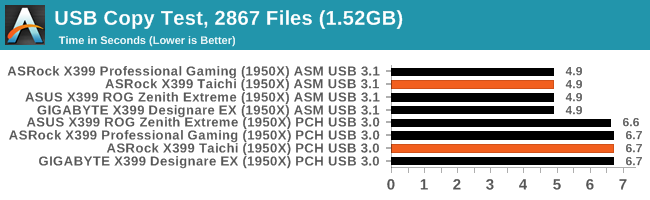
As expected, the ASRock X399 Taichi displayed USB performance identical to that of every AMD X399 motherboard that we have tested to this date. All of these four motherboards are using the same USB controller chipsets so, naturally, there are no performance differences here.
DPC Latency
Deferred Procedure Call latency is a way in which Windows handles interrupt servicing. In order to wait for a processor to acknowledge the request, the system will queue all interrupt requests by priority. Critical interrupts will be handled as soon as possible, whereas lesser priority requests such as audio will be further down the line. If the audio device requires data, it will have to wait until the request is processed before the buffer is filled.
If the device drivers of higher priority components in a system are poorly implemented, this can cause delays in request scheduling and process time. This can lead to an empty audio buffer and characteristic audible pauses, pops, and clicks. The DPC latency checker measures how much time is taken processing DPCs from driver invocation. The lower the value will result in better audio transfer at smaller buffer sizes. Results are measured in microseconds.
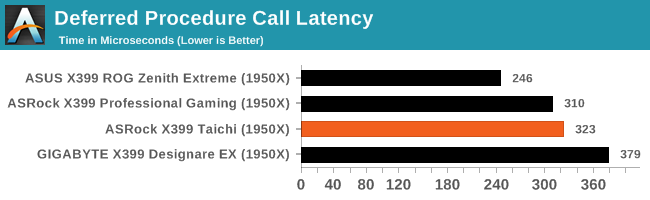
All of the AMD X399 motherboards display somewhat high DPC latency figures and the ASRock X399 Taichi is no exception. The highest recorded DPC latency was 323 μs, a figure that is not high enough to cause any performance concerns, yet higher than what we anticipated to be. It is peculiar for a motherboard with fewer subsystems than another motherboard of virtually the same core design (ASRock X399 Professional Gaming) to display higher DPC latency figures.
CPU Performance, Short Form
For our motherboard reviews, we use our short form testing method. These tests usually focus on if a motherboard is using MultiCore Turbo (the feature used to have maximum turbo on at all times, giving a frequency advantage), or if there are slight gains to be had from tweaking the firmware. We leave the BIOS settings at default and memory at JEDEC for these tests, making it very easy to see which motherboards have CPU core enhancements enabled by default.
Point Calculations – 3D Movement Algorithm Test v2.1: link
3DPM is a self-penned benchmark, taking basic 3D movement algorithms used in Brownian Motion simulations and testing them for speed. High floating point performance, MHz and IPC wins in the single thread version, whereas the multithread version has to handle the threads and loves more cores. For a brief explanation of the platform agnostic coding behind this benchmark, see my forum post here. We are using the latest version of 3DPM, which has a significant number of tweaks over the original version to avoid issues with cache management and speeding up some of the algorithms.
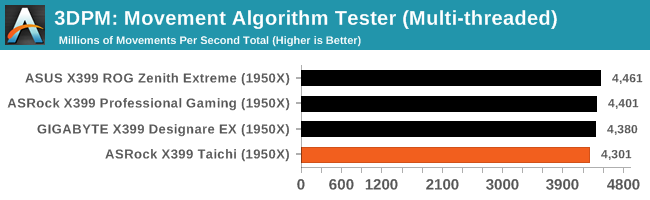
As we saw in the previous pages, the energy consumption of the ASRock X399 Taichi is significantly lower than that of other motherboards under maximum load, hinting that the automated overclocking features are not pushing our processor as has as the other motherboards did. Here we can see the verification of this assumption, as the ASRock X399 Taichi is falling slightly behind other AMD X399 motherboards. The performance difference is less than 2%, yet it is repeatable and measurable.
Rendering - LuxMark v3.1: link
As a synthetic, LuxMark might come across as somewhat arbitrary as a renderer, given that it's mainly used to test GPUs, but it does offer both an OpenCL and a standard C++ mode. In this instance, aside from seeing the comparison in each coding mode for cores and IPC, we also get to see the difference in performance moving from a C++ based code-stack to an OpenCL one with a CPU as the main host.
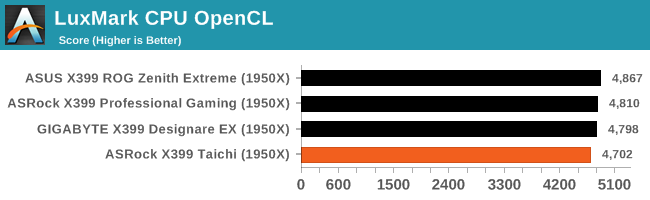
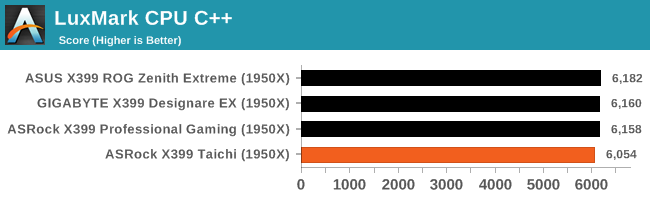
LuxMark verifies the processor performance figures that we got from 3DPM, with the ASRock X399 Taichi slightly lagging behind the other three AMD X399 motherboards. The performance difference is between two and three percent, a figure that will be indiscernible for most users.
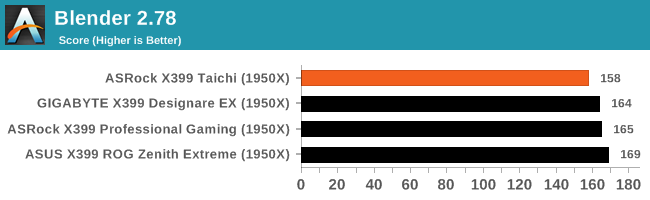
Rendering - Blender 2.78: link
For a render that has been around for what seems like ages, Blender is still a highly popular tool. We managed to wrap up a standard workload into the February 5 nightly build of Blender and measure the time it takes to render the first frame of the scene. Being one of the bigger open source tools out there, it means both AMD and Intel work actively to help improve the codebase, for better or for worse on their own/each other's microarchitecture.
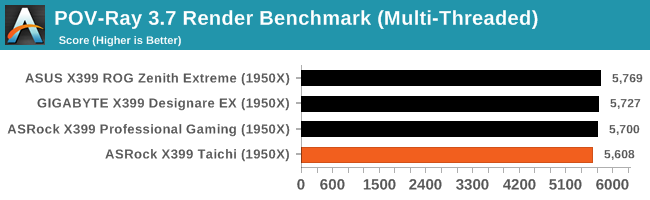
Rendering – POV-Ray 3.7.1b4: link
The Persistence of Vision Ray Tracer, or POV-Ray, is a freeware package for as the name suggests, ray tracing. It is a pure renderer, rather than modeling software, but the latest beta version contains a handy benchmark for stressing all processing threads on a platform. We have been using this test in motherboard reviews to test memory stability at various CPU speeds to good effect – if it passes the test, the IMC in the CPU is stable for a given CPU speed. As a CPU test, it runs for approximately 2-3 minutes on high end platforms.
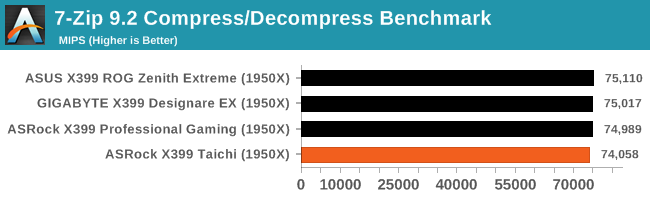
Synthetic – 7-Zip 9.2: link
As an open source compression tool, 7-Zip is a popular tool for making sets of files easier to handle and transfer. The software offers up its own benchmark, to which we report the result.
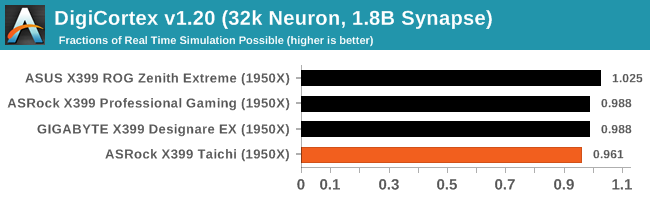
Neuron Simulation - DigiCortex v1.20: link
The newest benchmark in our suite is DigiCortex, a simulation of biologically plausible neural network circuits, and simulates activity of neurons and synapses. DigiCortex relies heavily on a mix of DRAM speed and computational throughput, indicating that systems which apply memory profiles properly should benefit and those that play fast and loose with overclocking settings might get some extra speed up. Results are taken during the steady state period in a 32k neuron simulation, and represented as a function of the ability to simulate in real time (1.000x equals real-time).
Gaming Performance
AoTS Excalation
Seen as the holy child of DirectX12, Ashes of the Singularity (AoTS, or just Ashes) has been the first title to actively go explore as many of DirectX12s features as it possibly can. Stardock, the developer behind the Nitrous engine which powers the game, has ensured that the real-time strategy title takes advantage of multiple cores and multiple graphics cards, in as many configurations as possible.
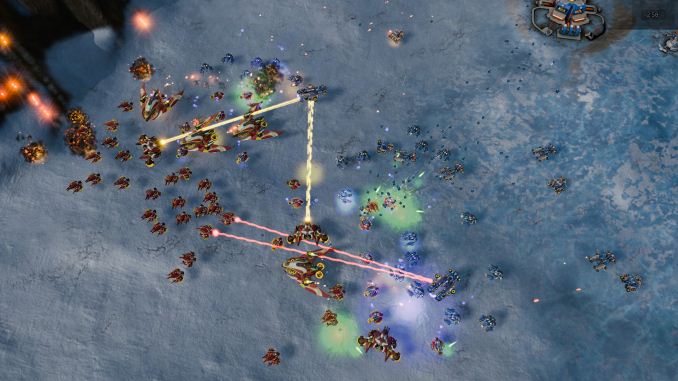
As a real-time strategy title, Ashes is all about responsiveness during both wide open shots but also concentrated battles. With DirectX12 at the helm, the ability to implement more draw calls per second allows the engine to work with substantial unit depth and effects that other RTS titles had to rely on combined draw calls to achieve, making some combined unit structures ultimately very rigid.
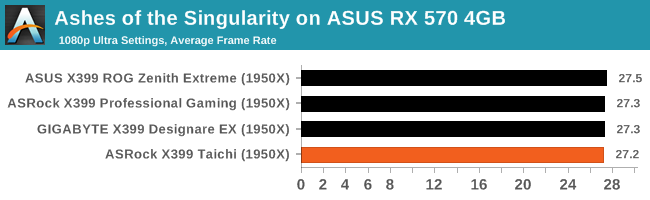
Stardock clearly understands the importance of an in-game benchmark, ensuring that such a tool was available and capable from day one, especially with all the additional DX12 features used and being able to characterize how they affected the title for the developer was important. The in-game benchmark performs a four minute fixed seed battle environment with a variety of shots, and outputs a vast amount of data to analyze.
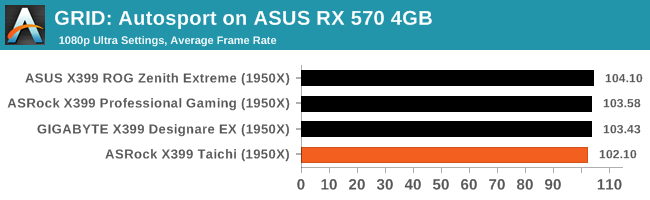
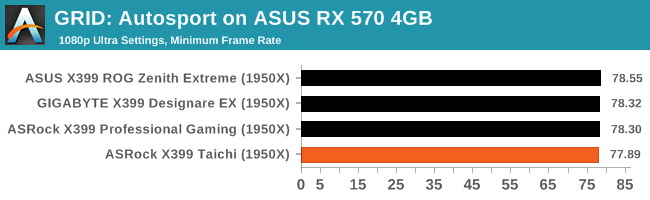
GRID: Autosport
No graphics tests are complete without some input from Codemasters and the EGO engine, which means for this round of testing we point towards GRID: Autosport, the next iteration in the GRID and racing genre. As with our previous racing testing, each update to the engine aims to add in effects, reflections, detail, and realism, with Codemasters making ‘authenticity’ a main focal point for this version. GRID’s benchmark mode is very flexible and, as a result, we created a test race using a shortened version of the Red Bull Ring with twelve cars doing two laps. The car is focus starts last and is quite fast, but usually finishes second or third. For low-end graphics, we test at 1080p medium settings, whereas mid and high-end graphics get the full 1080p maximum. Both the average and minimum frame rates are recorded.
Experience with ASRock X399 Taichi
Even though ASRock's promotion efforts of the X399 Taichi are not really focused on any specific group of users, comments on the overclocking capabilities are prominent amongst the company's marketing remarks. Most of the marketing is focused on the motherboard's advanced power circuitry but the ASRock X399 Taichi also has an external clock generator for stable BCLK overclocking and two headers that support liquid cooling pumps. BCLK overclocking is not something the majority of users will work with because straying just a bit too far from the base BCLK frequency will cause major issues with the motherboard's subsystems and/or connected devices, yet it may be useful for fine-tuning a stable overclock for users that want to squeeze out that last couple of dozen MHz from their processor.
The power circuitry of the ASRock X399 Taichi is very powerful. It is exactly the same with that of the ASRock X399 Professional Gaming and better than that of the GIGABYTE X399 Designare EX. What is a little strange is that the designer tried to increase the available trace area by separating the positioning of the CPU 12V power connectors. This approach does make sense from an engineering point of view but could cause compatibility problems with PSUs that have both of their 12V connectors on a single cable.
The BIOS of the ASRock X399 Taichi offers a very good range of overclocking options. Its layout however can be overwhelming for beginners, as nearly all of the overclocking settings are squeezed under a single tab. The advanced options, such as the RAM timings, are arranged into submenus, yet the main page of the OC Tweaker tab includes the core CPU, RAM, timing, and voltage options all packed together. We did not find the interface troublingly messy but it could be improved.
Methodology
Our standard overclocking methodology is as follows. We select the automatic overclock options and test for stability with PovRay and OCCT to simulate high-end workloads. These stability tests aim to catch any immediate causes for memory or CPU errors.
For manual overclocks, based on the information gathered from previous testing, starts off at a nominal voltage and CPU multiplier, and the multiplier is increased until the stability tests are failed. The CPU voltage is increased gradually until the stability tests are passed, and the process repeated until the motherboard reduces the multiplier automatically (due to safety protocol) or the CPU temperature reaches a stupidly high level (100ºC+). Our test bed is not in a case, which should push overclocks higher with fresher (cooler) air.
Overclock Results
The ASRock X399 Taichi has the "Overclock Mode" enabled by default, temporarily pushing our Ryzen Threadripper 1950X to 4.0 GHz. Such boosts are temporary and the processor will revert to its base 3.4 GHz frequency when the load is persistent. Nevertheless, this control method increases the processor's performance noticeably, especially during short processing bursts. The downside is that the energy consumption of the processor increases significantly as well and that effect is not temporary, because the automated overclocking scripts tend to overvolt the processor in order to ensure stability. The ASRock X399 Taichi has the least aggressive automated overclocking control, which is why it has the lowest stock energy consumption of all the AMD X399 motherboards that we tested to this date.

We managed to achieve good overclocking figures with the ASRock X399 Taichi, with a stable maximum overclock of 4.0 GHz on air cooling. Limited throttling does appear and the processor's temperatures are very high but these are the highest CPU performance figures that we achieved using an air cooler. At 4.1 GHz the OS boots but trying to run anything resource-intensive results to a complete system freeze, hinting that our Ryzen Threadripper 1950X requires far too high a voltage for air cooling to achieve greater overclocking figures. Manually forcing the default frequency and low voltage settings results to a massive energy consumption drop, lowering the maximum energy consumption by 86 Watts.
Conclusion
ASRock designed the X399 Taichi to be a product that would appeal to the largest number of users possible, a verity that is also supported by the generic marketing efforts that are not focused on any specific group of users. The motherboard has a wide range of features and competitive pricing, while it retains the capability to support multi-GPU systems. Its design and layout are largely based on the support of multiple graphics cards, with both mechanical and electrical support for powerful cards, as well as the supply of the necessary PCIe bridges for building dual, triple, and quad GPU systems.
For the most part, the ASRock X399 Taichi shares the same features and subsystems with all AMD X399 motherboards currently available. ASMedia supplies the ASM3142 USB 3.1 Gen 2 controller, the Realtek ALC 1220 codec is the heart of the audio system, and Intel provides the two I211-AT NICs. ASRock did not even remove the wireless connectivity features, with 802.11ac Wi-Fi and Bluetooth 4.2 present onboard. In term of storage device ports, the motherboard still has eight SATA ports and three M.2 slots that are exactly what is currently available on other AMD X399 motherboards (or more), plus an extra U.2 port that shares its lanes with a M.2 slot.
Despite the comparatively low price of the motherboard, the ASRock X399 Taichi is not lacking anything in terms of quality or implementation when compared to its more expensive alternatives. The power circuitry is on par with the most expensive AMD X399 motherboards currently available and technically better than that of significantly more expensive implementations. Furthermore, the designer did not cut corners on the application of the major subsystems either, with a fully isolated audio circuitry that also features audio-specific capacitors and a proper headphones amplifier.
The ASRock X399 Taichi also is an aesthetically pleasing motherboard. We feel that the designer did an excellent job creating an interesting and yet subtle aesthetic design. Everything, from the colors to the geometric shapes, are excellently combined to give the ASRock X399 Taichi its distinct appearance. On the other hand, the gear-shaped chipset heatsink is more than just a cosmetic part, as it has greater size and mass than that of most AMD X399 motherboards currently available, allowing for very low operational temperatures.
On performance, the X399 Taichi did well in our power consumption tests at load, but this is due to it having the least aggressive clocking during benchmarks. Almost all benchmarks, except Blender, despite being within a couple of percent of the top performer, the Taichi was at the bottom of the list. Despite this, our overclocking results showed a very easy 4.0 GHz overclock on air, or a flat 3.4 GHz will knock 86W from a stock system.
Combined with a conservative bundle, the company managed to bring the retail price of the motherboard below $300. For the feature set and performance, the Taichi offers very good value.
AnandTech's AMD Ryzen Threadripper and X399 Motherboard Coverage
- The AMD Ryzen Threadripper 1950X and 1920X Review: CPUs on Steroids
- An AMD Threadripper X399 Motherboard Overview
- Analyzing Threadripper Thermals: Big Base Cooling Wins
- The GIGABYTE X399 DESIGNARE EX Motherboard Review
- The ASRock Fatal1ty X399 Professional Gaming
- The ASUS X399 ROG Zenith Extreme Motherboard Review: Top Tier Threadripper
- AMD Reveals Threadripper 2 : Up to 32 Cores, 250W, X399 Refresh
- GIGABYTE’s X399 Aorus Extreme: The Threadripper 2 Halo Motherboard
- MSI's New Threadripper 2 Motherboard on Steroids: X399 Creation
- New EKWB Threadripper X399 Monoblocks for GIGABYTE and MSI


