Original Link: https://www.anandtech.com/show/4303/inwin-buc-100-dollar-chassis
IN-WIN BUC: Just How Much $100 Can Buy
by Dustin Sklavos on May 9, 2011 4:28 PM EST- Posted in
- Cases/Cooling/PSUs
- In-Win
- mid-tower
Introducing the IN-WIN BUC
When building a new machine, it's often easy to pass by certain manufacturers in favor of old standbys like Antec, Cooler Master, SilverStone, or Thermaltake. Whenever another company becomes a contender it's usually because they made a big splash at the top of the market and let the halo effect strike the way Corsair did. However, there's great engineering going on with smaller firms, and in the case of IN-WIN and their new BUC enclosure, you'd be surprised at just how much actual value can be crammed into what seems at first glance like a mid-range enclosure. If you're the type to tinker religiously with your desktop, the BUC may just be the case for you.
I'll admit I was a bit skeptical when the BUC arrived. Good enclosures can be difficult to find, and my initial perspective was that the BUC was going to be "just another gaming case". Thankfully my job requires more than snap judgments: I have to actually use the case, build a computer with it, and really get a feel for it. In the process, I found a lot of very pleasant surprises.
Keeping things moving with our new set of case reviews, the BUC is our first full-sized ATX case and as such it's the first case to take advantage of our full-sized ATX testbed, which I'll talk more about when we get to the thermal and acoustic testing. Once again I ask that if you have any suggestions for how we handle future case reviews, please feel free to let us know. Now, on with the show!
| IN-WIN BUC Specifications | ||
| Motherboard Form Factor | ATX, Micro ATX, Mini ITX | |
| Drive Bays | External | 3x 5.25", 1x 3.5" |
| Internal | 5x 3.5"/2.5" (three hotswap) | |
| Cooling | Front | 1x 120mm intake fan |
| Rear | 1x 120mm exhaust fan | |
| Top | 1x 120mm fan mount | |
| Side | 2x 120mm fan mount (tested with extra included fan mounted) | |
| Bottom | - | |
| Expansion Slots | 7 | |
| Front I/O Port | 2x USB 2.0, headphone and mic jacks, eSATA | |
| Top I/O Port | 1x USB 3.0 (with routing cable) | |
| Power Supply Size | Standard ATX | |
| Clearance | 250mm (PSU), 12" (Expansion Cards), 170mm (CPU HSF) | |
| Weight | 14.77 lbs. | |
| Dimensions | 19.9" x 8.3" x 19.1" | |
| Price | $99 | |
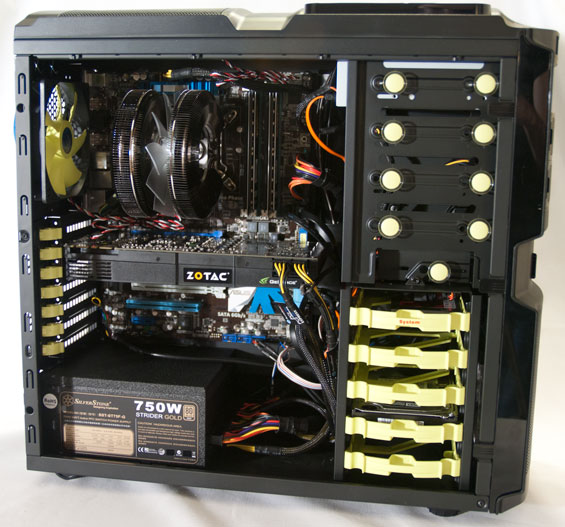
I whipped out the tape measure to give more exact figures of just what you can expect to fit in this enclosure, but generally speaking just about any standard CPU cooler or power supply should fit. As far as video cards are concerned, fitting anything the size of a Radeon HD 5970/6990 is going to be a tight squeeze, but other than that you should be good to go. Our GeForce GTX 580 was able to fit comfortably and easily with room to breathe.
In and Around the IN-WIN BUC
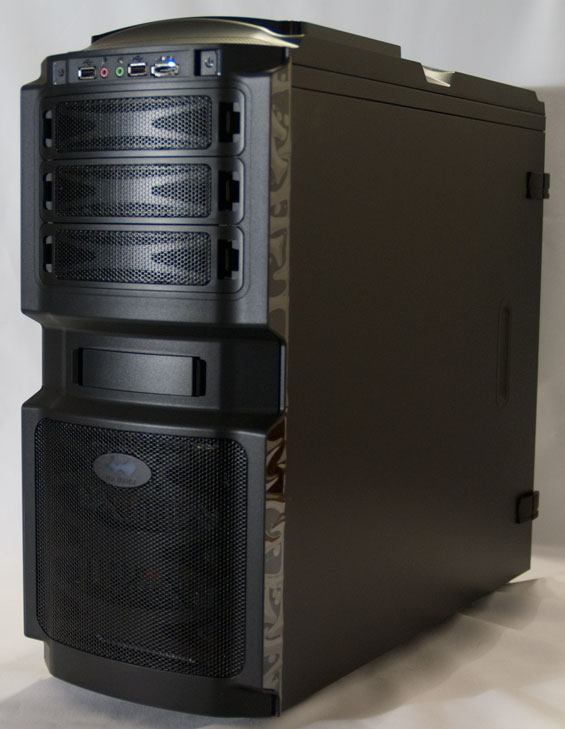
I'll come out and say it: while I don't think it's anywhere near as ostentatious as a lot of gaming-oriented cases can be, the IN-WIN BUC could probably stand a little more understatement. There's no glossy plastic to be found anywhere on this chassis except for a light trim at the top and small side accents, though, and thankfully the lighting is in no way overpowering: the front logo glows red (this can be disabled), and the front fan glows blue. The color scheme is two-toned, with most of the case in black and assembly grommets and trays in a kind of neon yellow-green.


Build materials are the standard plastic and SECC steel one would expect in the price range, but the case feels sturdy and not liable to snap or break anywhere in particular. As we get into this, you'll see places where IN-WIN cut corners to keep costs down and generally speaking they're fairly smart with their approach.
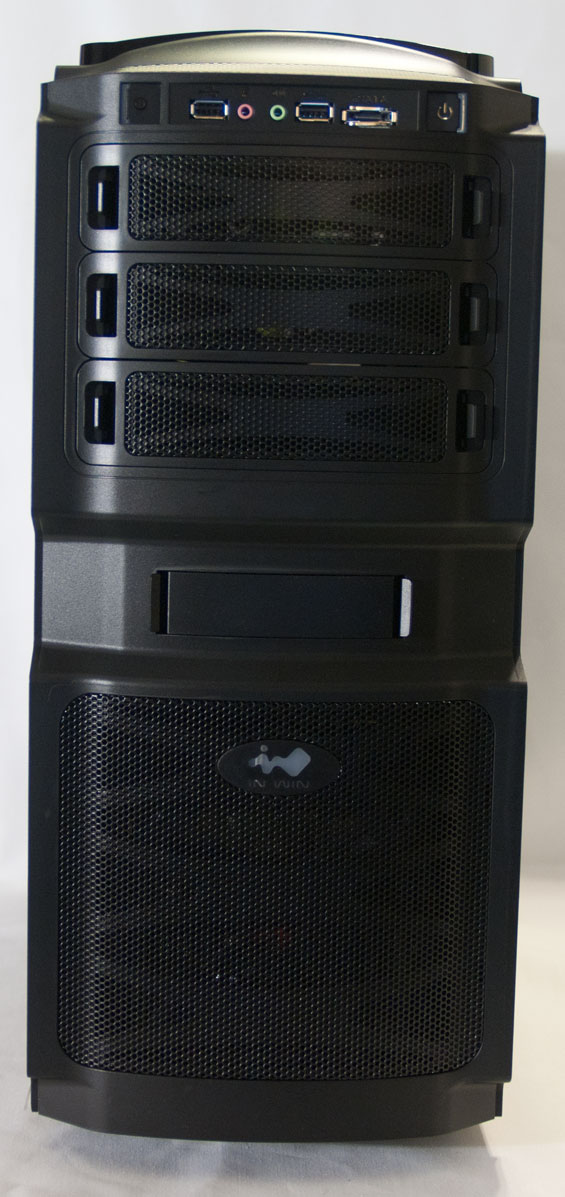
The first thing that struck me when I started playing with the BUC was that it's a largely toolless case design. This is something I think some manufacturers even at the upper end of the field forget we actually appreciate, and what you're going to find is that there's an awful lot of thought given to practicality, ease of use, and flexibility when it comes to this case. The front covers for the 5.25" bays all snap in and out relatively easily, but they're secure enough so they don't rattle and have a squeeze-clamp kind of design that I actually prefer to the drive bay covers I've seen on more expensive cases like Antec's P182/P183 and Corsair's 600T. Practicality is king here.
When you go to open the case up, you'll find that instead of even thumbscrews, IN-WIN has adopted plastic clamps that work surprisingly well. If these aren't to your taste, you can remove them and just use conventional screws/thumbscrews to secure the panels. What I was really pleased with, and a couple of you are going to nod knowingly, is the fact that the side panels slide on and off with a minimum of fuss. I've used a few inexpensive cases where side panels didn't line up quite right or required a lot of force to budge once they were stuck in place.
The main side panel also features ventilation and mounts for two 120mm fans; clearance in the bottom mount is fine for video cards, but there wasn't enough room to put a fan in the top mount with our Zalman CNPS9900 CPU cooler attached. There's a smaller removable piece in the bottom right of the panel that uses a conventional case key; this gives you access to three of the hotswap bays. NewEgg cites the enclosure as having four bays, but that's not entirely true; only the first three can be accessed with the door and the fourth is only accessible if the entire side panel is removed.
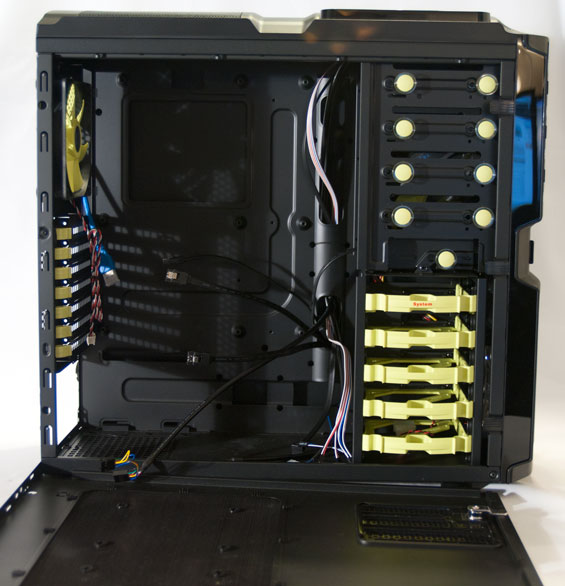
Popping open the BUC reveals a largely toolless interior. 5.25" drives are secured by popping out the neon green knobs, sliding the drive in, and then popping the knobs back in--and you only have to do this on the main side of the enclosure. There's a single knob for the external 3.5" bay, and then there are five 3.5" drive trays, four of which connect seamlessly to a SATA backplane.
The motherboard tray has the standoffs for a full ATX board more or less built in, and amen to that. It's been a long time since I've seen a motherboard that uses any kind of nonstandard standoffs, so not having to install those is welcome. Above the motherboard area is an opening where an additional 120mm fan can be installed; two plastic clamps flex open as you insert the fan, and then it more or less locks into place. This felt a little bit loose to me and is definitely vibration prone.
Finally, the expansion bays include one actual removable slot cover, with the rest essentially needing to be bent and snapped off. That's disappointing, but on the bright side each of these have a clamp that rotates outside of the case: no screwing in expansion cards, and our GTX 580 was remarkably secure using these clamps.
Assembling the IN-WIN BUC
While the SilverStone FT03 we recently reviewed required some level of instruction to assemble, the BUC doesn't come with a manual. You can download one online, but the overall design of the case is smart enough that we doubt you'll need it.
Installing the motherboard was easy enough thanks to the built-in standoffs on the tray, and there are plenty of cable routing holes surrounding it to keep the internals relatively clean. It's worth mentioning there's a decent-sized cutout in the tray for cooler backplates; hopefully at some point Intel will realize their push-pin mounting system sucks hard (I've actually seen a machine where the pins deteriorated after just a couple of years and the stock heatsink fell off), but until then it's nice to see most case manufacturers have us covered.
Removing the covers for the external bays is also painless as I mentioned before, though every bay below the top one has a metal piece you'll need to twist and remove. From there, pop out the fastening knobs, slide the optical drive in, then push the pins in and you're good. Again, this is a remarkably simple and sturdy system, and I never felt like the drive was anything less than completely secure. If that's not satisfactory, though, you can actually screw the drive in on the opposite side.
Unfortunately, the 3.5" drive trays aren't toolless and can be a source of some frustration. You have to squeeze the handle from the sides to loosen these trays up, but that's easier said than done and can require a remarkable amount of effort. That calls into question the usefulness of the hotswappable drive bay door, but the system does essentially work. To install a 3.5" drive, you need to first install rubber standoffs, then use special screws included with the case to mount the drive. This worked fine with a pair of Western Digital drives I tested, but an ever-so-slightly wider Seagate Barracuda just plain wouldn't fit using the side screws and had to be attached to the bottom of the tray. Once you're done it's good to go and lines up perfectly with the backplane, but the extra steps here and difficulty actually swapping drives can be a nuisance. 2.5" drives are bottom mounted in the trays with the mounting holes clearly labeled; these don't have any kind of vibration dampening, but you're expected to mount SSDs with no moving parts so it's a non-issue.


The backplane is probably one of my favorite features and a surprising inclusion in a case at this price. It basically consolidates power connections into just two plugs, and already has SATA cables built in that for the most part easily route to the ports on the motherboard. While it's necessary for any kind of hotswap functionality to even work, I was just happy it was there to make cable routing that much simpler.
Installing expansion cards with the built-in mounting system was surprisingly painless. The GTX 580 lined up and locked into place on the motherboard, and then the clamps came down and did their job. No muss, no fuss, although if you like you can also screw the card in.
Beyond hard drive and SSD installation, there were really two points that did require a bit of fuss during assembly. The first is the power supply, which essentially "snaps" into place but still didn't feel quite as clean as the other parts of the case did. I had to apply some measure of force to get it in, and from there it felt...mostly secure. In that instance I did wind up using screws to secure it in the back of the enclosure, and for those that are concerned, there's ventilation (and a removable filter) beneath the power supply. My other snag came with installing a 120mm fan in the side panel. There are vibration-dampening rubber grommets included, but these pop out relatively easily and so installation effectively requires lining up three elements instead of two: the fan, the grommets, and the screw holes. I was able to do it, but case fans almost never feel like they mount right and this was no exception.

After all was said and done, my only major complaint was, surprisingly, cable routing. I had issues with this with the Antec P182 and again with the Corsair 600T, and I was hoping I wouldn't run into it here after our IN-WIN rep showed us some other models (we do have one more IN-WIN case on hand we'll be reviewing in the future) that had ample space behind the motherboard tray expressly for cabling. Getting the right-hand side panel back on proved to be an exercise in frustration and brute force, as it often tends to be with other enclosures, and my feeling is this: if you don't have enough space behind your motherboard tray for a molex connector to stand on its side, you don't have enough space. Mercifully the BUC's side panels are fairly flexible and can bow enough to handle it (unlike, say, the P182/183), but this is an issue that we shouldn't even be having at this point. I'm willing to accept a case that's a half inch wider if it means I don't have to grunt every time I put the side panel back on.
Testing Methodology
For those that didn't catch our brief word on our updated testing methodology from our SilverStone FT03 review, I'll give you a quick primer. After our first two case reviews since 2009 went over with mixed reception, we went back to the drawing board and worked up a better, hopefully more streamlined approach to case testing. First, we've standardized the parts we're using for case testing. For Mini-ITX and Micro-ATX enclosures, we're using the testbed I described in the FT03 review. For full ATX enclosures (e.g. mid-towers like the BUC and larger full-tower cases), we've kicked things up a notch. Below is the kit we're testing with; you'll see some overlap in a few places from our Mini-ITX board where the same components could handle the same jobs:
| Full ATX Test Configuration | |
| CPU | Intel Core i7-875K (95W TDP, tested at stock speed and overclocked to 3.8GHz @ 1.38V) |
| Motherboard | ASUS P7P55D-E Pro |
| Graphics Card | Zotac NVIDIA GeForce GTX 580 (244W TDP) |
| Memory | 2x2GB Crucial Ballistix Smart Tracer DDR3-1600 |
| Drives |
Samsung 5.25" BD-ROM/DVDRW Drive Kingston SSDNow V+ 100 64GB SSD Western Digital Caviar Black 1TB SATA 6Gbps |
| CPU Cooler | Zalman CNPS9900 MAX with Cooler Master ThermalFusion 400 |
| Power Supply | SilverStone Strider Gold 750W 80 Plus Gold |
For full ATX cases, we need to know not only how well they muffle sound but also how well they handle overclocked hardware. The Intel Core i7-875K we're using can run at an overclock nearly 900MHz faster than stock (and with a healthy dollop of voltage under it to boot). While going for maximum thermals would probably involve using an X58-based platform, LGA1155/1156 tend to be more popular and using that standard gives us the flexibility to potentially test air- and water-coolers down the line. It also bears mentioning that when we test under stock settings, the DDR3 runs at 1333MHz; it only goes up to 1600MHz when we're testing with the overclock in place.
My primary concern involves the BIOS-based fan controls. ASUS offers a decent amount of granularity in controlling the CPU fan, but I'd like to know what you think the ideal settings are. I currently have it set conservatively, to try and keep the processor below 60C, which is how I'd likely set it for my own system. But how would you set it? Would you just use ASUS's default "Silent" setting? Would you set a higher temperature threshold? Let us know.
Our actual testing procedures are unchanged from the Mini-ITX/Micro-ATX testbed, so here they are again:
Acoustic testing is standardized on a foot from the front of the case, using the Extech SL10 with an ambient noise floor of ~32dB. For reference, that's a silent apartment with nothing running, testing acoustics in the dead of night (usually between 1am and 3am). A lot of us sit about a foot away from our computers, so this should be a fairly accurate representation of the kind of noise the case generates, and it's close enough to get noise levels that should register above ambient.
Thermal testing is run with the computer having idled at the desktop for fifteen minutes, and again with the computer running both Furmark (where applicable) and Prime95 (less one thread when a GPU is being used) for fifteen minutes. I've found that leaving one thread open in Prime95 allows the processor to heat up enough while making sure Furmark isn't CPU-limited. We're using the thermal diodes included with the hardware to keep everything standardized, and ambient testing temperature is always between 71F and 74F. Processor temperatures reported are the average of the CPU cores.
And last but not least, it's important we thank the vendors who made our testbeds possible.
Thank You!
We have some thanks in order before we press on:
- Thank you to Crucial for providing us with the Ballistix Smart Tracer memory we used to add memory thermals to our testing.
- Thank you to Zalman for providing us with the CNPS9900 MAX heatsink and fan unit we used.
- Thank you to Kingston for providing us with the SSDNow V+ 100 SSD.
- Thank you to CyberPower for providing us with the Western Digital Caviar Black hard drive, Intel Core i7-875K processor, ASUS P7P55D-E Pro motherboard, and Samsung BD-ROM/DVD+/-RW drive.
- And thank you to SilverStone for providing us with the optical drive and power supply.
Noise and Thermal Testing, Stock
We'll start our testing with the processor and RAM set to stock speeds to see how well the IN-WIN BUC handles a thermal load more or less indicative of an average enthusiast's setup. Down the road, we'll add more cases to the charts, but so far the only cases we've tested with our new equipment are a micro-ATX case and this mid-tower.
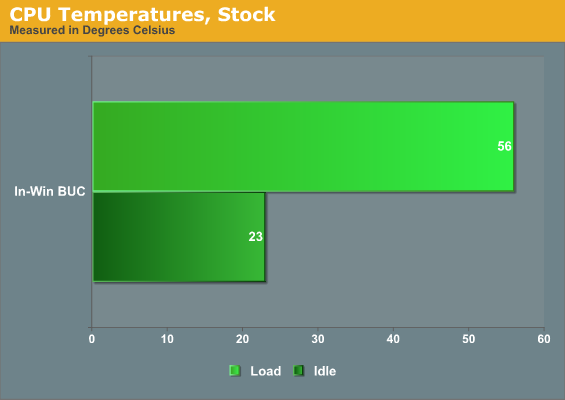
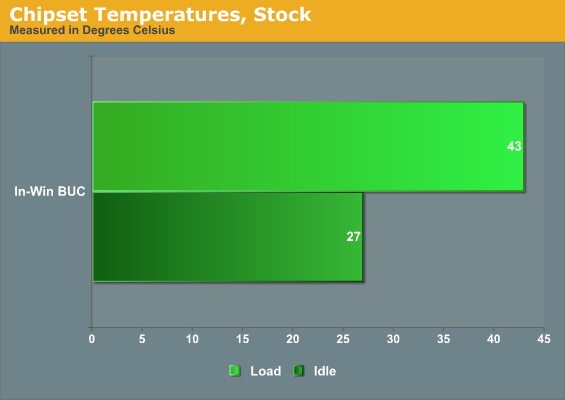
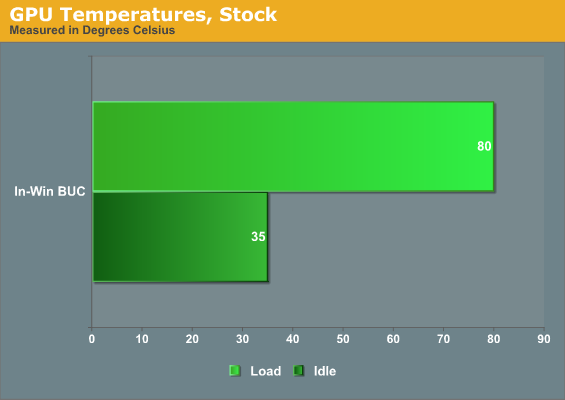
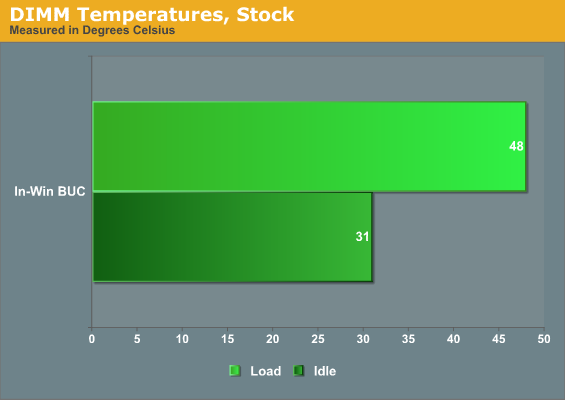
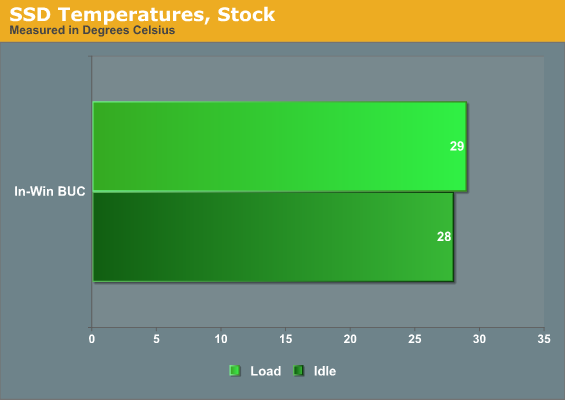
Thermals are very reasonable, with the i7-875K hovering below 60C and the GTX 580 being fed plenty of fresh air from the intake fan we mounted on the side panel. 80C under load is really quite good for the 580. The SSD and by extension the hard drive also run nice and frosty thanks to both ventilation above the bays and the front intake fan.
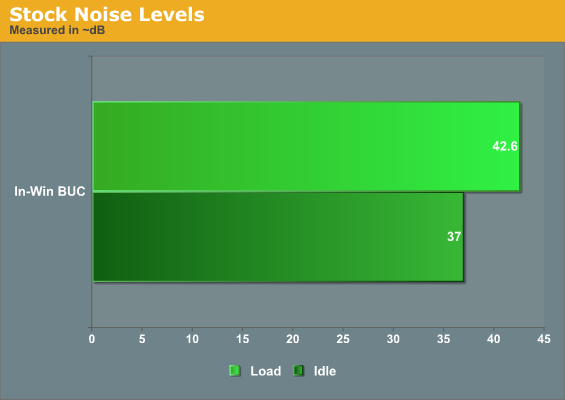
With proper fan control in place, the BUC also remains remarkably quiet. The 37dB idle noise level is actually very comfortable, with a low whooshing character to it that remains inobtrusive. Under load things get a little bit noisier but still reasonable.
Noise and Thermal Testing, Overclocked
Bringing the massive overclock on the processor into the equation means a lot more voltage and a lot more heat. It's at this point that we'll really see just how well the IN-WIN BUC can handle a thermal load more typical of the enthusiasts they're gunning for.
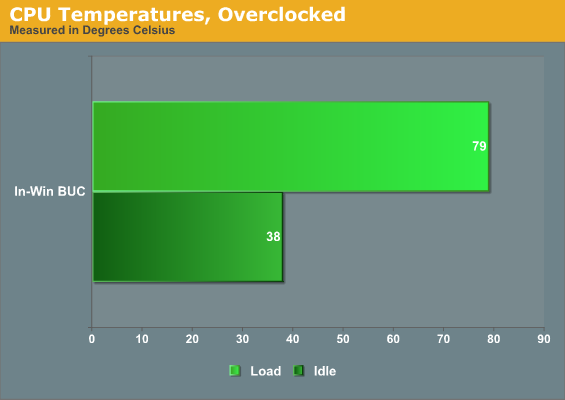
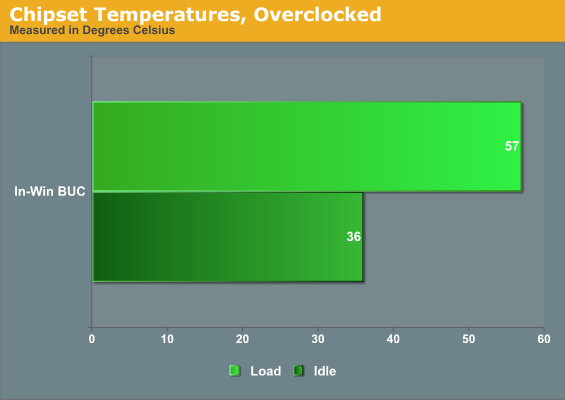
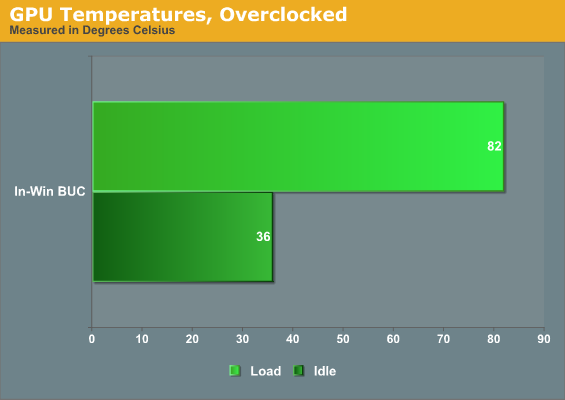
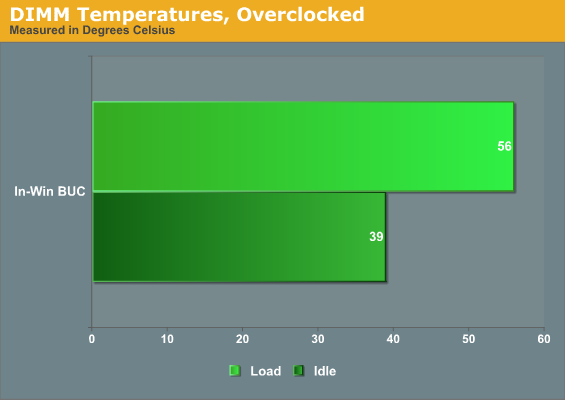
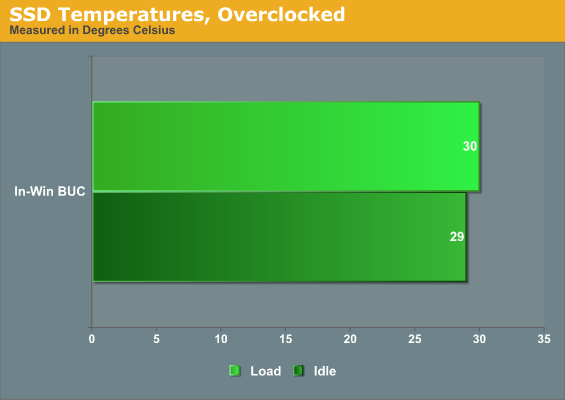
With the massive heat being generated by the overclocked i7-875K, the BUC has a much harder time keeping the temperatures in check. The processor's load temperature goes up 20C and is even idling a lot hotter, and the ambient temperature seems to be substantially higher as well as a result: chipset and RAM temperatures are both up at least 10C, though both are also doing more work with the faster processor. The GTX 580 and SSD remain largely unaffected, though, with both being quite close to cool air intakes.
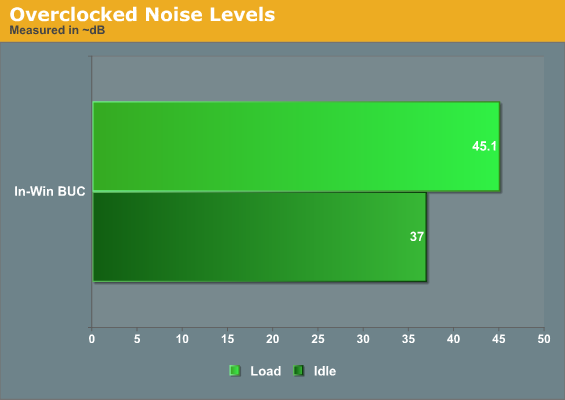
Under the overclock, idle noise remains about the same, but the fans have to work harder and add about 3dB to the load noise. The Zalman 9900CNPS MAX we're using for the processor cooler is basically working as hard as it can at this point.
Conclusion: A Lot For a Little
While a hundred bills is more than entry level cases tend to go for, it's also a world away from the more expensive enthusiast cases on the market. What's impressive is that in many ways IN-WIN has given those cases a run for their money.
The IN-WIN BUC is a tremendously flexible piece of kit, full of features without seeming to be overrun by them. The hotswap bay is a little problematic with some drives, but it's also there on a $100 case, and it does work. Likewise, there's USB 3.0 connectivity, a drive/key tray on the top of the case, and a largely toolless assembly. The plastic/steel construction can feel on the chintzy side, but it also keeps the case comparatively light. Every time I've needed to work on my tower when it was in the Antec P182 and now the Corsair 600T, I've felt like I was going to throw my back out trying to move the thing. The BUC is frankly incredibly light compared to those two monsters.
It's not all sunshine and rainbows, though. With that construction you do get an enclosure that's not as effective at dampening noise. There's a lot you can do to mitigate it by using quiet fans and employing fan controls, but it just doesn't have a whole lot to really keep all that noise in and with a video card like the GeForce GTX 580 it might get a little louder than you'd like. The BUC also seemed to struggle a little with our overclocked setup; while it never locked up, it certainly ran hotter than we'd like. If your system is more conservative you're not likely to have any issues. I'm also not a big fan of the gamer-centric styling and I'm not sure how many gamers like their computer cases ostentatious. That may just be me, as I tend to prefer builds that look more austere, but many or our readership appears to feel the same. The Corsair 600T is about my limit. Finally, the hotswap bay works great in theory, but in practice the plastic trays bow so much with 3.5" drives installed that they become extremely difficult to actually remove.
What I'm left with, though, is a pleasant surprise in the form of a case that's inexpensive but feature-packed. IN-WIN clearly tried very hard to produce an enclosure that offers a tremendous amount of value and in that respect they succeeded. I know a lot of boutiques will tend to cut corners a bit on their case selection, so I'll spell it out: boutiques looking for a case that's comparatively inexpensive should go with the BUC. But what about you, the end user? Well, if you need a workhorse case that's feature rich, relatively easy to work in/with, and you don't have a lot of bread to spend on it, the BUC is an excellent choice and it made a believer out of me.


