Original Link: https://www.anandtech.com/show/9854/asus-maximus-viii-impact-z170-rog-review-itx
The ASUS Maximus VIII Impact Z170 ROG Mini-ITX Motherboard Review
by Ian Cutress on December 29, 2015 9:00 AM EST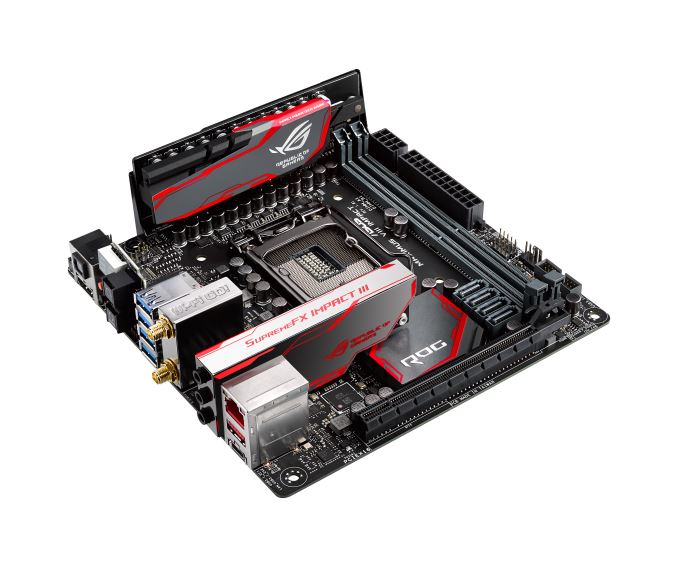
For the Z170 platform, ASUS is slowly increasing the number of Republic of Gamers motherboards available. Alongside the seniors Gene/Formula/Extreme, we have the Impact as a junior, sophomore models in Ranger and Hero but freshman in the Pro Gamer pair, the Extreme/Assembly, the Aura, and potentially more models down the line. Like a stick of seaside rock, ROG runs through the middle, with bits and pieces of the feature set ending up on different models. For this review, we look at the newest version of the Impact built for Skylake, the mini-ITX small motherboard line that has historically set a high standard for small PC builds.
Other AnandTech Reviews for Intel’s 6th Generation CPUs and 100-Series Motherboards
Skylake-K Review: Core i7-6700K and Core i5-6600K - CPU Review
Comparison between the i7-6700K and i7-2600K in Bench – CPU Comparison
Overclocking Performance Mini-Test to 4.8 GHz – Overclocking
Skylake Architecture Analysis - Architecture
Z170 Chipset Analysis and 55+ Motherboards - Motherboard Overview
Discrete Graphics: An Update for Z170 Motherboards - PCIe Firmware Update
100-Series:
The GIGABYTE Z170X-Gaming G1 Review ($500)
The ASRock Z170 Extreme7+ Review ($240)
The MSI Z170 Gaming M7 Review ($230)
The ASUS Z170-A Review ($165)
To read specifically about the Z170 chip/platform and the specifications therein, our deep dive into what it is can be found at this link.
ASUS Maximus VIII Impact Z170 ROG Overview
There are a few well-known traits that the Impact motherboard line promotes, and anyone following the industry will recognize them. Unique to mini-ITX, the Impact line has a common theme of daughterboards for power delivery, semi-external audio (which is even unheard of on any size motherboard outside of the Impact without a separate PCIe card), and an effort on the hardware/software such that it still offers many features of the full sized ROG motherboards in the smaller form factor. They are as expensive as mini-ITX motherboards tend to get (save the mini-ITX on X99), stretching well into the territory of mid-to-high prices for full sized ATX motherboards.
Perhaps unsurprisingly, the new Maximus VIII Impact follows the same traits, and this particular brand in ROG could potentially leave ASUS scratching their heads as to how to improve on a design which has historically performed very well when we look at our previous data. It has been mentioned to us in the past that the motherboard manufacturers are aware of other companies reverse engineering each other’s ideas and implementing them the generation after, thus making the original idea no longer unique. But the Impact line remains strong - no-one has copied the right angled power attached design, nor the separate audio card, nor the rear-IO panel for two-digit debug and extra functionality, nor the extra fan extension card. Perhaps the mini-ITX motherboard market only has room for one premium player (although I find the hard to believe), but when you're the only one heading a specific niche, the requirement to innovate further is less of a concern as long as your target market is happy.
Semantics aside, the Maximus VIII Impact has one new issue to solve thanks to the introduction of the Z170 chipset - with 20 PCIe lanes from the chipset to use and abuse, the already jam packed design has to fit in more of the functionality similar to the rest of the 100-series line, such as USB 3.1 controllers, PCIe storage support with RAID, and others. To a certain extent the Impact is successful in this, although as mini-ITX boards tend to showcase, you only get 'one of each'.

The features on the Impact start with the usual set: daughterboard based power delivery, SupremeFX audio on a separate add-in card, Intel networking, 2x2 dual band 802.11ac Wi-Fi supporting MU-MIMO, rear-IO based troubleshooting tools and support for additional fan headers via the fan extension card. New to the scene are USB 3.1 ports, one Type-A and one Type-C, supported through Intel's Alpine Ridge controller. Use of the AR controller typically indicates future Thunderbolt 3 support, but ASUS has told me this will not be the case on the Impact. The rear panel also has a U.2 port for PCIe based 2.5 inch storage, which at this point means only Intel's SSD 750, but at least they haven't stretched to the defunct SATA Express standard.
Performance of the Impact in most key areas makes it hard to ignore - a super low DPC latency is one of the lowest we have ever seen. Our test BIOS did come with MultiCore Turbo enabled but power consumption is particularly light compared to other MCT motherboards, and it comes with a good Mini-ITX audio response due to the configuration. POST times are long at over 22 seconds, but our overclocking results were impressive with 4.7 GHz being very comfortable and even hitting 4.9 GHz at high voltage.
ASUS typically pushes the user experience of their BIOS and software packages, both of which get iterative updates on the last generation involving compatibility with the new chipset, USB 3.1 Turbo and a push into RAMDisk/RAMCaches now that we can get 16GB of DRAM per module, making the Impact support of up 32GB of overclocked memory.
Quick Links to Other Pages
In The Box and Visual Inspection
BIOS
Software
System Performance (Audio, USB, Power, POST Times on Windows 7, Latency)
CPU Performance, Short Form (Office Tests and Transcoding)
Gaming Performance 2015 (R7 240, GTX 770, GTX 980)
Conclusions
Quick Board Feature Comparison
| Motherboard Comparison | ||
| ASUS Maximus VIII Impact | ||
| Socket | LGA1151 | LGA1151 |
| MSRP at Review | $250 | $230 |
| DRAM | 2 x DDR4 | 4 x DDR4 |
| PCIe Layout | x16 | x8/x8 |
| BIOS Version Tested | 1101 | 142 |
| MCT Enabled Automatically? |
Yes | Yes |
| USB 3.1 (10 Gbps) | Intel Alpine Ridge 1 x Type-A 1 x Type-C |
ASMedia ASM1142 1 x Type-A 1 x Type-C |
| M.2 Slots | None | 2 x PCIe 3.0 x4 |
| U.2 Ports | 1 x PCIe 3.0 x4 | No |
| Network Controller | 1 x Intel 219-V 1 x QCA61x4A |
1 x Killer E2400 |
| Audio Controller | Realtek ALC1150 | Realtek ALC1150 |
| HDMI 2.0 | None | No |
ASUS Maximus VIII Impact Z170 ROG Overclocking
Experience with ASUS Maximus VIII Impact Z170 ROG
The overclocking methodology from ASUS comes in several formats. Most of the larger ASUS motherboards have a Turbo Power Up switch with two overclock modes, but for the Impact this is moved into the BIOS as an option under ‘TPU’.
When in LN2 mode, the BIOS will open up more extreme overclocking features for those who want to take it sub-zero.
In the OS, the standard options manifest in the TPU option in the AI Suite software, giving manual control tools or the 5-Way Optimization method for frequency, power, fans and other components of the system. This has a number of options relating to max temperatures and voltages the user wants to support.
Methodology
Our standard overclocking methodology is as follows. We select the automatic overclock options and test for stability with PovRay and OCCT to simulate high-end workloads. These stability tests aim to catch any immediate causes for memory or CPU errors.
For manual overclocks, based on the information gathered from previous testing, starts off at a nominal voltage and CPU multiplier, and the multiplier is increased until the stability tests are failed. The CPU voltage is increased gradually until the stability tests are passed, and the process repeated until the motherboard reduces the multiplier automatically (due to safety protocol) or the CPU temperature reaches a stupidly high level (100ºC+). Our test bed is not in a case, which should push overclocks higher with fresher (cooler) air.
Overclock Results

Overall, the nature of Skylake makes our CPUs comfortably get 4.5 GHz to 4.7 GHz on air/water without much issue. The Impact gets a very nice result with our CPU #3, sitting happy at 4.7 GHz for only 1.300 volts set in the BIOS.
Board Features
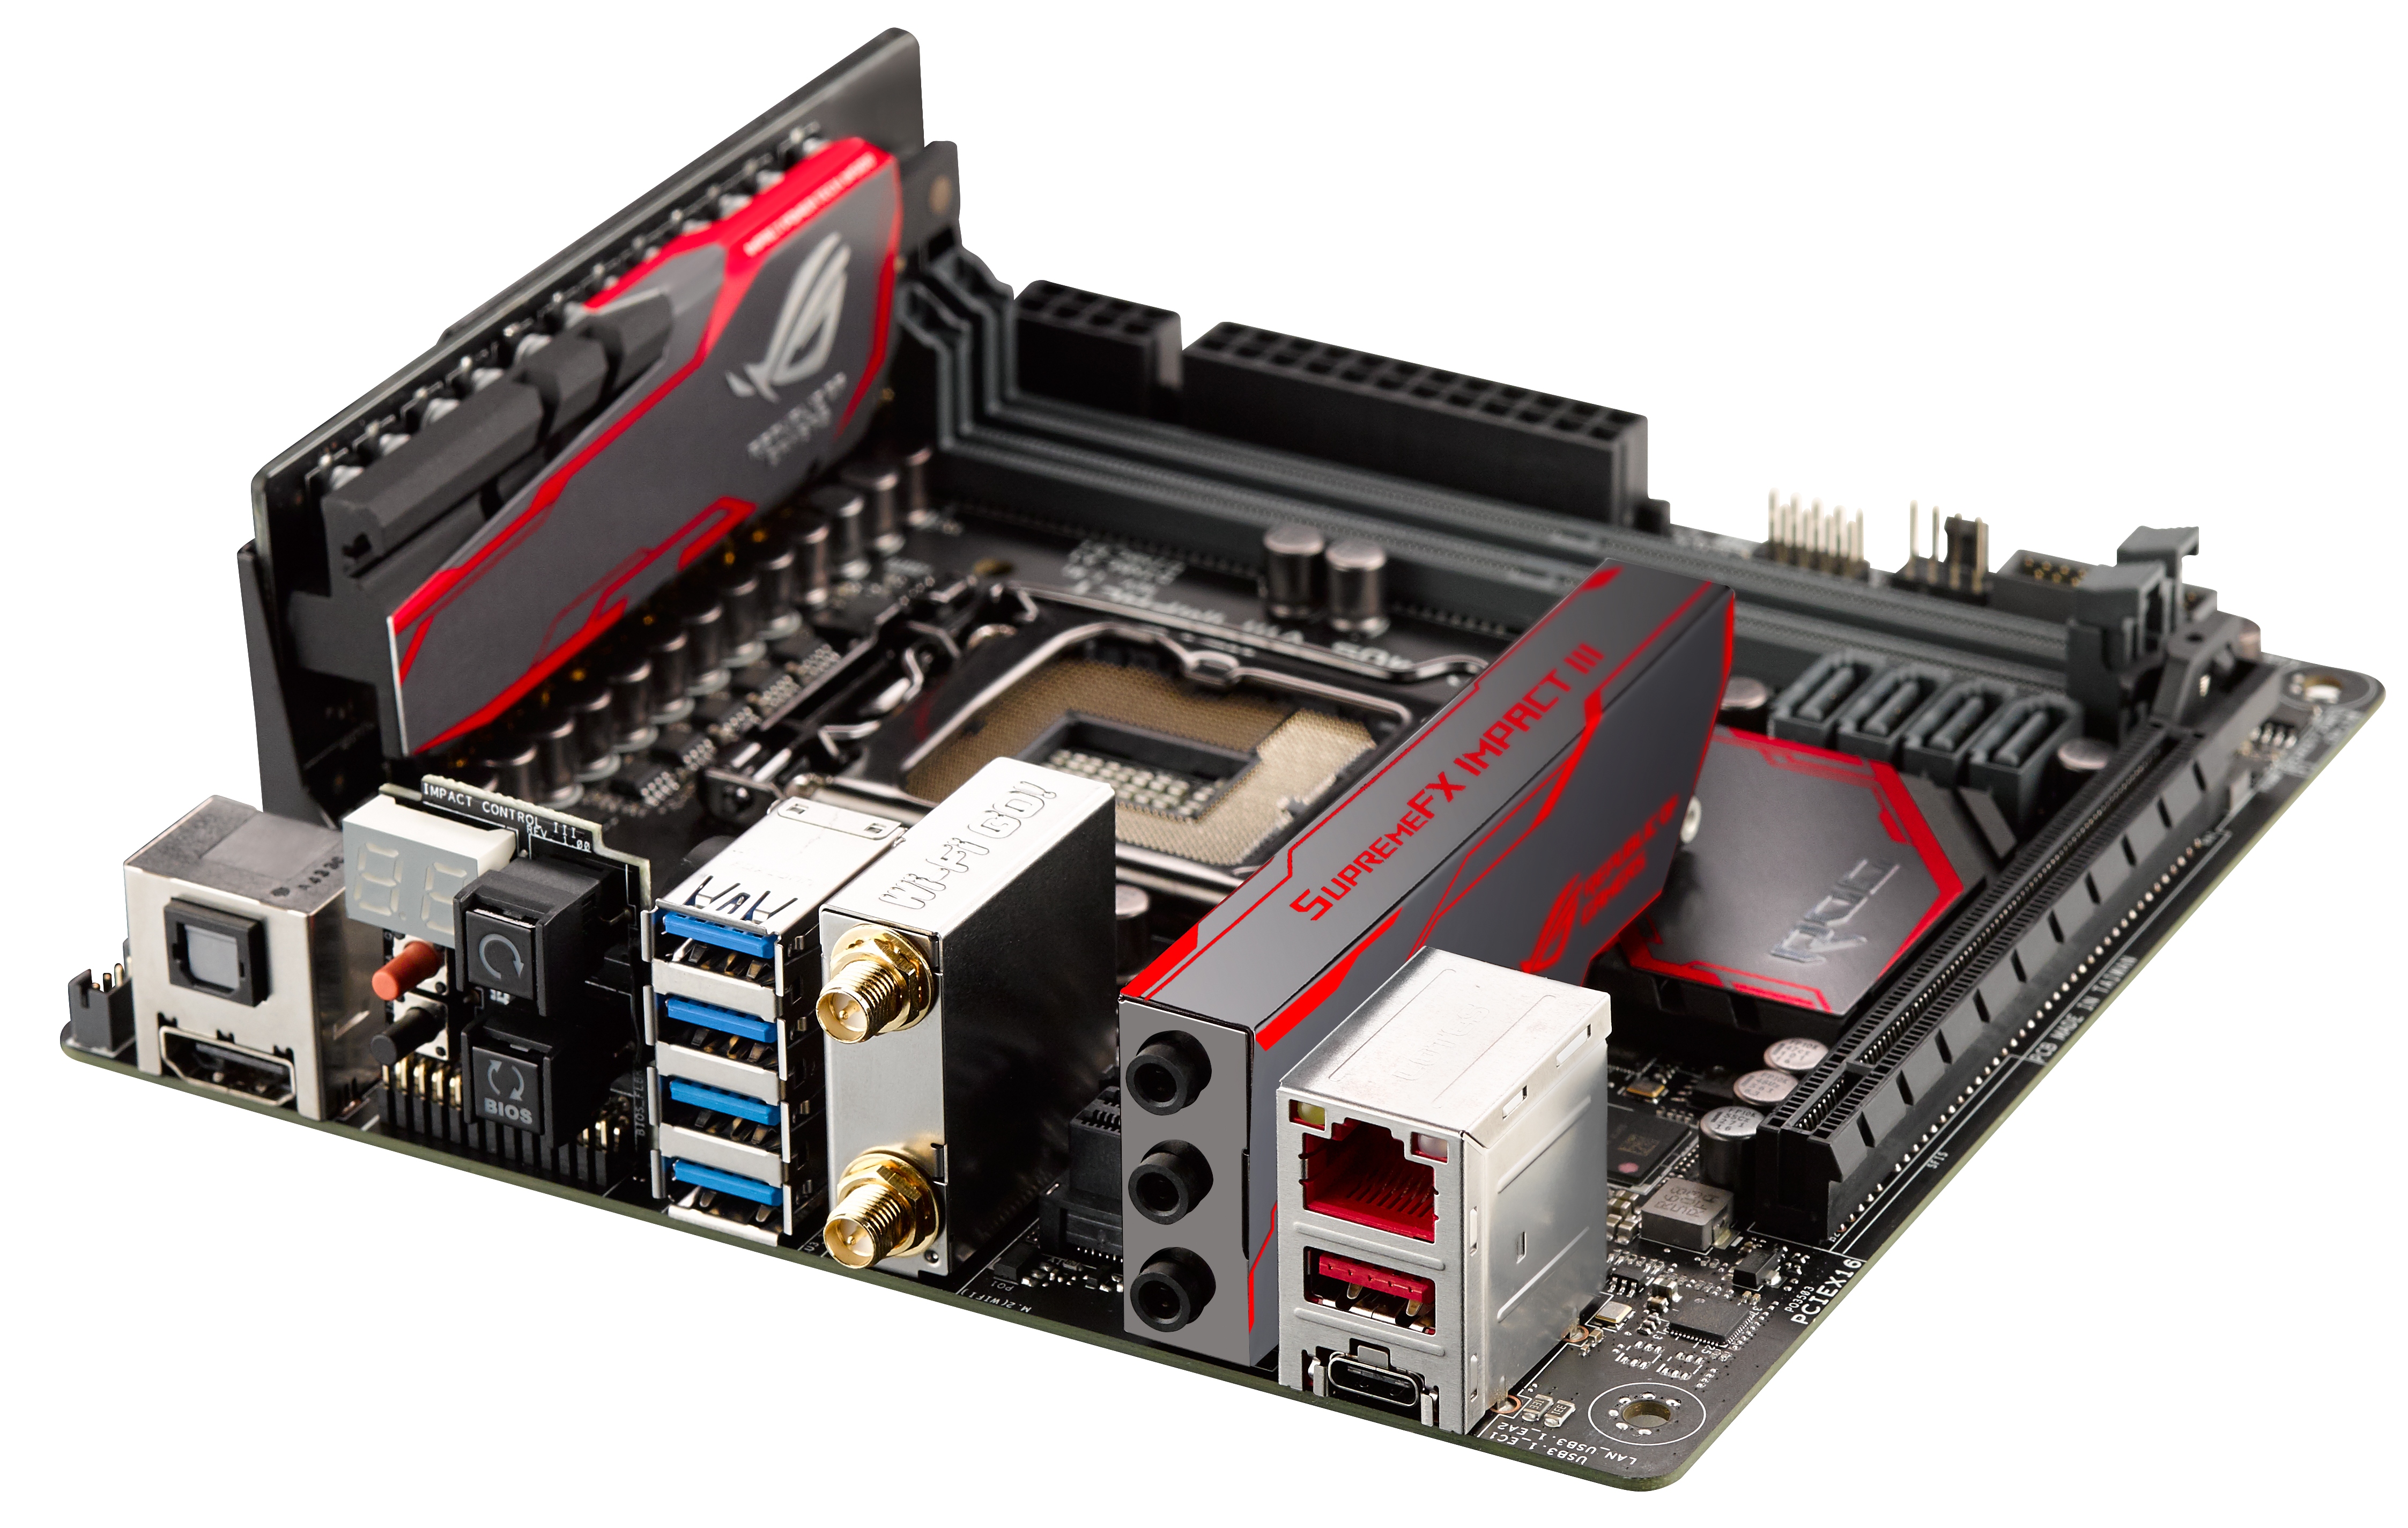
With the mITX platform, we expect ‘less’ of pretty much everything, mostly due to the size compared to ATX or mATX. Nevertheless, U.2 support is front and center, with USB 3.1-A plus USB 3.1-C, Intel networking, 802.11ac 2x2 WiFi, and then extra daughterboards for fan controls, two-digit debug, power and audio.
| ASUS Maximus VIII Impact | |
| Warranty Period | 3 Years |
| Product Page | Link |
| Price | Amazon US |
| Size | mini-ITX |
| CPU Interface | LGA1151 |
| Chipset | Intel Z170 |
| Memory Slots (DDR4) | Two DDR4 Supporting 32GB Dual Channel Up to 4133 MHz |
| Memory Slots (DDR3L) | None |
| Video Outputs | HDMI |
| Wired Network Connectivity | Intel I219-V |
| Wireless Network Connectivity | Qualcomm Atheros QCA61x4A 802.11ac 2x2 Dual Band, 2.4 / 5 GHz MU-MIMO Supported |
| Onboard Audio | Realtek ALC1150 via SupremeFX |
| PCIe Slots for Graphics (from CPU) | 1 x PCIe 3.0 (x16) |
| PCIe Slots for Other (from PCH) | None |
| Onboard SATA | Four, RAID 0/1/5/10 |
| Onboard SATA Express | None |
| Onboard M.2 | None |
| Onboard U.2 | One, PCIe 3.0 x4, RAID Capable |
| USB 3.1 | 1 x Type-A 1 x Type-C Intel Alpine Ridge Controller |
| USB 3.0 | 4 x Rear Panel 2 via headers |
| USB 2.0 | None |
| Power Connectors | 1 x 24-pin ATX 1 x 8-pin CPU |
| Fan Headers | 1 x CPU (4-pin) 1 x SYS (4-pin) 1 x Fan_EXT for three more 4-pin |
| IO Panel | HDMI 4 x USB 3.0 1 x USB 3.1 Type-A 1 x USB 3.1 Type-C 1 x Network RJ-45 (Intel I219-V) Wireless Antennas Impact Control Board with - Power On/Off - Reset - Two Digit Debug - Clear CMOS Audio Jacks |
| Other Features | U.2 Port Fan Extension Header Front Panel Header Front Audio Header Voltage Measurement Points Thermal Sensor Connector LN2 Mode Jumper Slow Mode Jumper |
One point of contention we could drag out here is the lack of a USB 2.0 header for older cases – we only get one USB 3.0 header. Personally I prefer my mouse/keyboard to use USB 2.0, just because there’s no danger of being stung by USB 3.0 drivers if a system by chance uses extra controllers or hub that need extra software to run under older versions of Windows. For the rare situations that need it, a USB 3.0 to USB 2.0 header might be a nice add-on.
In The Box
The top brands all revolve around giving the consumer a sense of superiority, exclusivity, or actually executing the product idea the best way possible. One of the ways to get that extra push for motherboards is through the box contents, even though some might argue that they can offer very little. With a gaming-focused product however, there are usually some trinkets worth mentioning beyond SATA cables. With the Impact we get the following:
Driver CD
Manuals
Rear IO Shield
ROG Stickers
CPU Guide
Four SATA Cables
ROG Fan Extension Board
Thermal Probe
Front Panel Assist
Wi-Fi Antenna
The Impact is between a rock and a hard place. Because it showcases how a Mini-ITX motherboard could be when competing against ATX counterparts, it does sit as a $250 board that focuses on engineering. That money would typically go on the pure product more than the box, but we get a fan controller breakout board as well as the Wi-Fi Antenna and additional thermistor for temperature probing which is good to see.
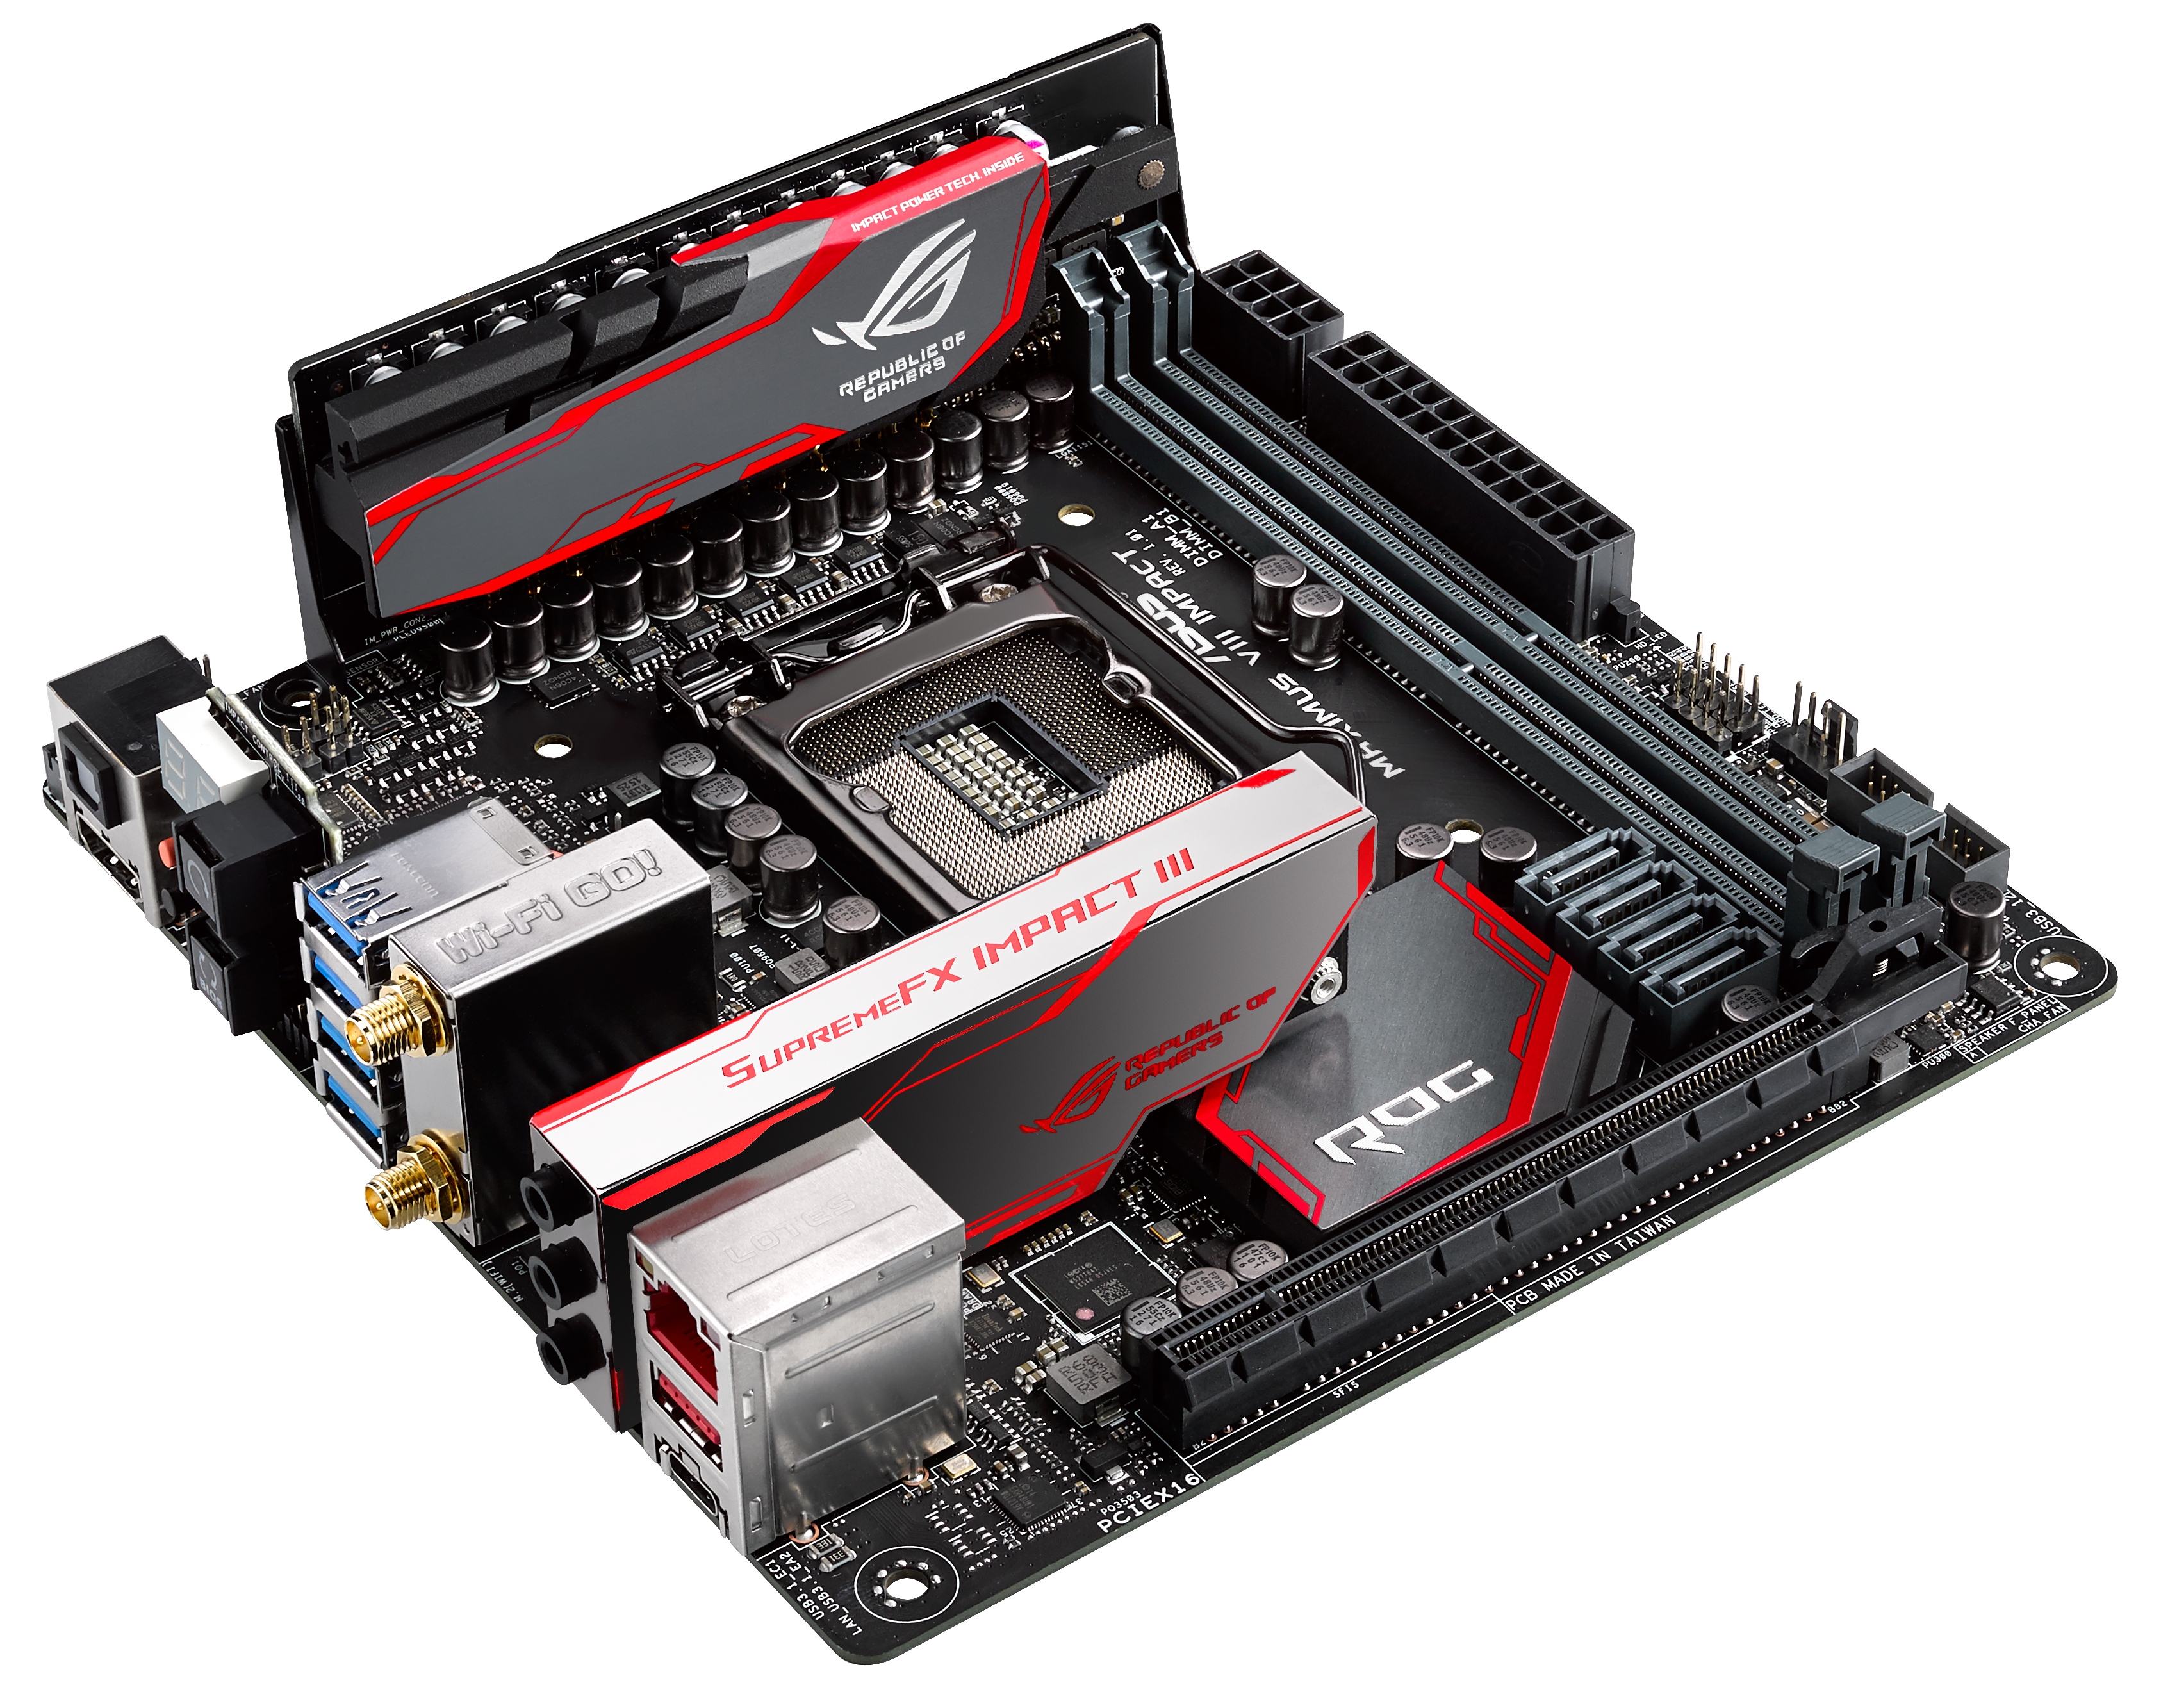
Visual Inspection
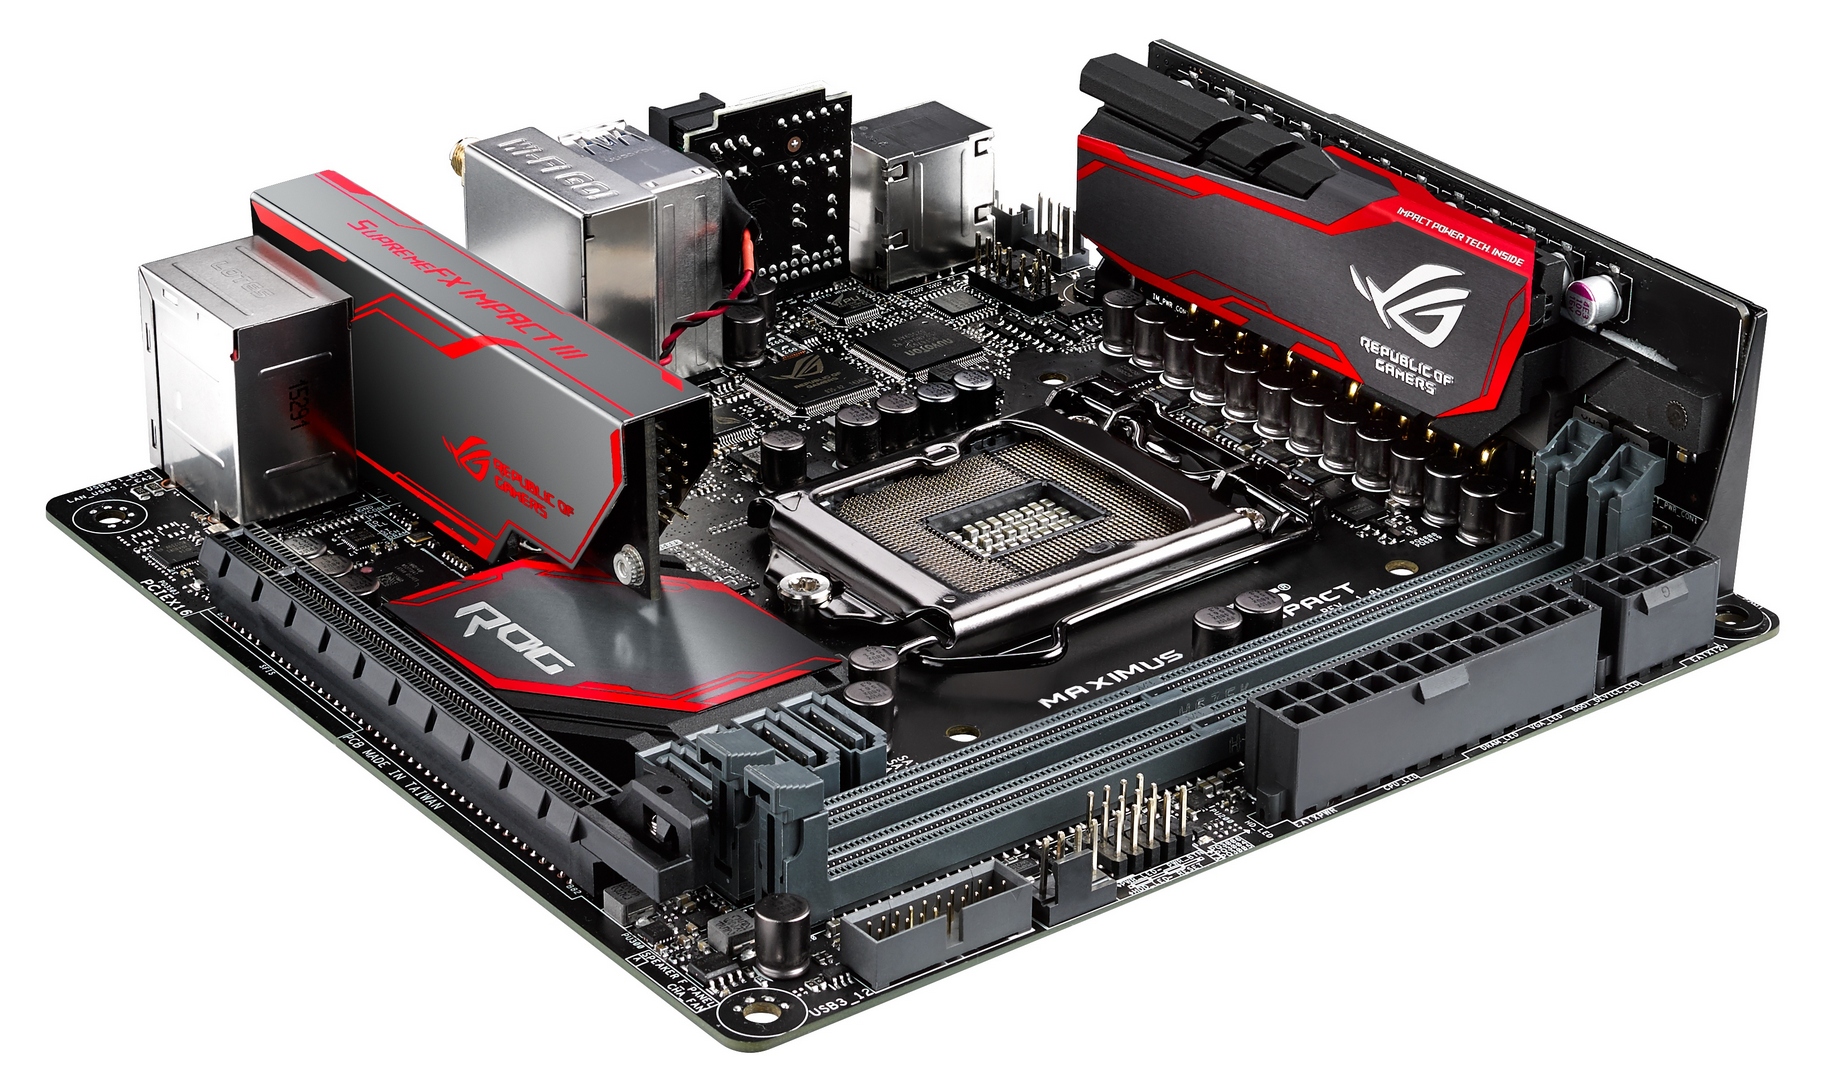
At first glance, the Impact follows the trend of the previous interactions of the design - a red and black livery with a few daughterboard add-ins. There are some subtle differences, and we start with the power delivery. In previous designs we had a fixed rear heatsink on the power delivery that was also screwed into another on the bottom of the board. This made case placement a bit of a juggling act, ensuring that everything was in the right place. This time however the rear heatsink is more firmly stuck onto the back of the daughterboard, opening up the case mounting points in the usual fashion.

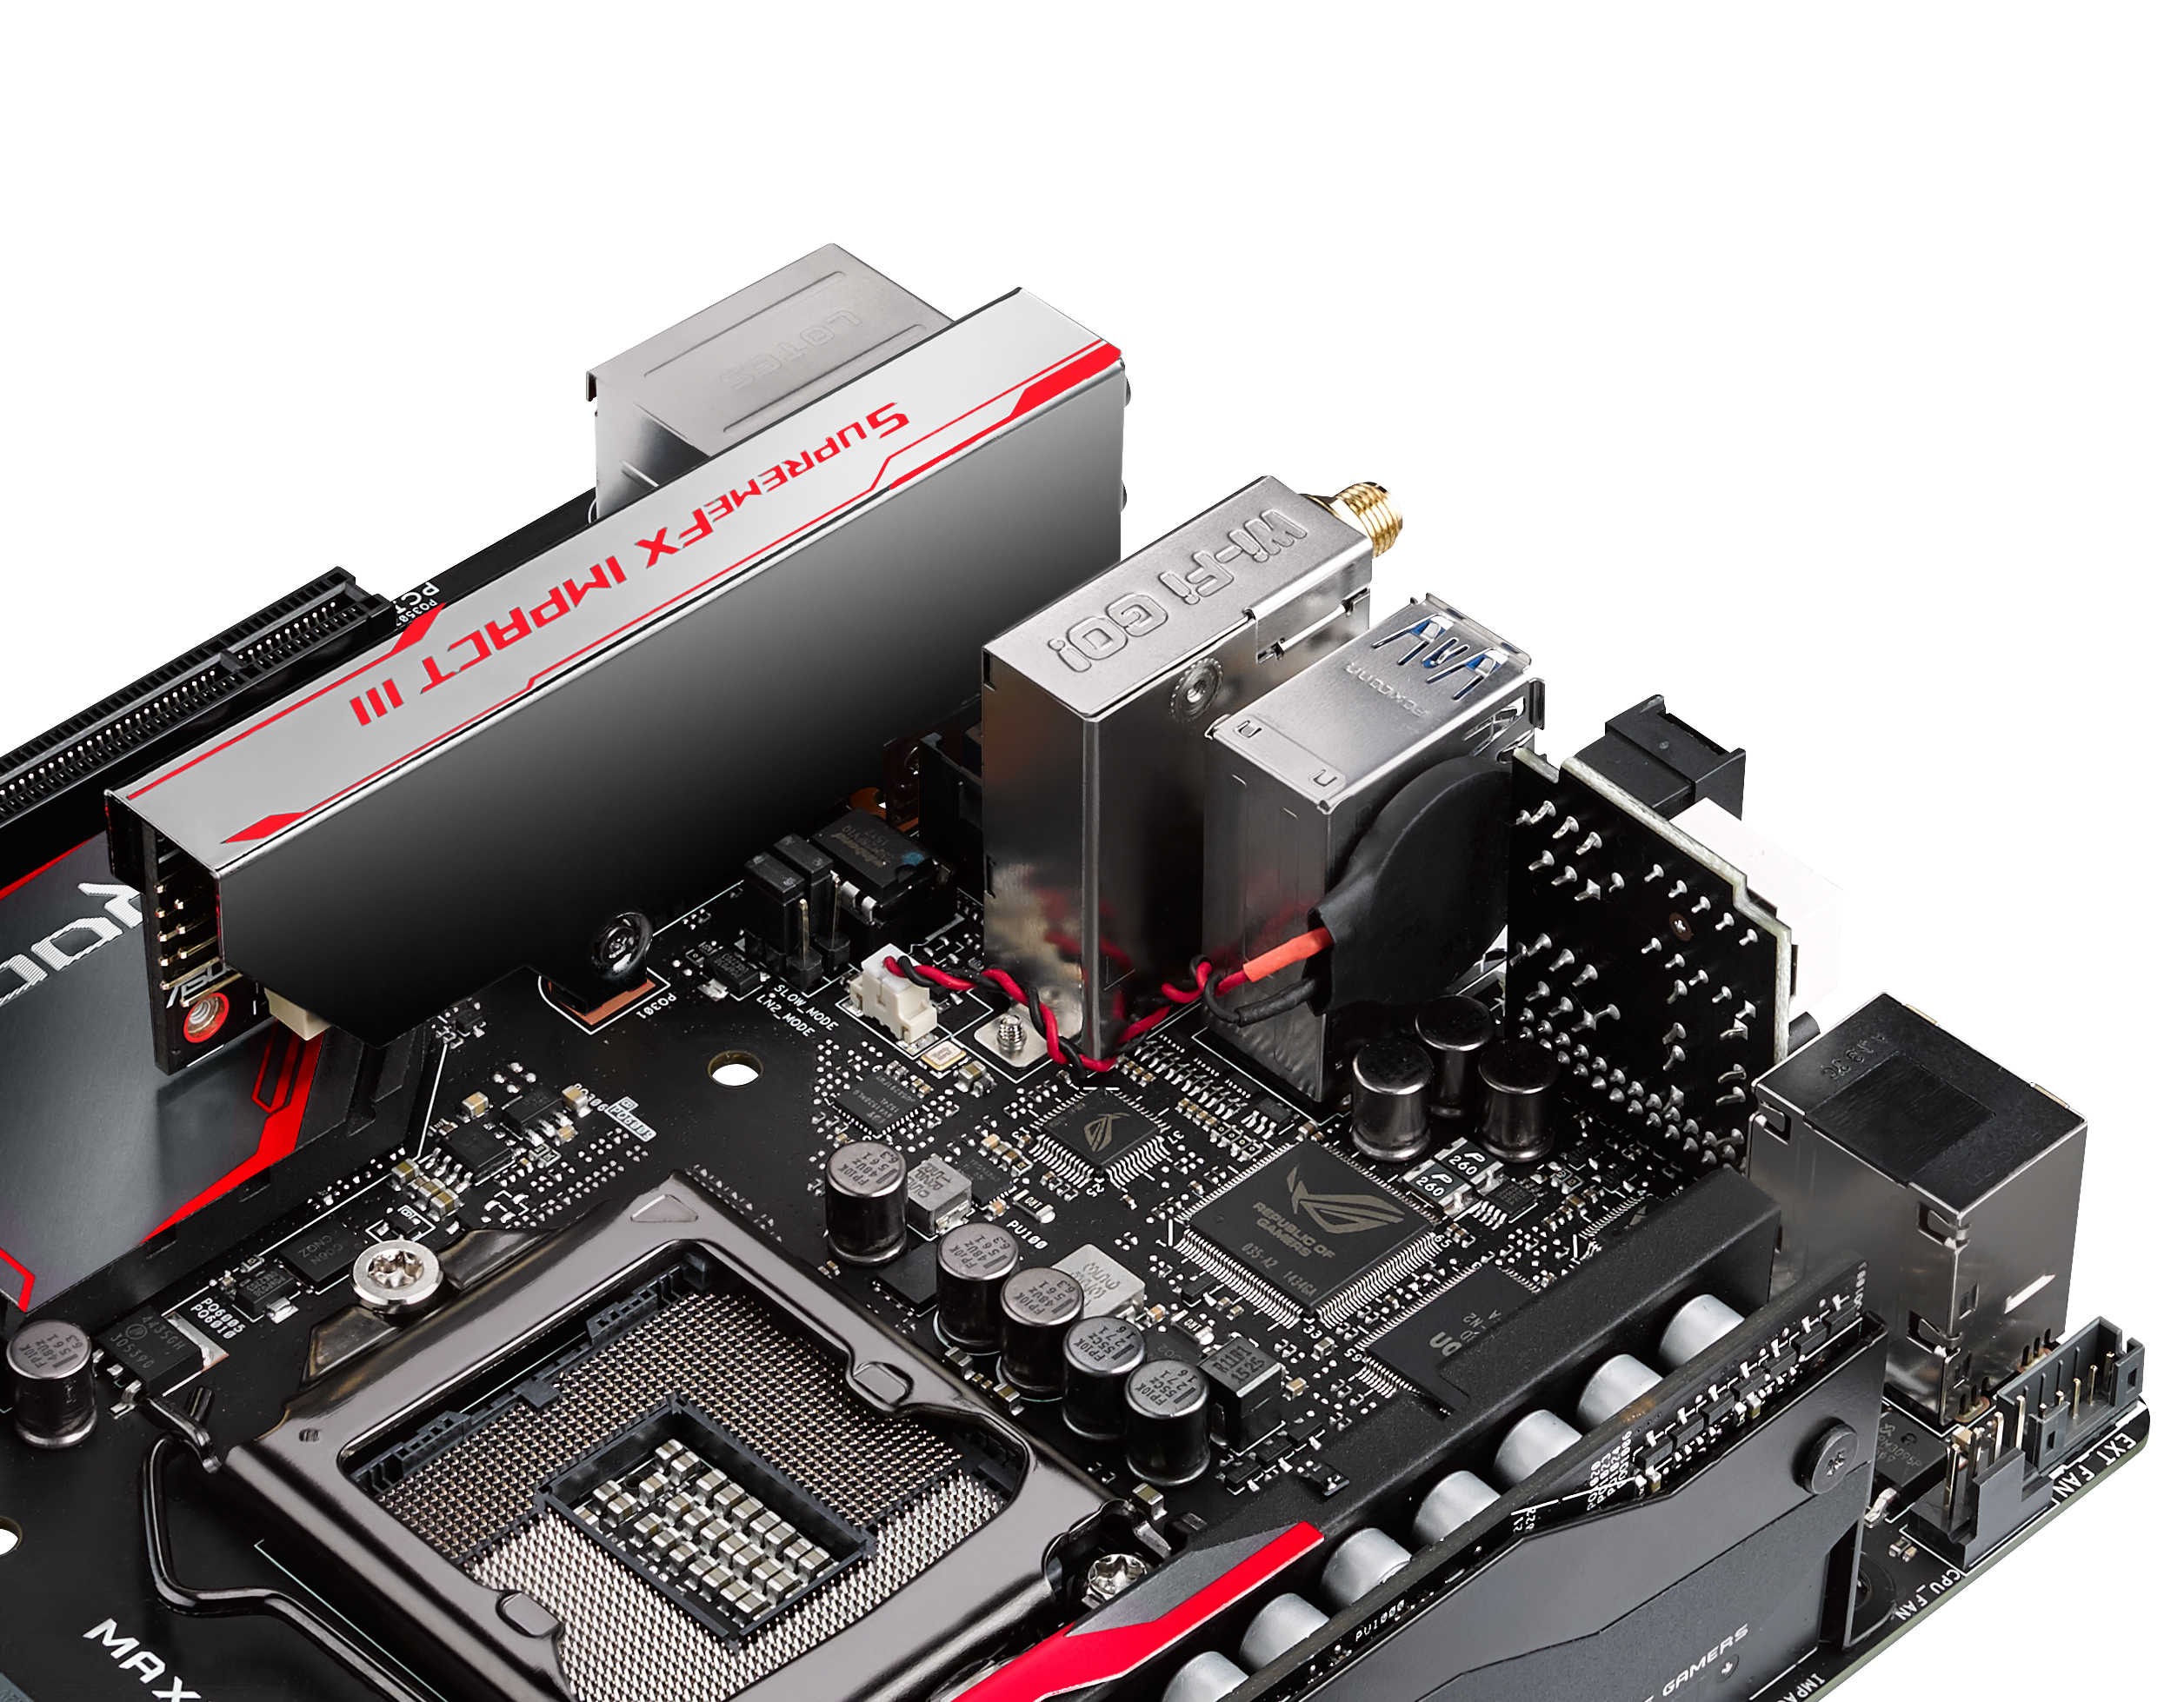
The image above shows the front heatsink removed, indicating the rear element which is also fixed through motherboard mounting screws.
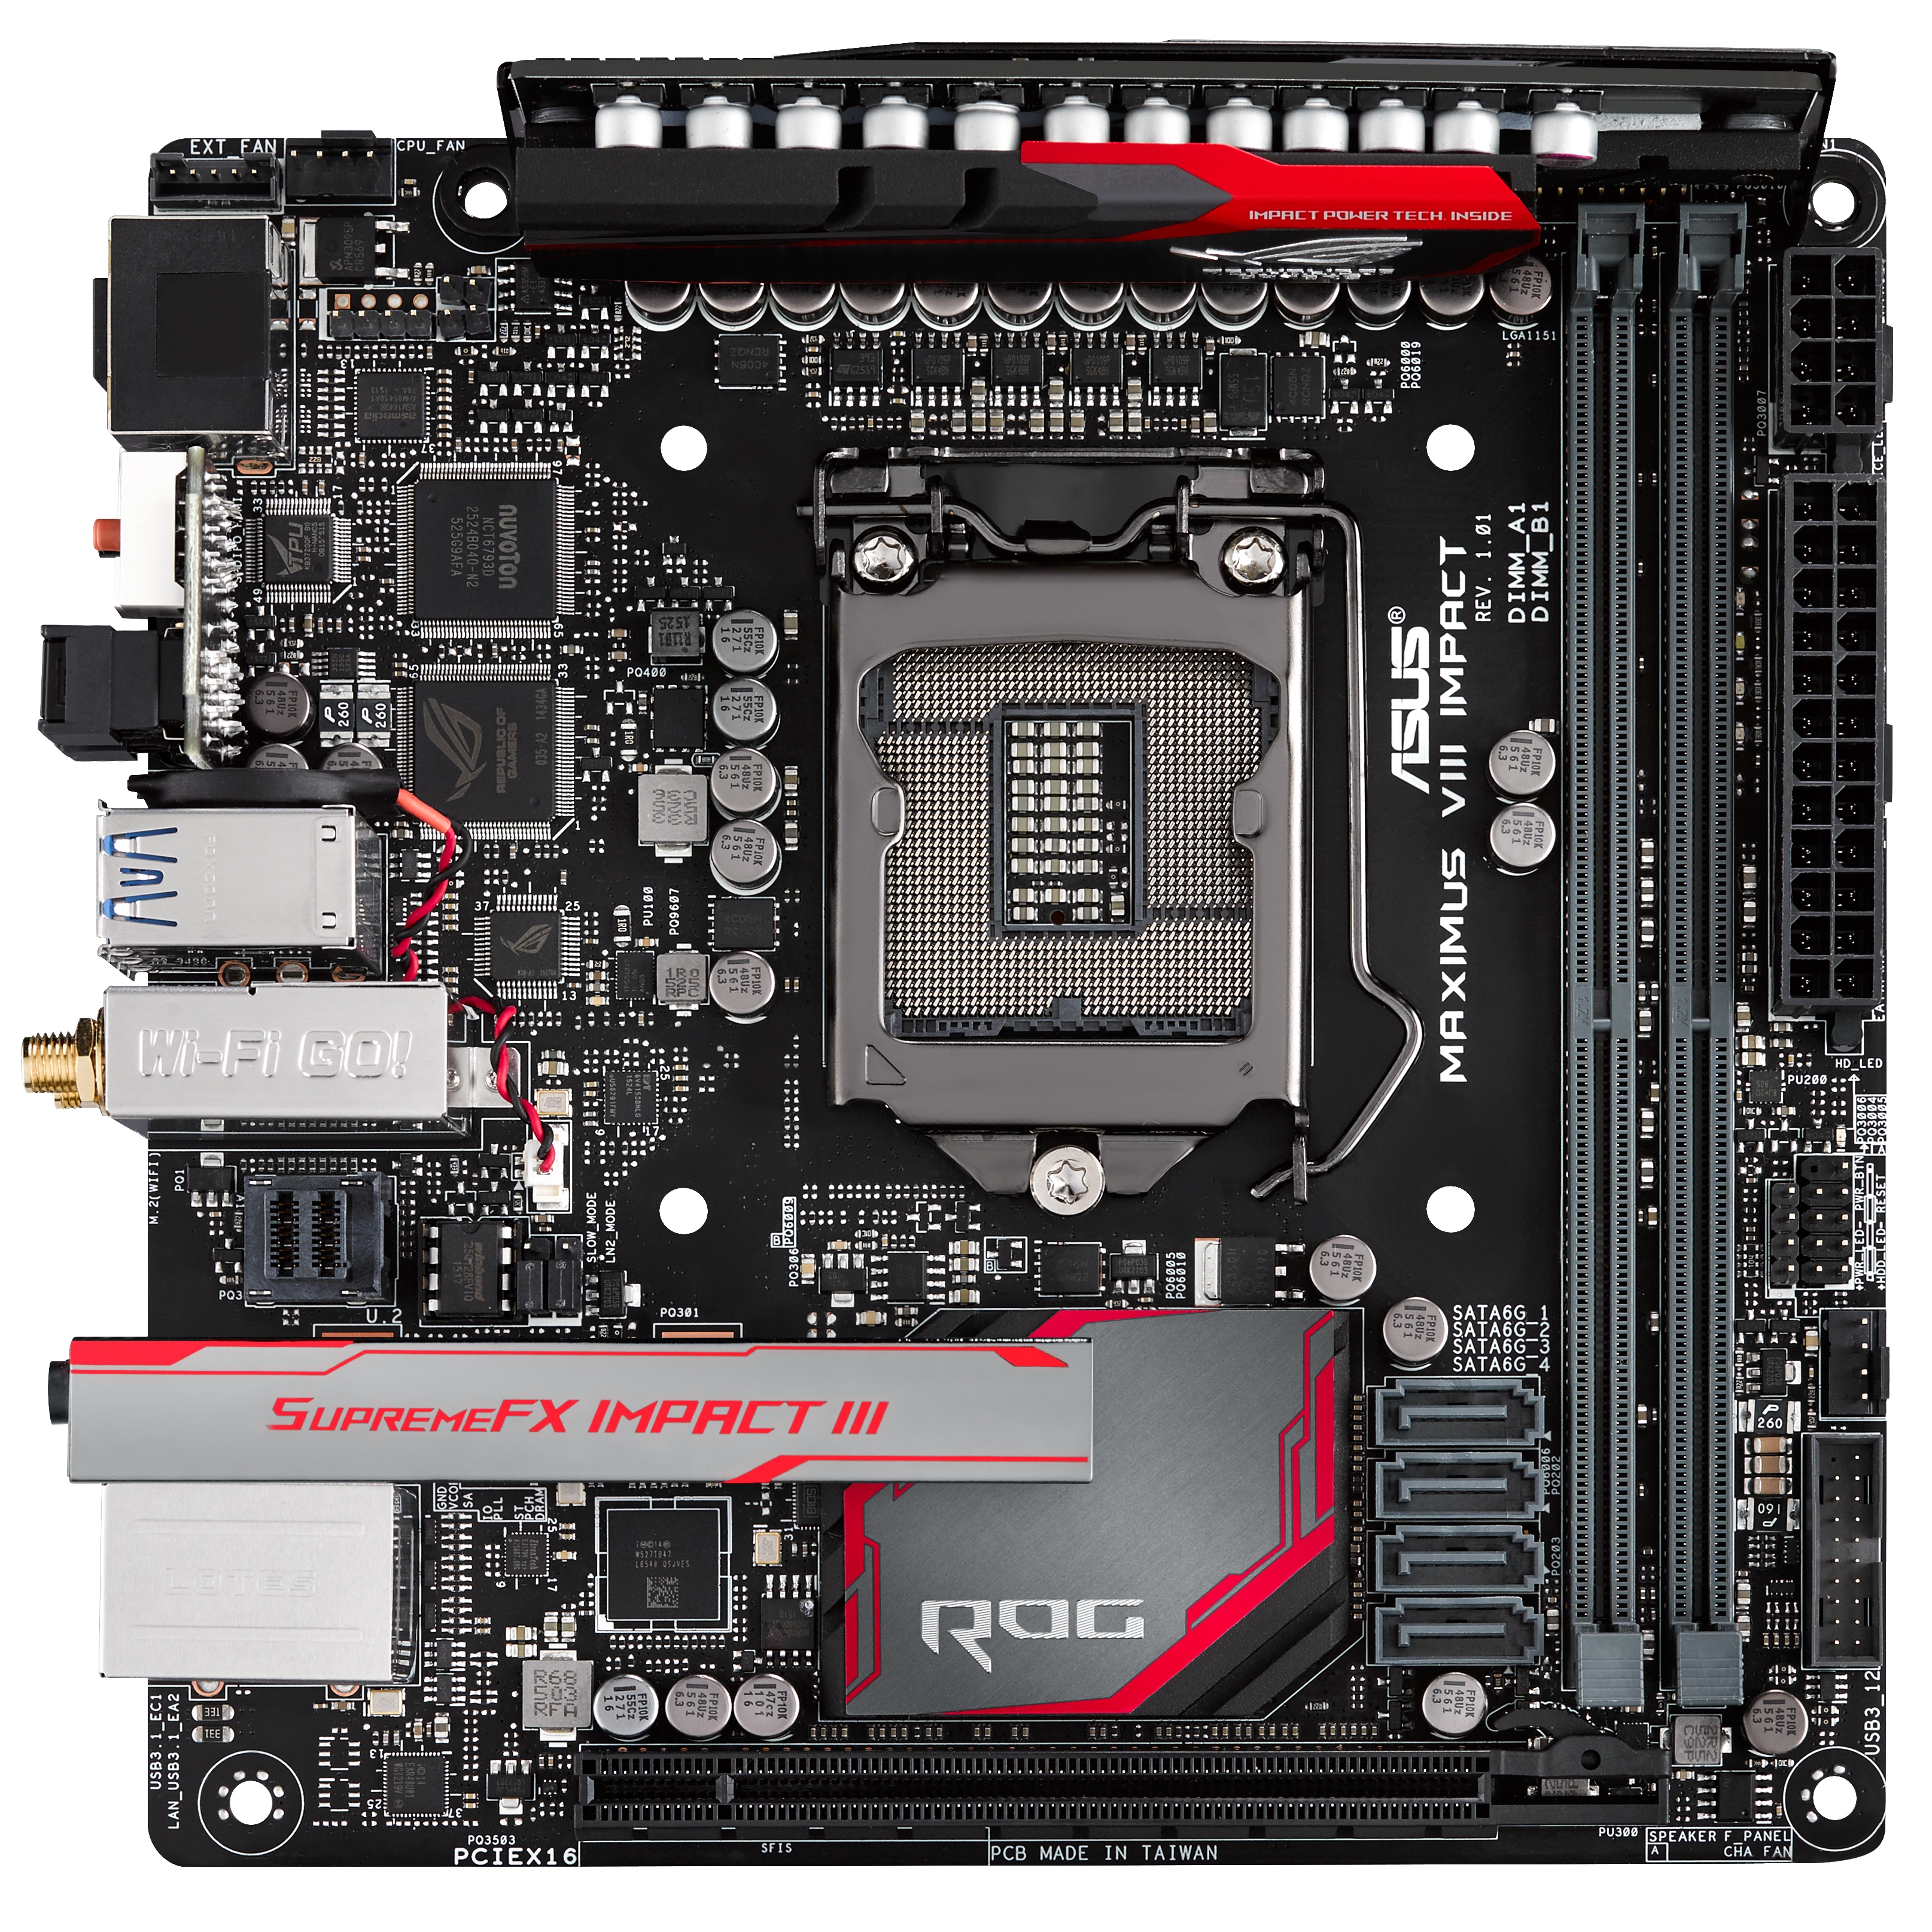
The socket area emulates previous Impact designs, and this time we get two DDR4 memory slots on the right. The power connector ports are on the other side of the DRAM slots, up against the edge of the board which makes them easier to use when building in a case. Below this are the front panel headers as well as a USB 3.0 header and one of the on-board fan headers. The other fan header is at the top left, next to the fan extension header for the fan header breakout board. It is worth noting that the socket area is actually very cramped, with three sides of it being up against some form of vertical barrier (DRAM, Power, Audio). In this case, the Impact ultimately works best with liquid cooling or something that conforms to Intel's X/Y dimensions through its full z-height, such as specific mini-ITX coolers.

The SATA ports are just inside the DRAM slots, and are arranged such that makes it extremely difficult to remove the bottom drive when locking cables are used. I have approached motherboard manufacturers on this before, and the usual response is that there is precious little space to put them in the first place without increasing cost.
As with other consumer mini-ITX motherboards, we get a single PCIe slot and this one takes all of the sixteen PCIe 3.0 lanes from the processor. With the Z170 chipset now offering 20 lanes in a switch format, it becomes less likely that lanes will be taken away for things like PCIe storage.
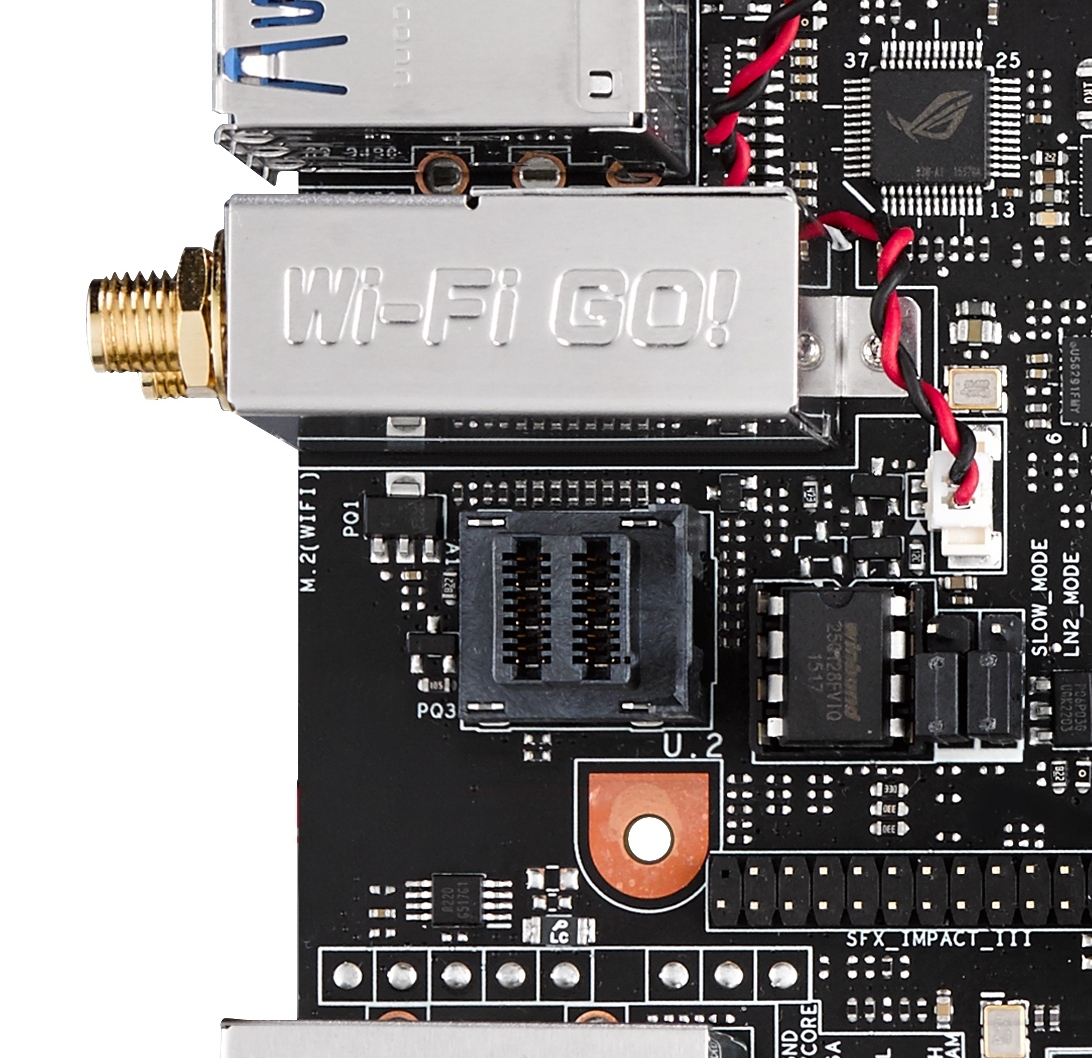
On that note, ASUS has done something interesting here. Rather than attempt some M.2 hybrid sticking out of the board similar to the X99 Deluxe, a U.2 port is placed near the rear IO instead. This is for a new wave of SSDs, such as the Intel SSD 750, that can take advantage of four PCIe 3.0 lanes of bandwidth. ASUS has equipped the Extreme and WS models with it as well, and it makes a mountain more sense than any SATA Express port anywhere, which has for all but died. It is worth noting that the reason the U.2 port is here near the rear of the board, rather than by the power connectors and USB 3.0 header, is apparently to do with signaling noise with other controllers.
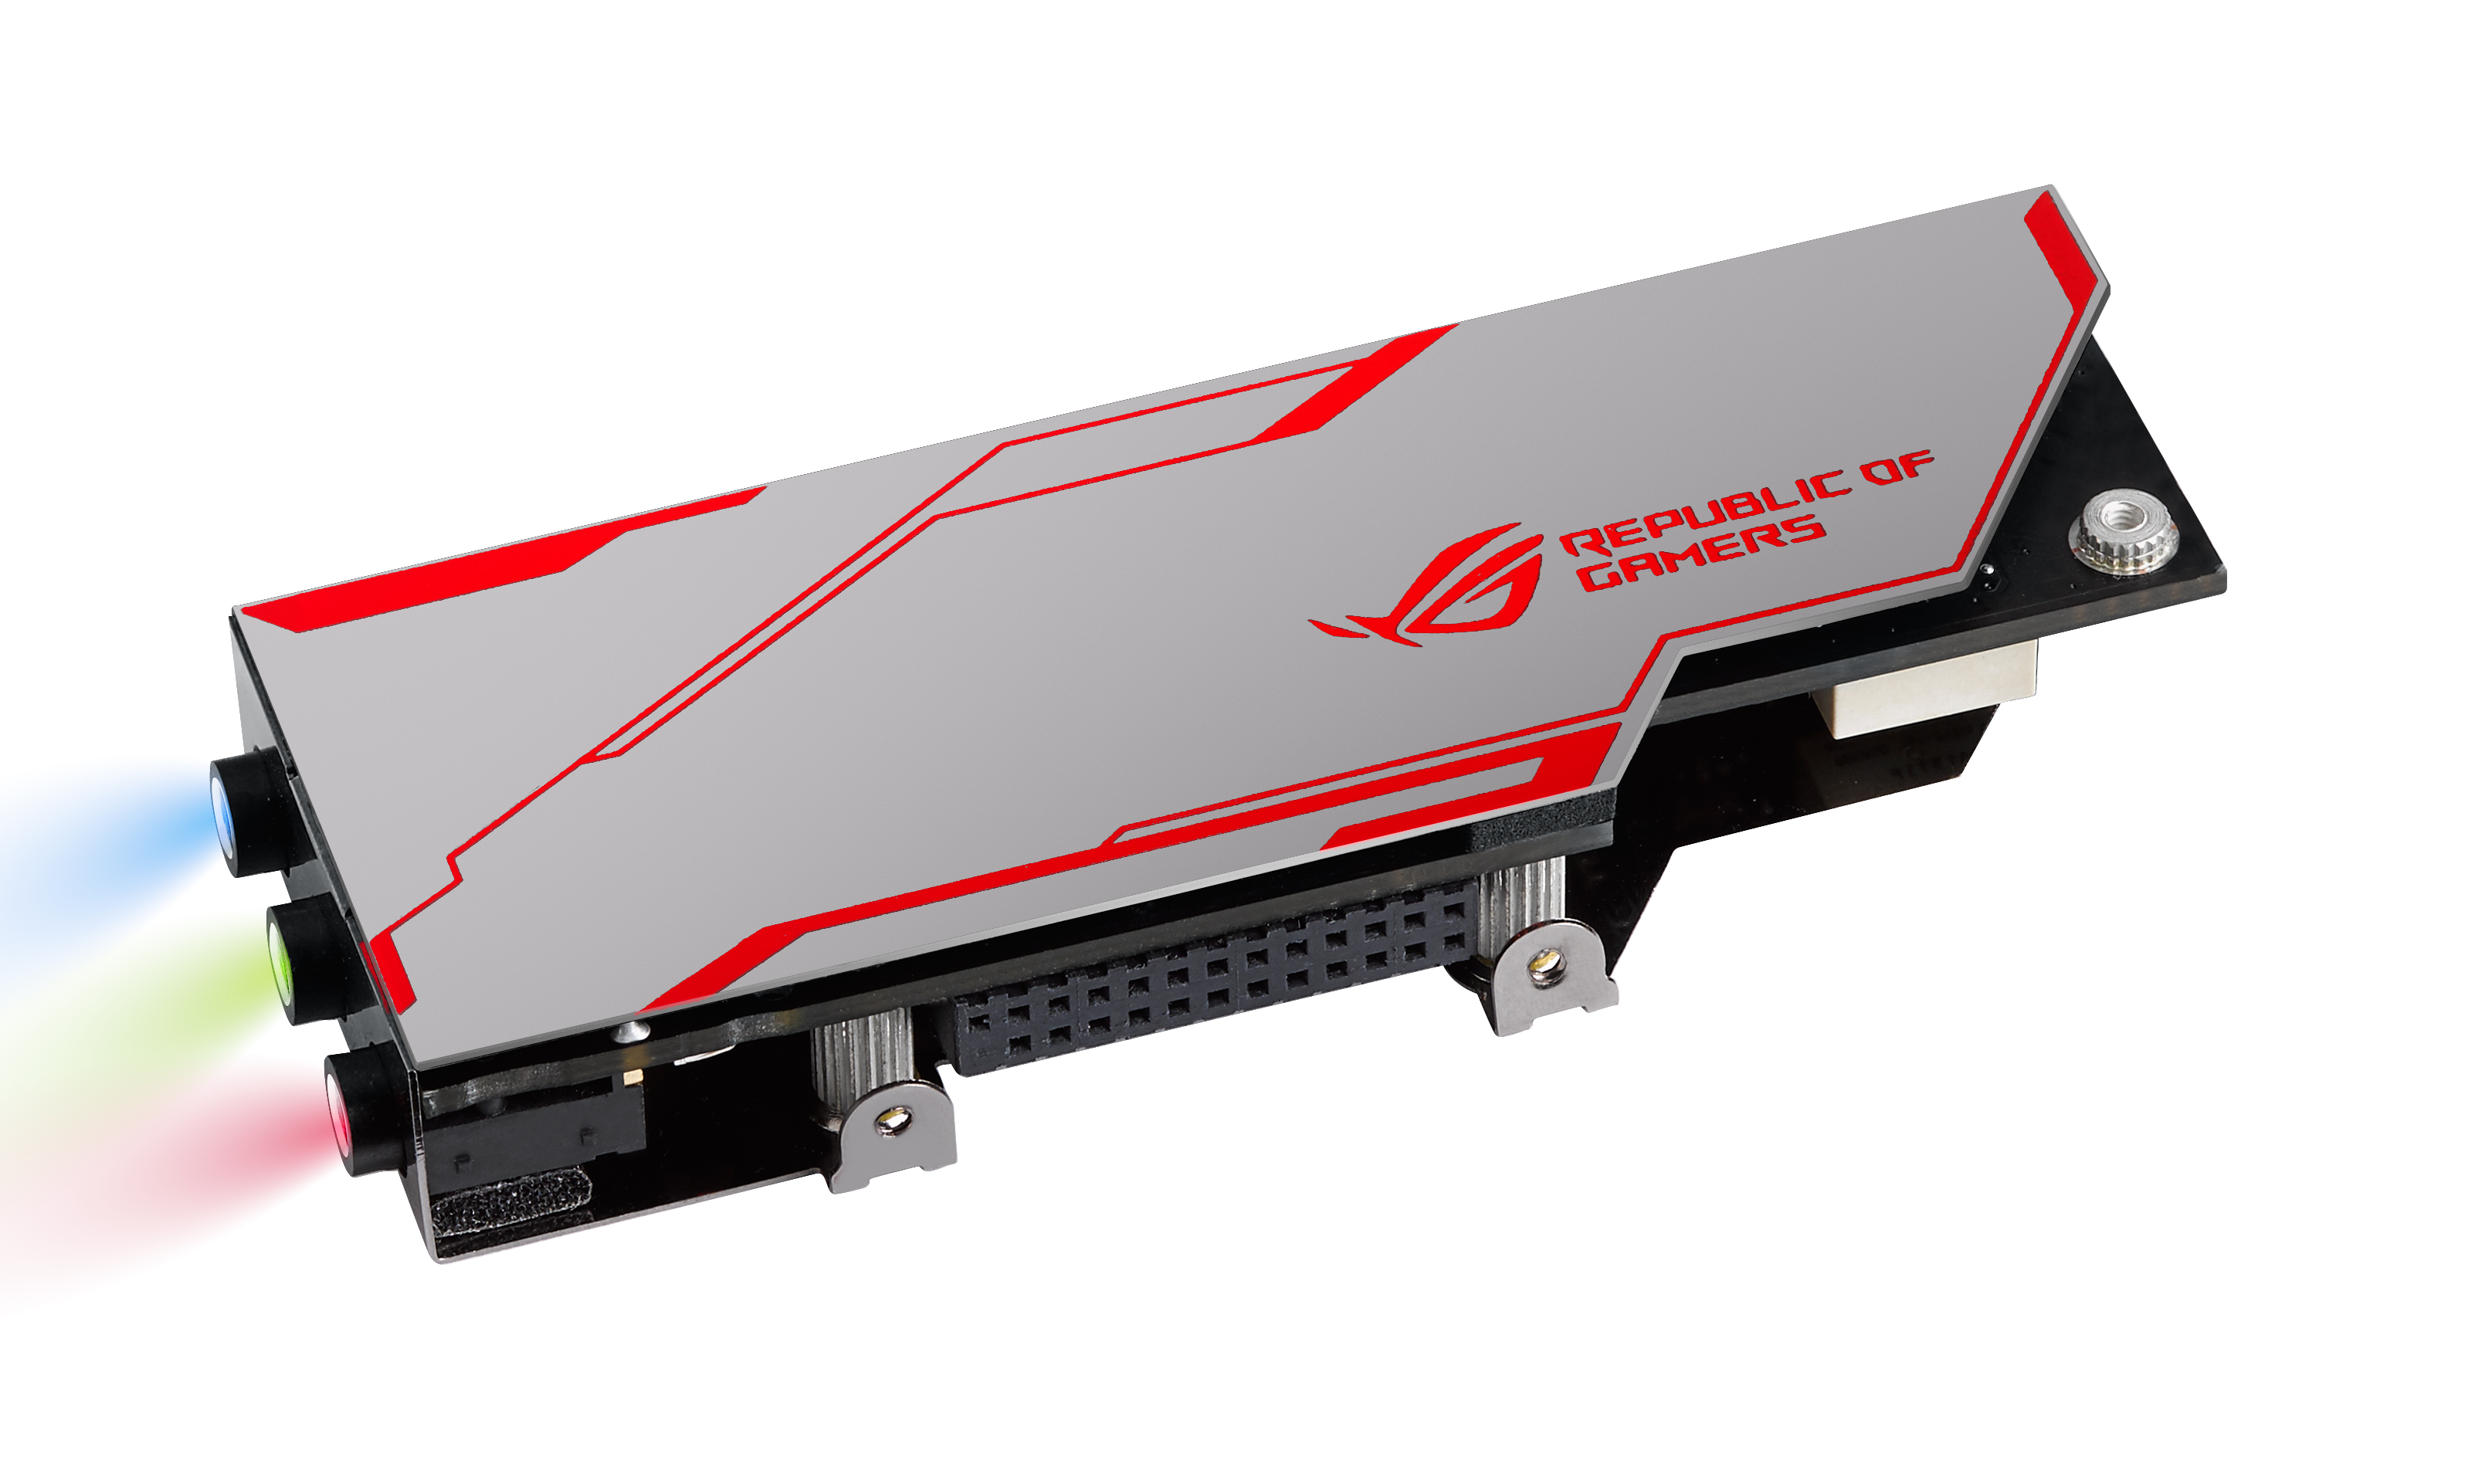
Underneath the U.2 port is another of ASUS' add-ins, the SupremeFX audio solution that uses a fully separate PCB to help improve audio clarity, typically because mini-ITX motherboards due to their size are historically electrically noisy. With this iteration of SupremeFX we get a full surround electromagnetic shield which also aids with any cooling, but also the ports on the rear are LED enabled making it easier to see which port is which in the dark.
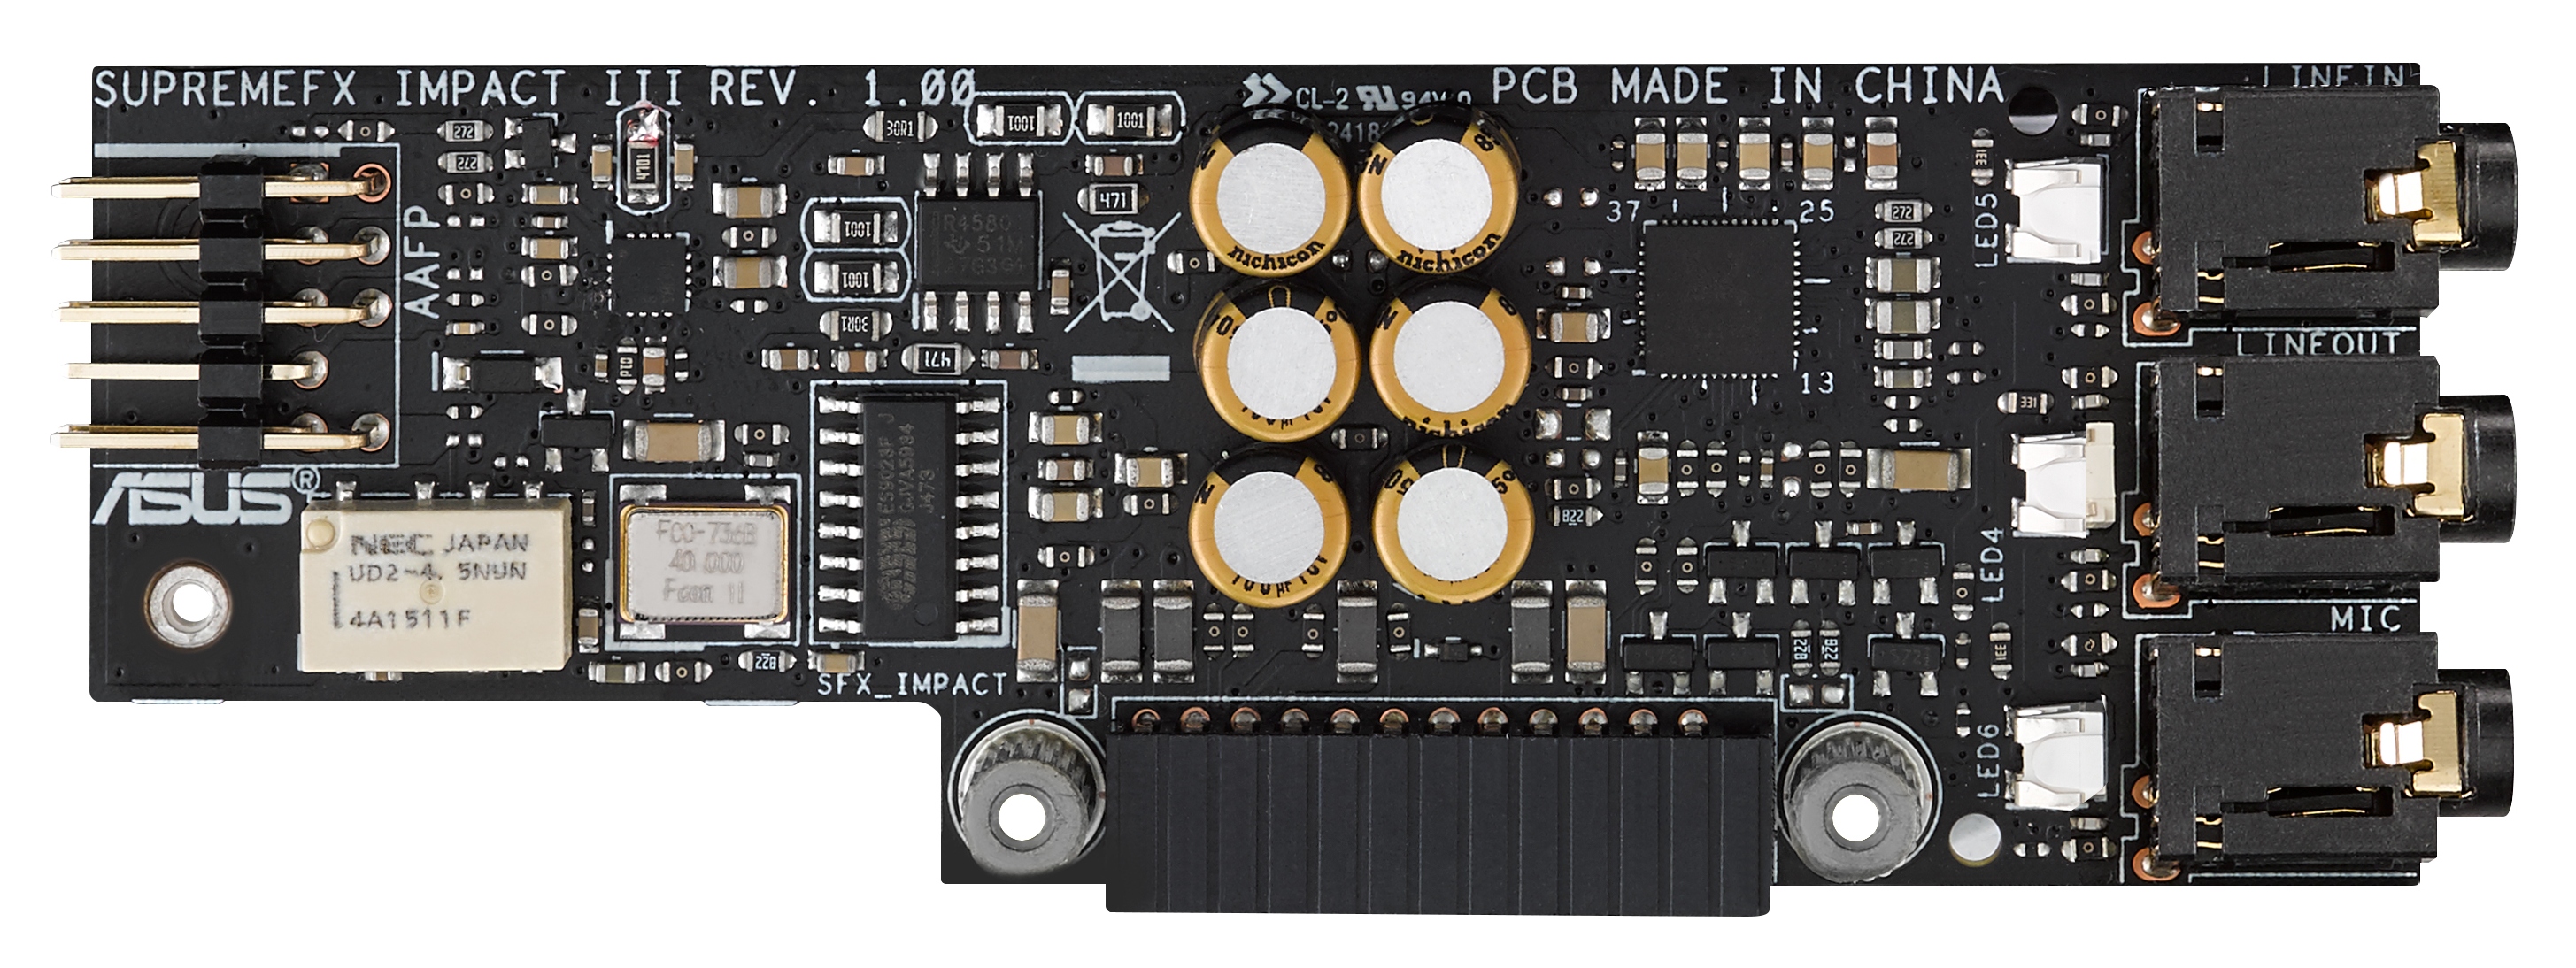
Underneath the audio solution is another interesting addition - an Intel Alpine Ridge controller. This is one of the two main controllers for USB 3.1 functionality on 100-series motherboards, and here it gives a single type-A and a single type-C on the rear of the motherboard. Nominally the Alpine Ridge controller can be verified for HDMI 2.0 and Thunderbolt 3 through USB Type-C, but I am told that the Impact will not be validated in this manner.

On the rear panel, aside from the USB 3.1, the audio jacks and the space for the U.2 port we also have the Intel I219-V network port, a HDMI port, USB 3.0 ports, and the 2x2 dual band 802.11ac wireless module, which is actually a Qualcomm implementation that supports MU-MIMO. We also get Impact Control, another PCH which holds the power/reset buttons alongside a two-digit debug display, an ROG Connect button and the USB Flashback button.


Test Setup
| Test Setup | |
| Processor | Intel Core i7-6700K (ES, Retail Stepping), 91W, $350 4 Cores, 8 Threads, 4.0 GHz (4.2 GHz Turbo) |
| Motherboards | ASUS Maximus VIII Impact (Z170) |
| Cooling | Cooler Master Nepton 140XL |
| Power Supply | OCZ 1250W Gold ZX Series Corsair AX1200i Platinum PSU |
| Memory | Corsair DDR4-2133 C15 2x8 GB 1.2V or G.Skill Ripjaws 4 DDR4-2133 C15 2x8 GB 1.2V |
| Memory Settings | JEDEC @ 2133 |
| Video Cards | ASUS GTX 980 Strix 4GB MSI GTX 770 Lightning 2GB (1150/1202 Boost) ASUS R7 240 2GB |
| Hard Drive | Crucial MX200 1TB |
| Optical Drive | LG GH22NS50 |
| Case | Open Test Bed |
| Operating System | Windows 7 64-bit SP1 |
Readers of our motherboard review section will have noted the trend in modern motherboards to implement a form of MultiCore Enhancement / Acceleration / Turbo (read our report here) on their motherboards. This does several things, including better benchmark results at stock settings (not entirely needed if overclocking is an end-user goal) at the expense of heat and temperature. It also gives in essence an automatic overclock which may be against what the user wants. Our testing methodology is ‘out-of-the-box’, with the latest public BIOS installed and XMP enabled, and thus subject to the whims of this feature. It is ultimately up to the motherboard manufacturer to take this risk – and manufacturers taking risks in the setup is something they do on every product (think C-state settings, USB priority, DPC Latency / monitoring priority, overriding memory sub-timings at JEDEC). Processor speed change is part of that risk, and ultimately if no overclocking is planned, some motherboards will affect how fast that shiny new processor goes and can be an important factor in the system build.
For reference, the ASUS Maximus VIII Impact Z170 ROG, on our testing BIOS 1101, MCT was enabled by default. Also, the FCLK 10x ratio was present in the BIOS tested at the time of testing.
Many thanks to...
We must thank the following companies for kindly providing hardware for our test bed:
Thank you to AMD for providing us with the R9 290X 4GB GPUs.
Thank you to ASUS for providing us with GTX 980 Strix GPUs and the R7 240 DDR3 GPU.
Thank you to ASRock and ASUS for providing us with some IO testing kit.
Thank you to Cooler Master for providing us with Nepton 140XL CLCs.
Thank you to Corsair for providing us with an AX1200i PSU.
Thank you to Crucial for providing us with MX200 SSDs.
Thank you to G.Skill and Corsair for providing us with memory.
Thank you to MSI for providing us with the GTX 770 Lightning GPUs.
Thank you to OCZ for providing us with PSUs.
Thank you to Rosewill for providing us with PSUs and RK-9100 keyboards.
ASUS Maximus VIII Impact Z170 ROG BIOS
For users well accustomed to BIOS layout, it makes sense when a company uses the same basic libraries throughout their product stack. It makes sense for time and development, and there can be some leeway in customization for different types of products. So this is what I mean when I say that users who are familiar with ASUS’ main line of motherboards (the -Pro, the -A, the -Deluxe and other) will also understand what goes on with ROG. There are differences, and the first two to notice are the color scheme moving red but also that the BIOS enters straight into advanced mode, bypassing EZ mode.

But let us step back a bit, and move to EZ mode. For users who want to deal only in EZ mode, there is a setting which forces it as the default BIOS entry point.
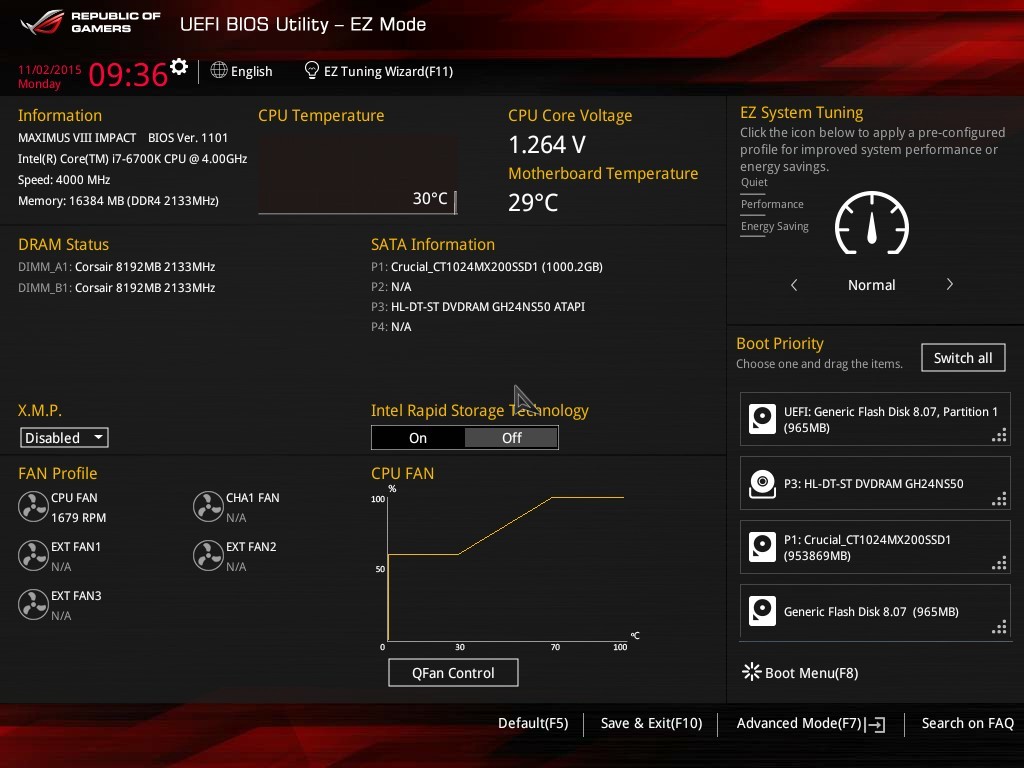
Similar to other EZ modes we have seen from ASUS, this one gives details on the motherboard name, the BIOS version, the CPU installed, the speed of the CPU, the amount of memory installed, a graph of CPU temperature over time (useful if you’ve ever forgot to plug in the CPU fan… oops), the CPU voltage, the motherboard chipset temperature the speed the memory is running at, a per-DRAM slot label of what memory is installed, a per-SATA port label of what drives are installed, a quick button for XMP, a quick button for RST, a per-fan rundown of fan speeds, a diagram of the fan power control for the CPU fan, a quick button to customize the fan profiles, an EZ system tuning list for quick updating, and a boot priority list. Pretty much 90% of what you want a motherboard for, especially if you are the family computer guy fixing it and it is hidden in a pile of dust.
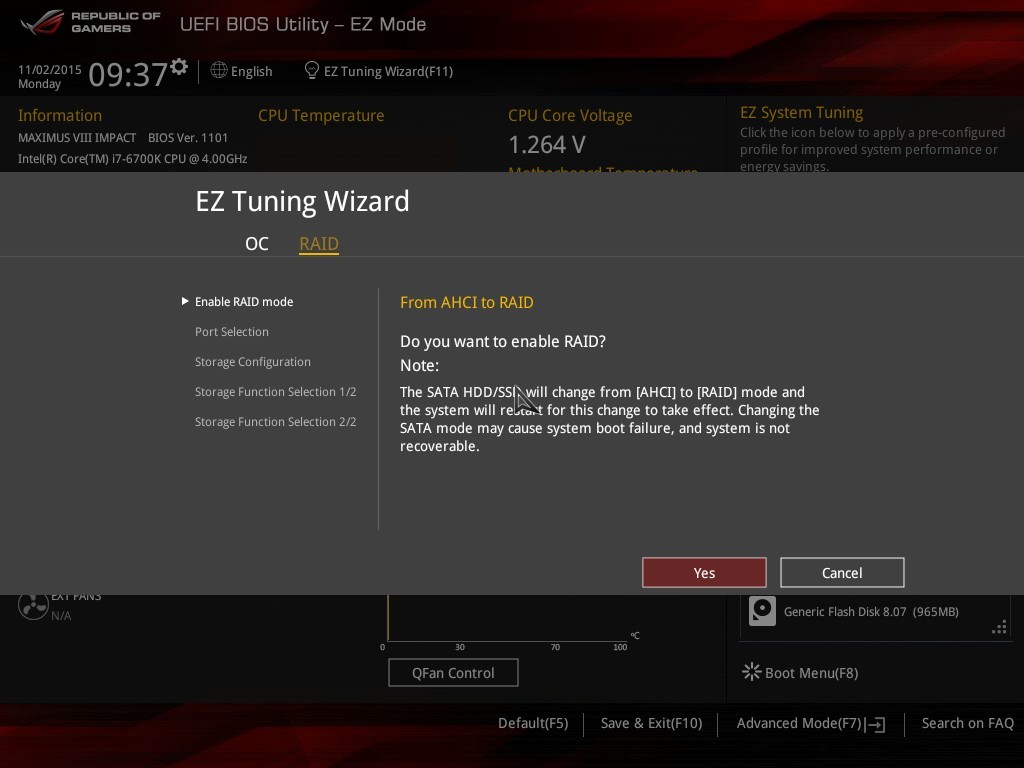
Pressing F11 brings up the EZ Tuning Wizard to help users get some basic overclocking and RAID controls.
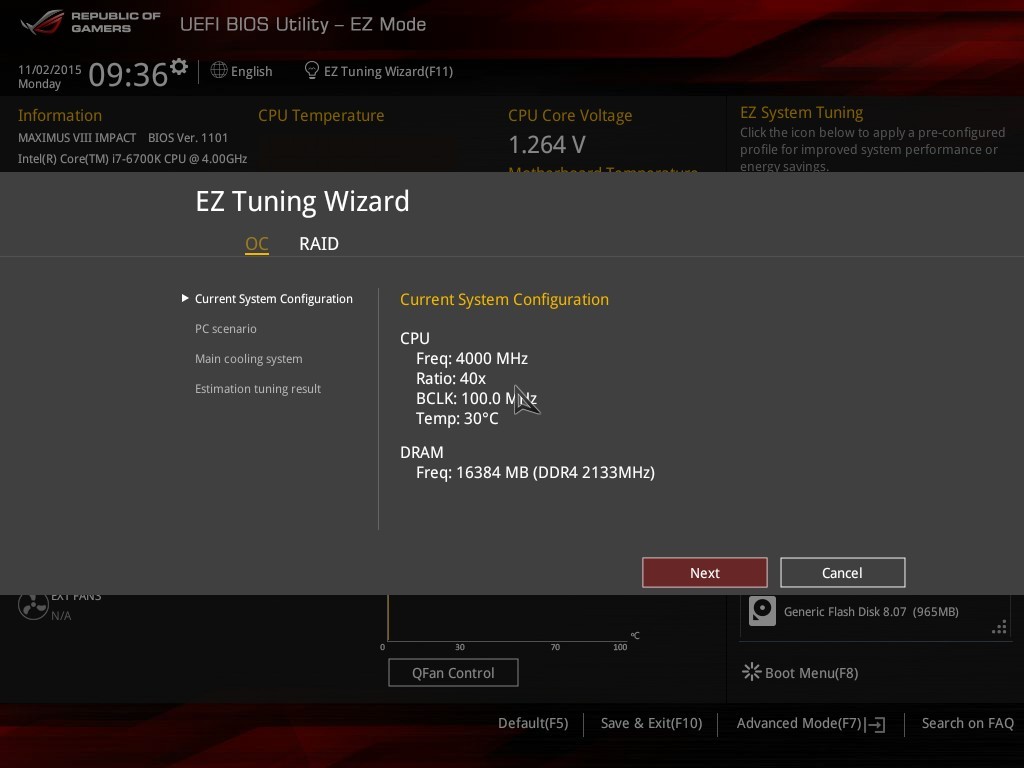
The EZ Wizard asks a couple of questions, such as what the system is used for (gaming or daily tasks/media consumption), what cooling is installed (stock cooler, tower cooler, liquid cooling, unknown), and then uses a lookup table and attempts to apply a sufficient overclock. It beats many ‘set it and see’ overclocking tools on other motherboards purely on user experience, even if results are similar.
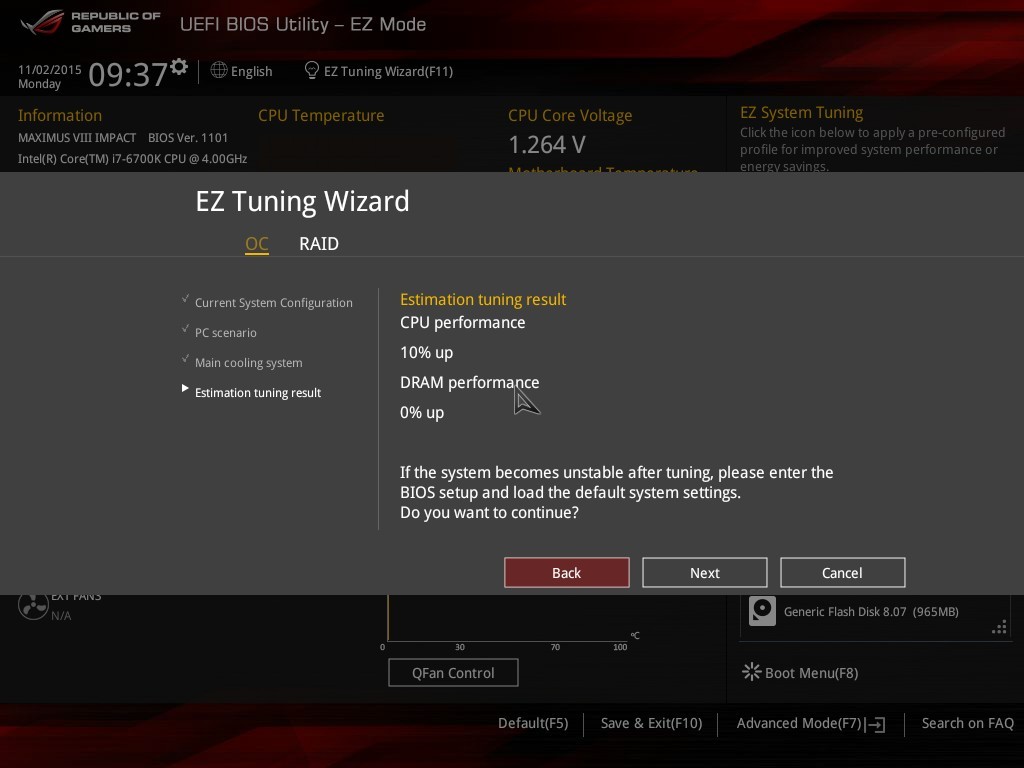
Here for example I chose Daily Computing with a Stock Cooler, and it offered a 10% overclock for the i7-6700K (moving from 4.0 GHz to 4.4 GHz) and no chance in the DRAM (DDR4-2133), then asked to enable it.
For the EZ RAID option, this makes the task of implementing RST on Intel configured RAID ports easier by providing a step-by-step guide.
Also on the EZ Mode page we have access to quick fan controls under Q-Fan:

The system will allow each fan to be configured either by PWM or DC controls where possible, and offers four presets (standard, silent, turbo, full speed) as well as manual control of a multi-point fan gradient. On the left hand side is the ‘Optimize All’ option, which provides per-fan tuning.
Moving back into Advanced Mode, and similar to previous motherboards ASUS is offering a My Favorites menu to allow users who have specific settings they want to tweak (typically overclockers), then options can be added here. For the Z170 platform, ASUS is now pre-filling the My Favorites menu with a number of options they feel are best suited for overclocking, such as core ratios, base frequency, DRAM multiplier, voltages and power options.

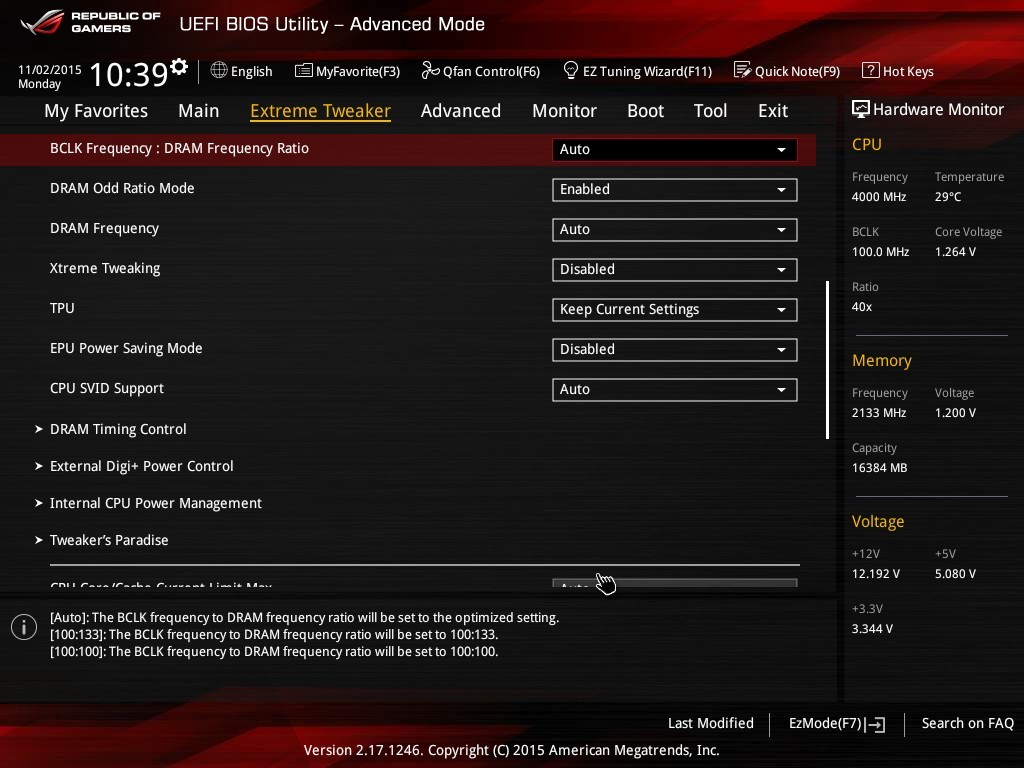
For the main glut of overclocking options though, the Extreme Tweaker menu has them all.
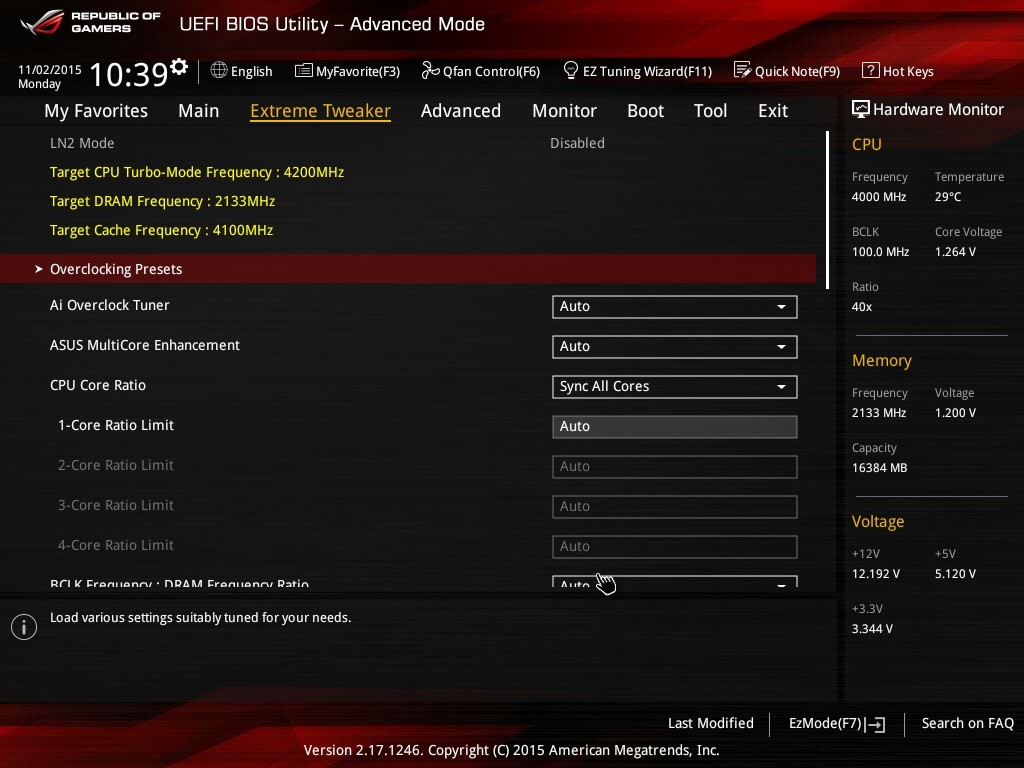
A wider range of CPU overclocking options are exposed on this first set of screens, with additional menu options for DRAM, power management and ‘extreme tweaking’. For users with the LN2 header enabled, more obscure options are also offered. However, the first option at the top is relatively interesting as a set of overclocking presets:
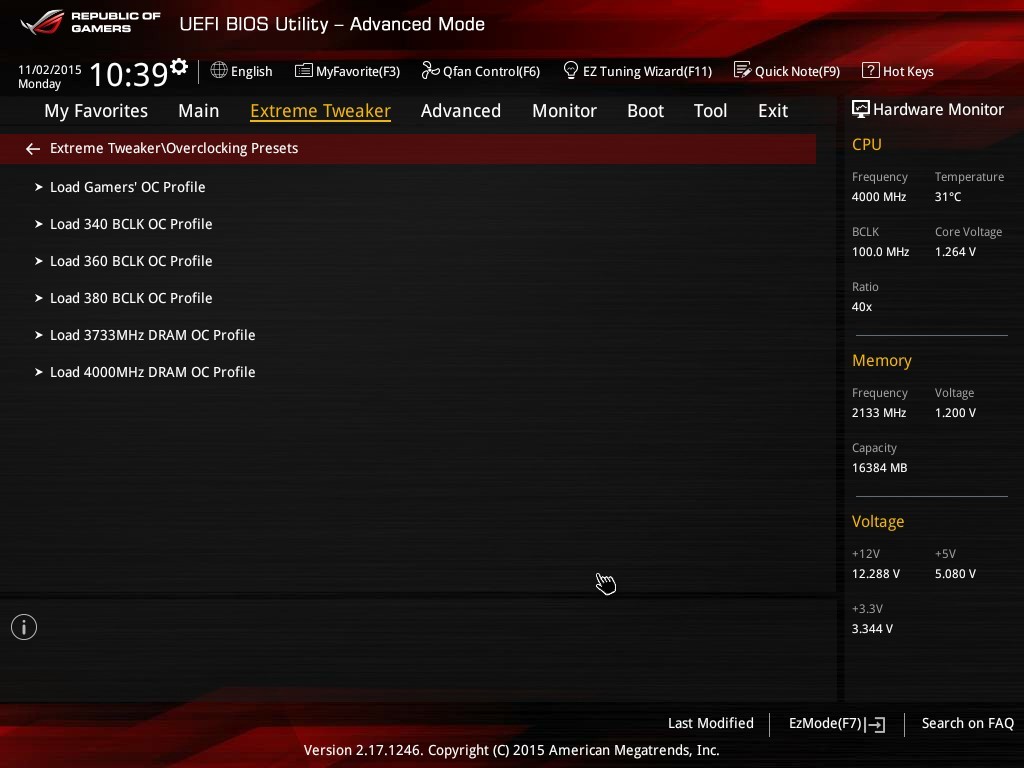
The majority of these are for extreme overclockers, but the Gamers’ OC profile is one we have tested in the OC section (along with the TPU options). The Gamers’ OC gives a 48/47/46/45 multiplier overclock with 1.425 volts set in the BIOS with LLC at Level 7. On our test bed with our #3 CPU, this passed our tests.
Similarly in the DRAM section, we also get a list of presets for extreme overclocking:
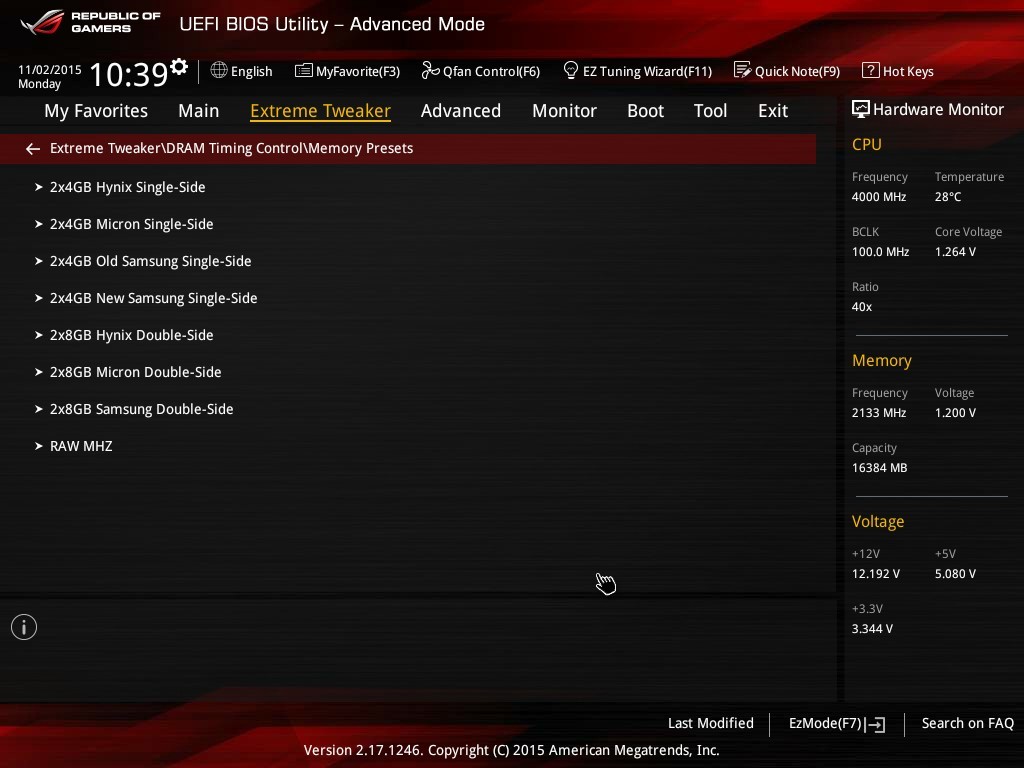
Most of these require knowledge into the memory you have, and are typically used by those close to ASUS’ in-house overclocking team.

Moving away from overclocking, and the Advanced menu holds most of the typical motherboard options for enabling/disabling controllers, organizing storage controls, C-states and USB configuration. I think the best bit about this is the SMART information screen.
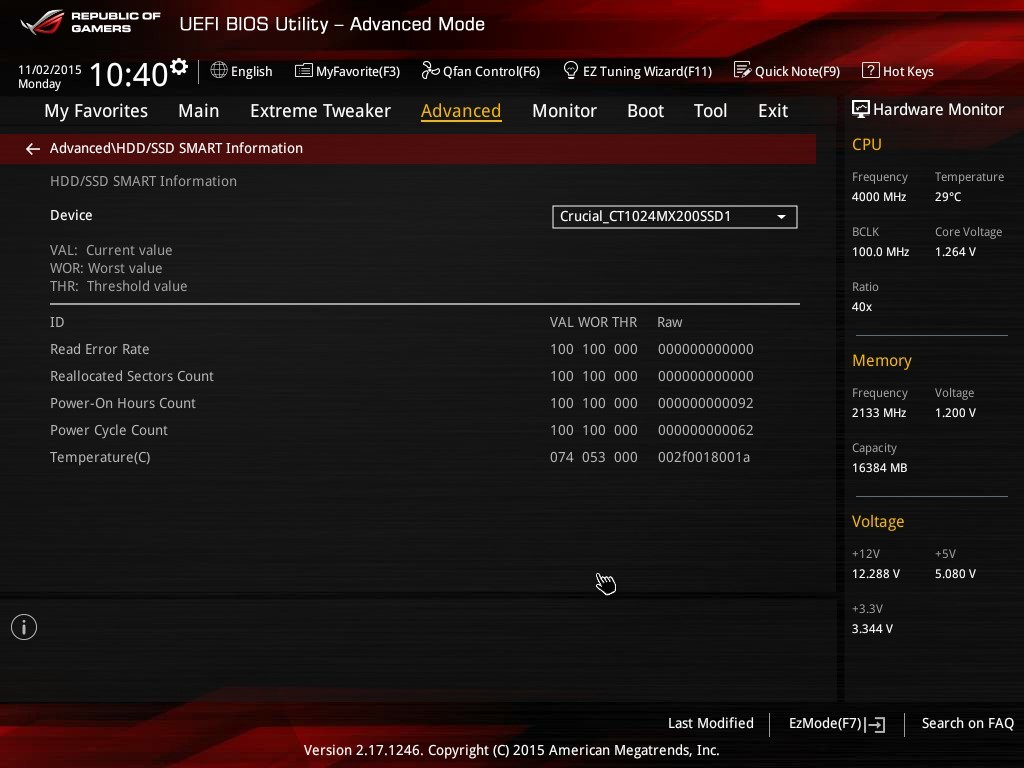
Similar to OS tools to read SMART data, here we get information about power-on hours, power cycles and drive temperature. This sort of information tool is slowly moving into BIOSes of all the manufacturers, which is a good thing to see.
Next up in the BIOS is the monitoring tools, which also doubles as the place for manual fan controls without the graph.
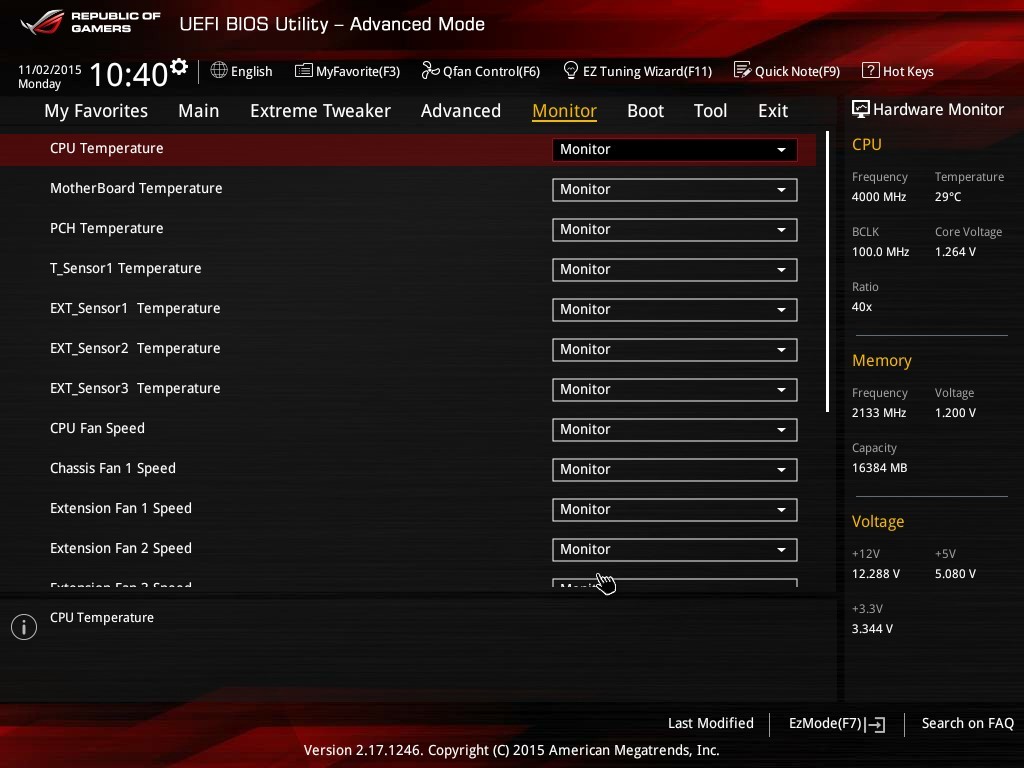
As the Impact has several additional temperature sensor headers onboard for additional thermistors, these can be added and configured here as well.
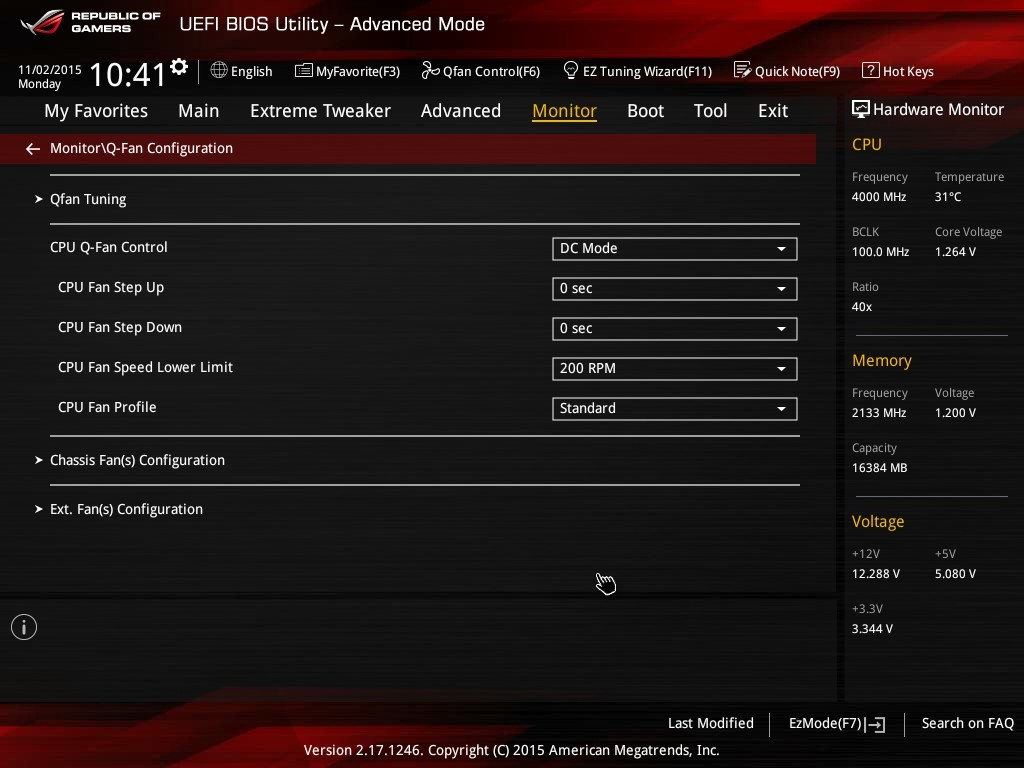
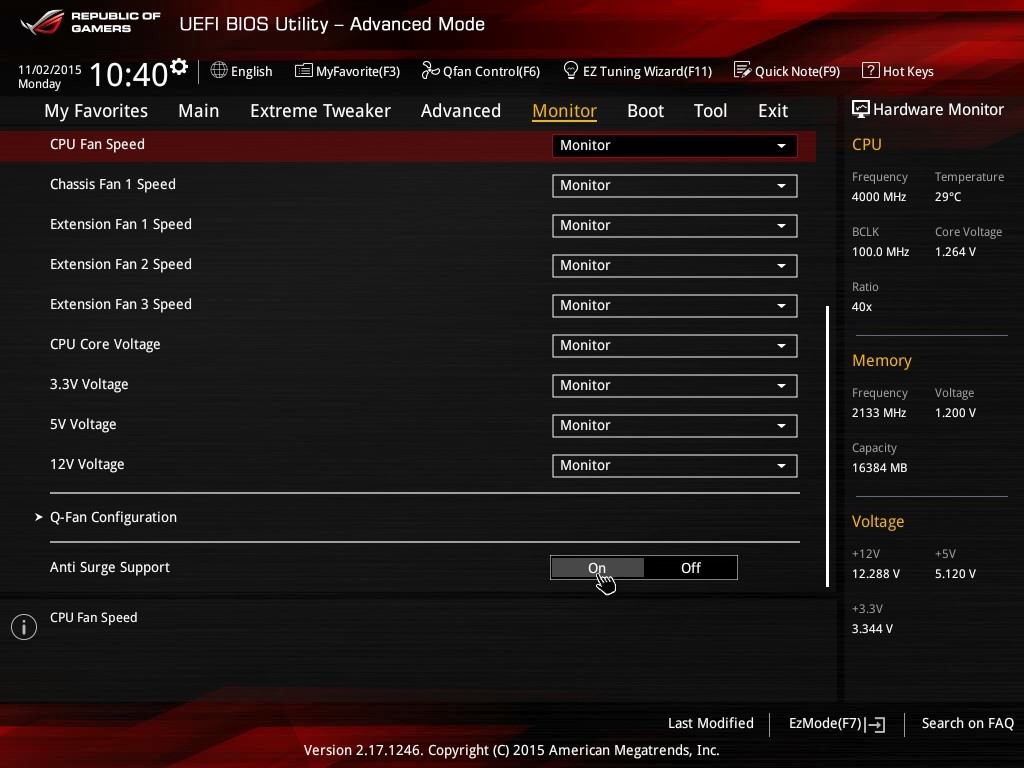
The Q-Fan control in text looks similar to other fan control software, and allows for separate fan header adjustment in DC or PWM mode.
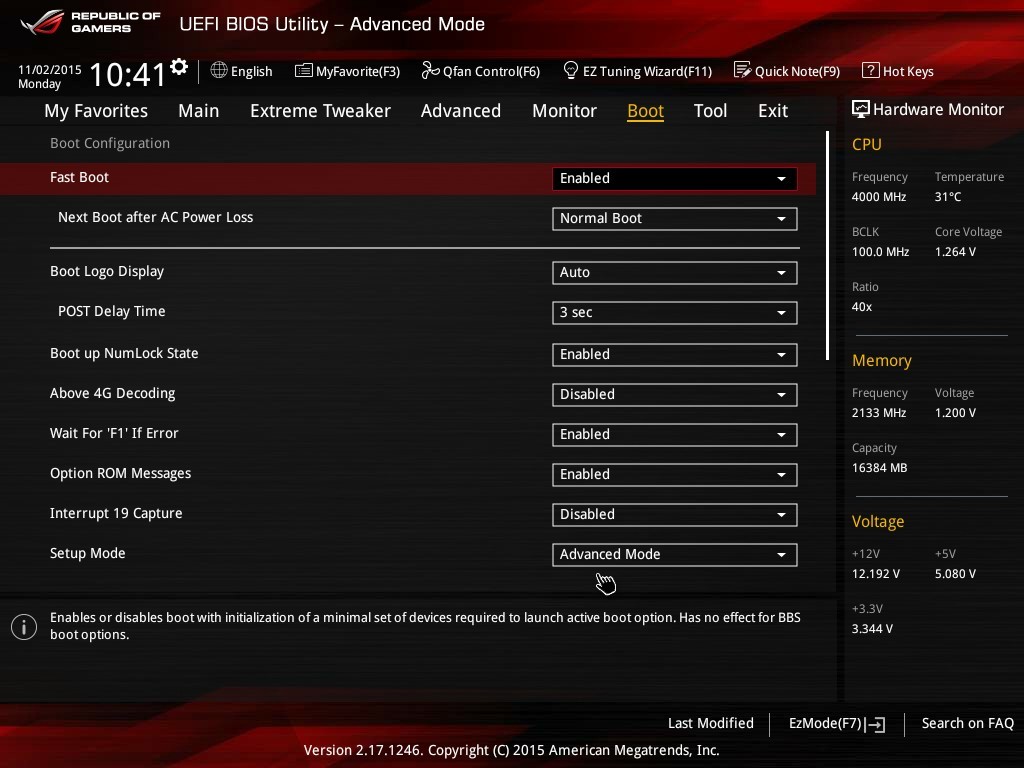
Boot override and CSM controls are found in the Boot Menu, which also has the option for Above 4G Decoding if anyone wants to pair the motherboard with a MIC.

The last set of features for the BIOS are in the Tool menu.

ASUS has updated its EZ Flash tool to generation 3, allowing it to also probe an online server for an updated BIOS version, which is similar to what ASRock does. Secure Erase still features in the ROG BIOSes, as well as overclocking profiles, SPD information and GPU information. The thing missing from ASUS’ repertoire is a Board Explorer mode, similar to what ASRock and MSI have, which shows a diagram of the motherboard and what is installed in each port. As a method of showing if certain DRAM modules are not detected, or SATA drives not found, it provides a good user experience for most users (though one could argue that the various lists around the BIOS already do this, though they are not currently in one place).


ASUS Maximus VIII Impact Z170 ROG Software
The software tools from ASUS, similar to the BIOS, come in two flavors. A base blue contains the majority of features that a wide portion of users might decide suits their needs, but the ROG platform adds in a few specific extras (some of which are externally licensed with an ROG theme). The main interface is still AI Suite featuring ‘Dual Intelligent Processors 5’, with a few more satellite software programs to complement the standard functionality.
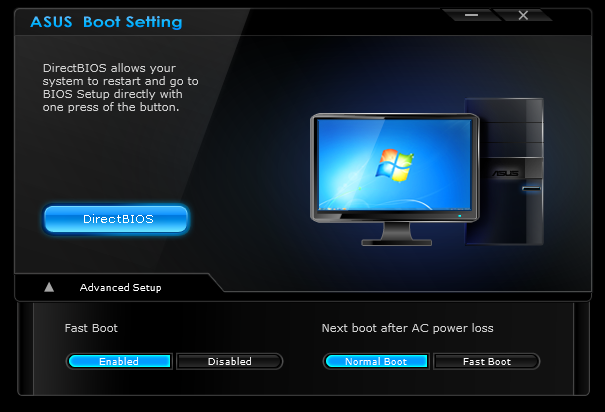
First up is Boot Setting, a small app I use quite a lot for one main reason – the DirectBIOS button. For any users taking advantage of AHCI fast booting, this button is how you instantly reset the machine and reboot into the BIOS to make changes. As a hardware reviewer, I tend to fiddle with the BIOS a fair bit, especially when overclock testing, to a tool like this is great. That being said, once a system is up and running, it rarely gets used again.
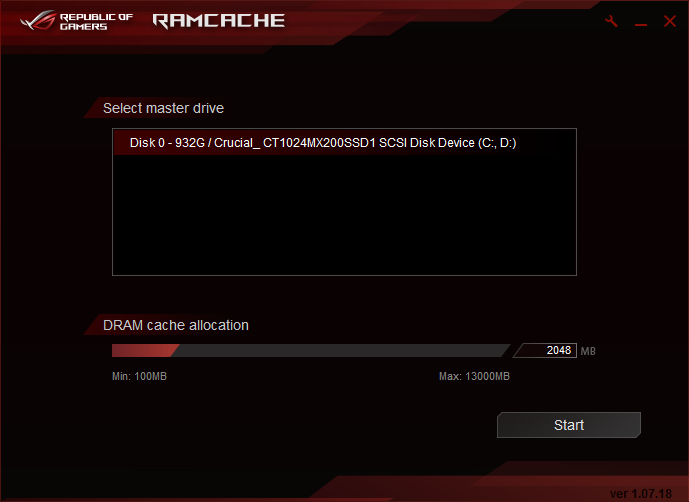
New on the scene for ROG is RAMCache, which is different to RAMDisk (see below). The RAMCache tool is similar to the tools we’ve seen on certain brands of SSD software – earmark up to a quarter of the DRAM to act as a fast storage cache which then flushes out to the SSD in a non-time critical manner. In theory, great – it worked fine in our little test scenario, although the benefits over a regular SSD are minimal so it is more aimed at HDDs. The downside is write commits if the system fails. If you have data in the cache and power is lost, or the system dumps garbage at you requiring a hard reset, the data in the cache may be lost - such as that save game you have been working on. The best way for ASUS to expand this is to offer more options – how long data should reside in the cache before being write committed to the drive, or for certain programs/files to bypass the cache completely and write immediately.

RAMDisk is the other side of the equation, especially if you have more RAM than you can shake a stick at (don’t start shaking sticks at sheep, I’m not to be held liable for injuries obtained). Here we can allocate a portion of the memory available as a drive to use when the machine is in action. This is handy in some scenarios, such as migrating a non-critical virtual machine or batching media to be processed. Similarly with the RAMDisk, data is lost if the machine loses power.

As part of the SupremeFX audio package, we also get Sonic Studio software, which acts as a ‘smart EQ’ for gaming that can focus on certain sounds for audio output. Similar to MSI’s Nahimic, this is a glorified EQ adjuster, although without the song and dance (or licensing fees) and it still allows you to have manual EQ settings if you want.
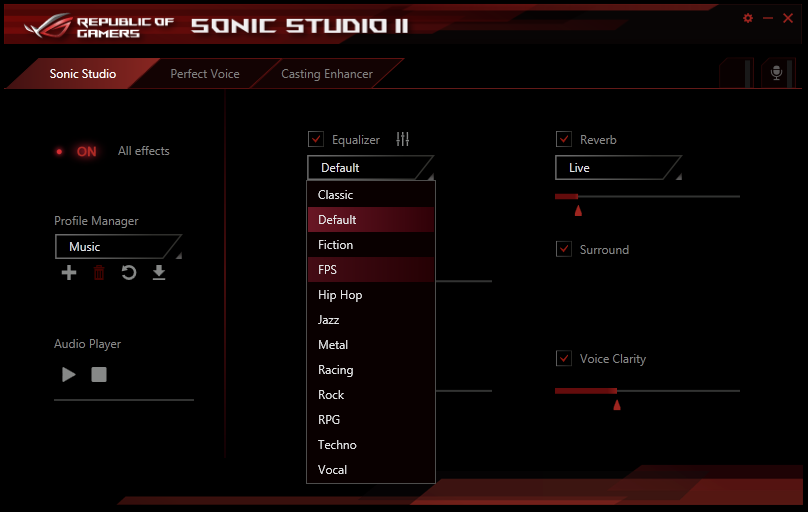
There are settings for different game types, as well as a microphone input/output adjuster and tools to help with audio when streaming.

As part of the ROG package, ASUS also licenses CPU-Z with a custom skin. This is a tool used by overclockers to verify what processor is being used in a system, as well as the speed, the memory, and other functionality. By using a ROG skin, the idea is that when overclocking world records are made and promoted using the ROG skinned CPU-Z, there’s a subtle mental link in there between the brand and the performance.
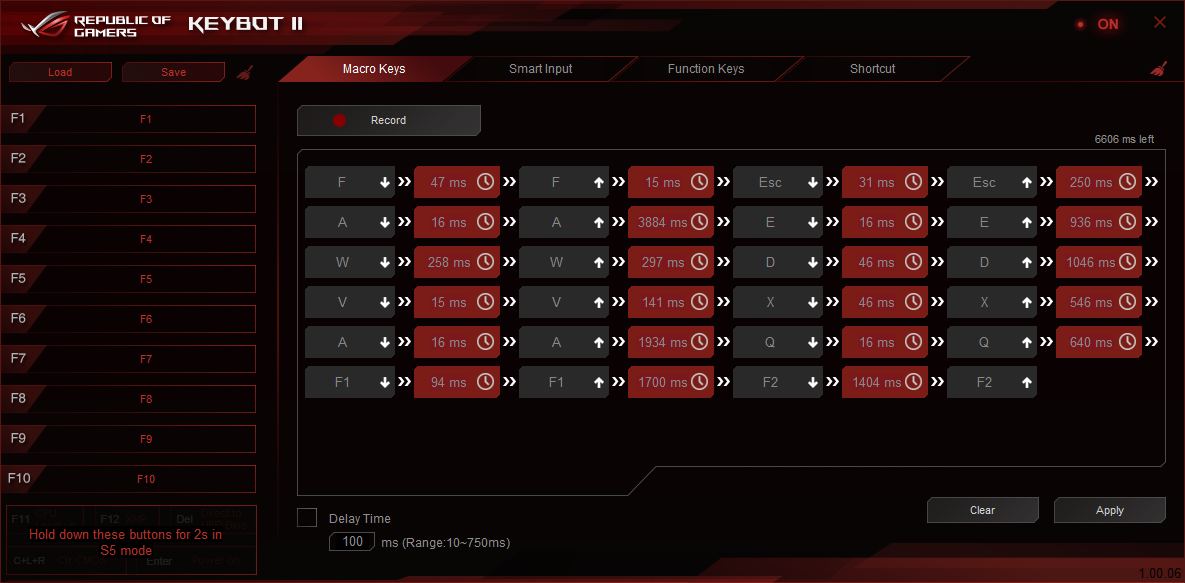
Keybot is ASUS’ in-house macro tool to allow gamers to predefine a series of keyboard commands (with appropriate delays) to enhance their gaming performance and/or experience. The tool can also be used to map certain programs to keys, or other things such as volume/playback. As a macro tool, it falls under the simplistic heading, only because making a full-on macro tool such as AutoHotKey requires a team and a million more options/commands to choose from. But it works for the intended purpose.
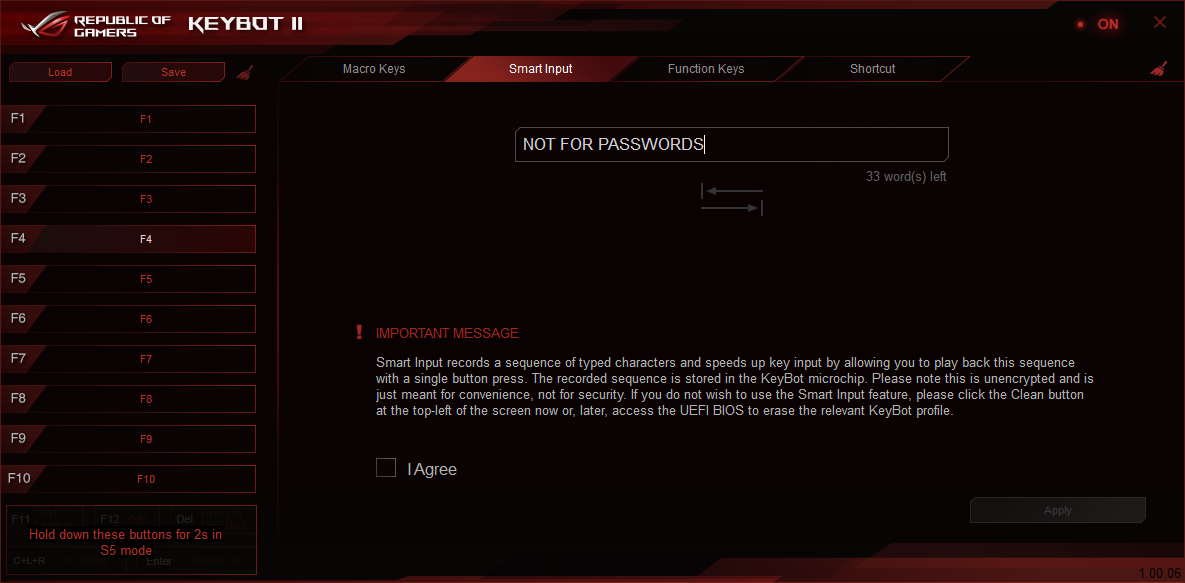
Keybot offers a hardware saved ‘Smart Input’ script, that can be called regardless of the OS or setting of the hardware. This can be interesting for users who want a quick string of characters that can be applied anywhere, although it is worth noting that the text is not stored encrypted, so ASUS recommends against using it for passwords.

For memory sub-timing adjustments, the MemTweakIt tool from previous ROG generations is updated for Skylake and also included in the software suite.
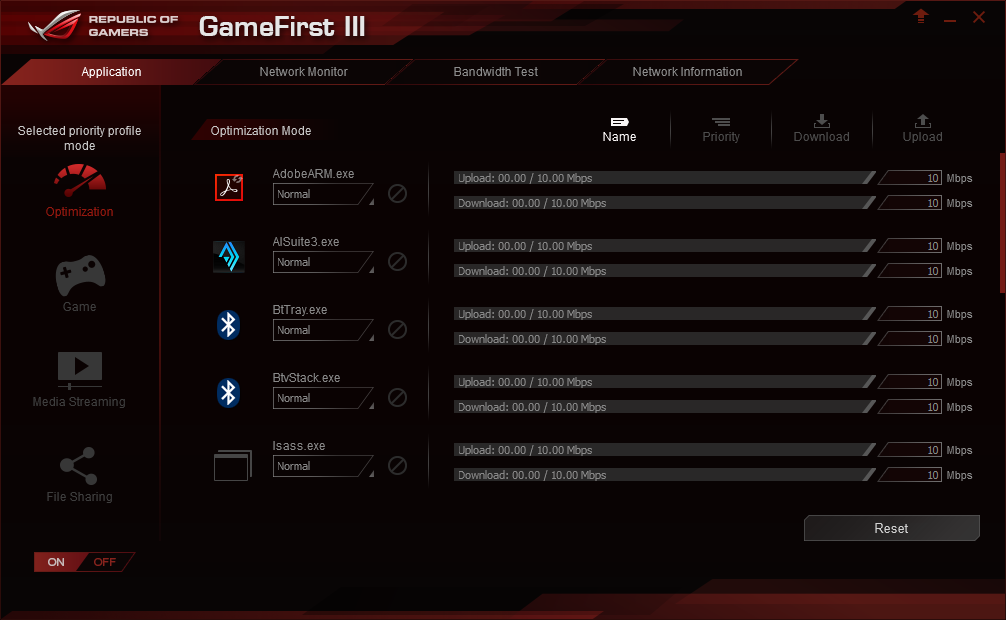
For networking, ASUS offers the ROG line with GameFirst III, an in-house custom networking tool for prioritization. This tool allows users to promote which data streams (such as gaming and VOIP) over others (such as windows updates or downloads) and maintain latency when multiple things are happening at once – at the expense of some CPU overhead and power. ASUS does this with the Intel networking, which provides some control similar to cFos seen on other motherboards, but arguably less control than something like Killer which also uses hardware controls to accelerate some features. Pretty much every networking software program has issues with user experience too, with little optimization in terms of style or handling except for those dedicated to network prioritization. There’s also the extra problem if someone else on the network is chewing up the data, which cannot be solved by simple motherboard software.
AI Suite 3
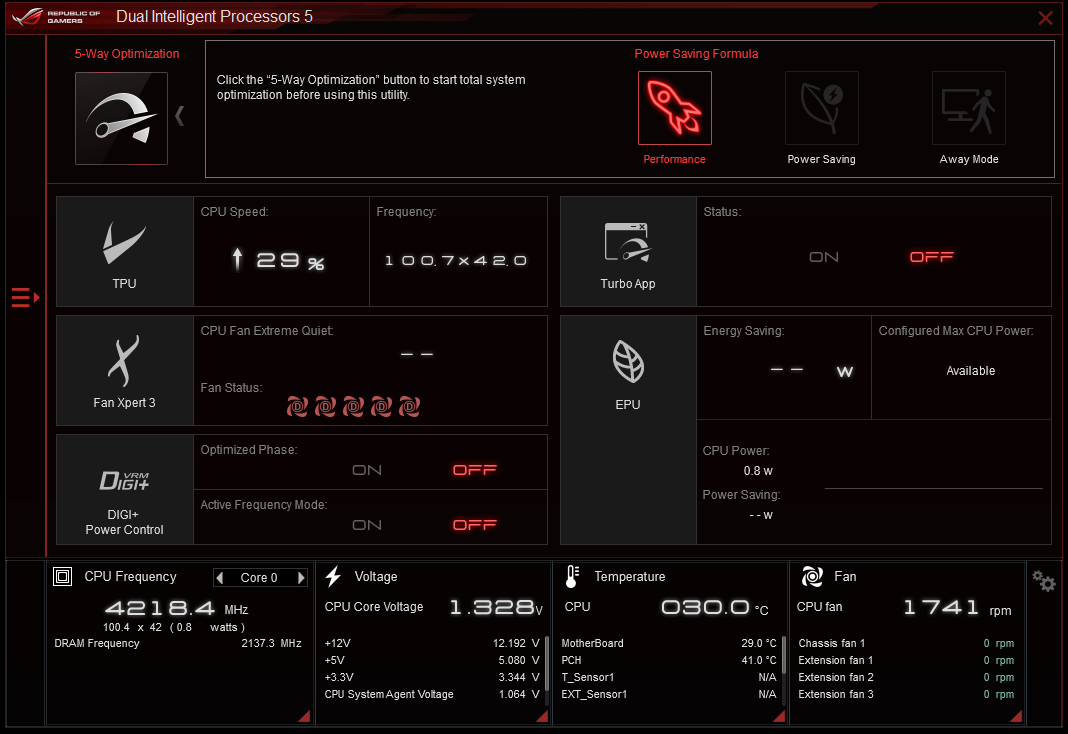
Finally we move on to AI Suite 3, which for the most part contains the software tools we’ve written about many times before. The front page is part of ASUS’ Dual Intelligent Processor program, version five. The two intelligent processors are the TPU (Turbo Processing Unit) and the EPU (Energy Processing Unit) which are separate ICs on board to help control both overclocking and power use. These two options are mixed with three other modes (Fan Xpert 3, DIGI+ Power, and Turbo App) for the five apps listed above.
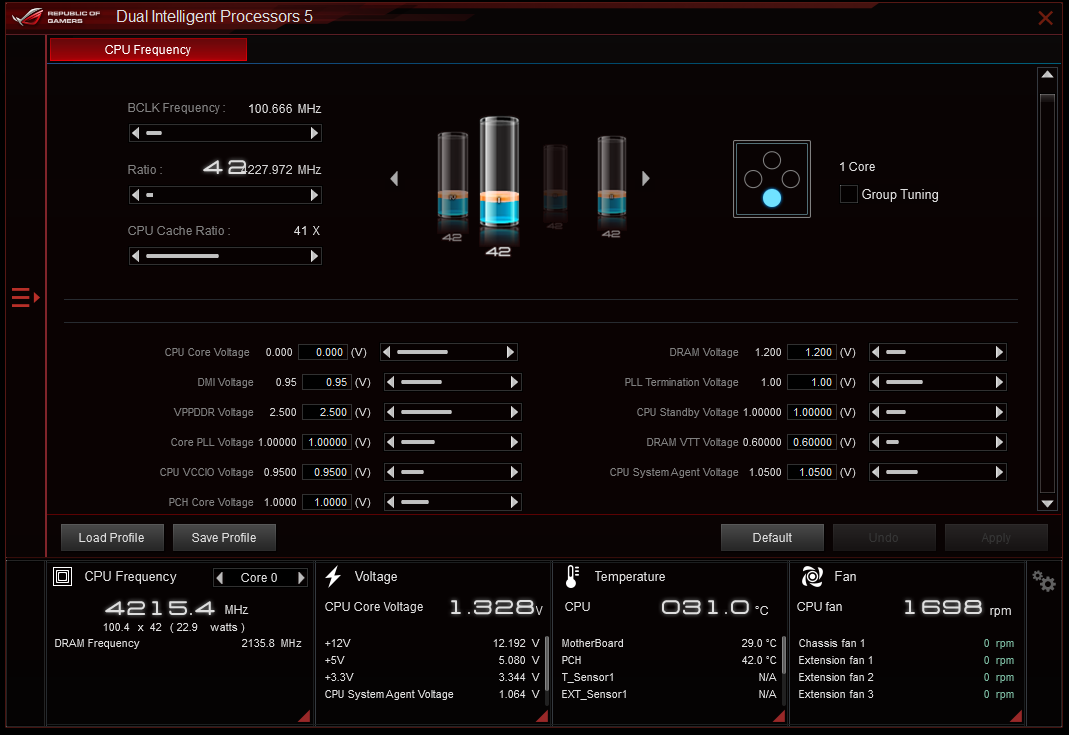
The TPU menu offers the usual array of voltages and per-core overclocking. In generations past we saw graphs showing how the voltage responded to load and could adjust the load-line calibration to compensate, but unfortunately this sems to have regressed here.
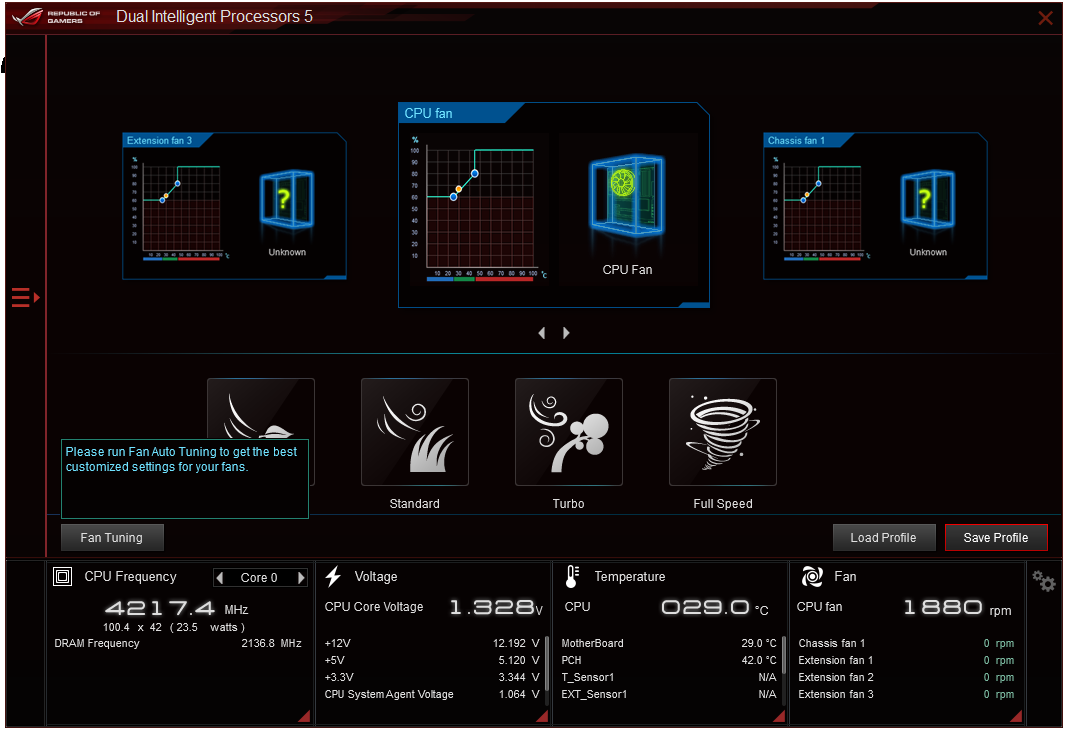
The Fan Expert tools are similar to those we saw in the BIOS under Q-Fan, with the fan tuning mode also present. One difference in the software here is the result screen when the tuning is finished:
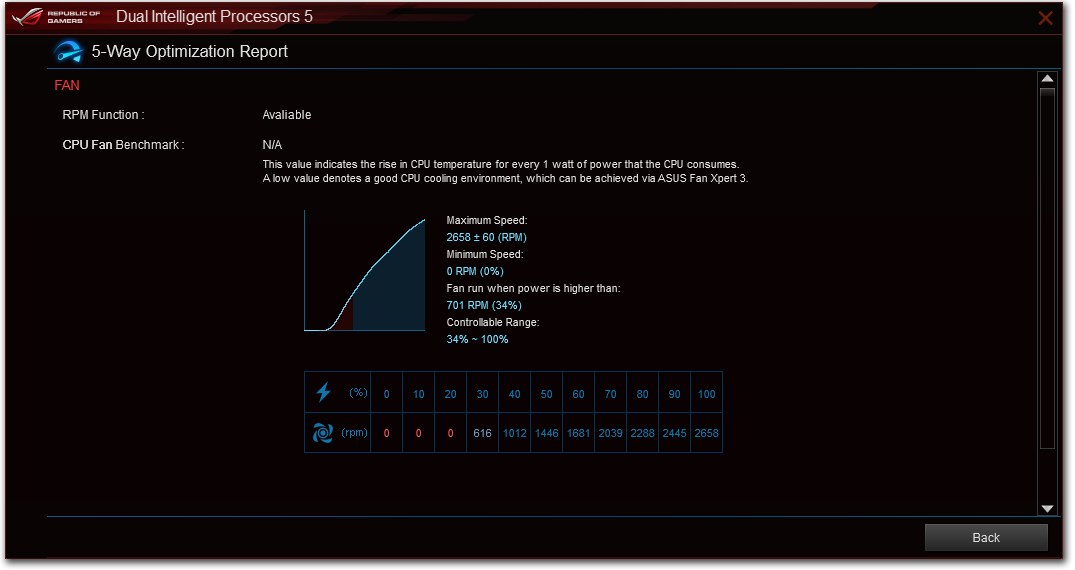
Here is the result of my CPU fan, showing a dead zone below 20% power and a non-linear response in the controllable range. This shows the disparity between fan speed and applied fan power which still needs to be addressed across the motherboard industry.
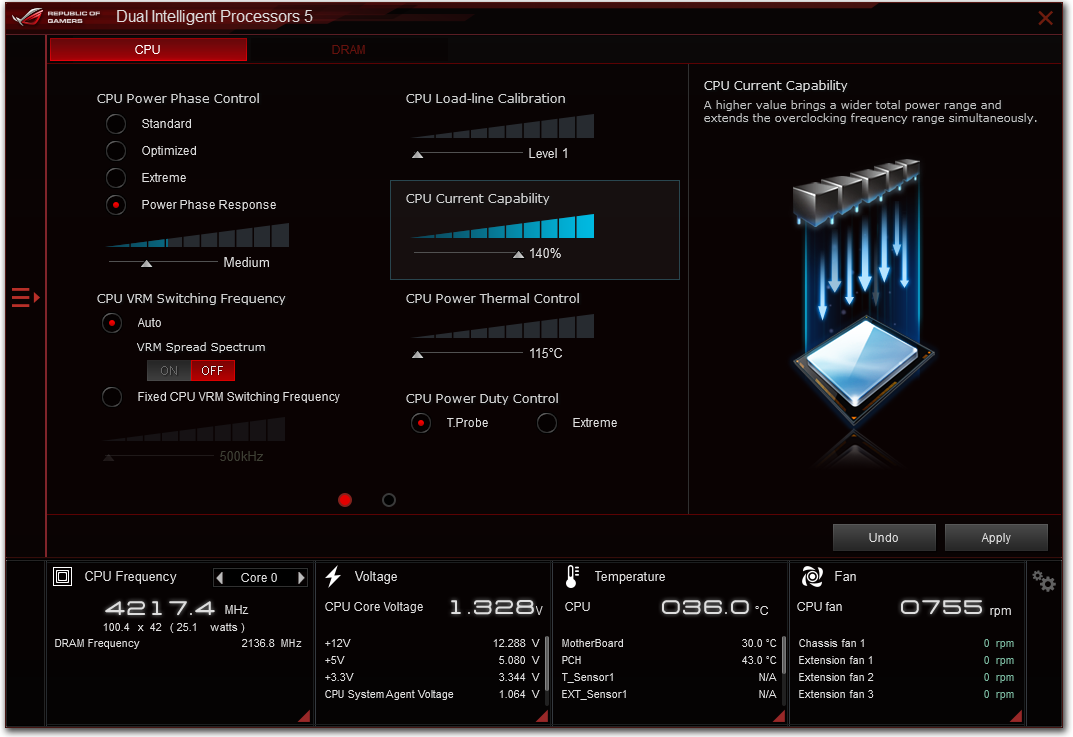
Also from the AI3 front page are the DIGI+ Power controls, giving options to extend power phase limits, response times, load line calibration and temperature limits. Most of these are usually untouched by the majority of users, but are given for those who might have an odd piece of silicon in the socket that behaves a little differently.
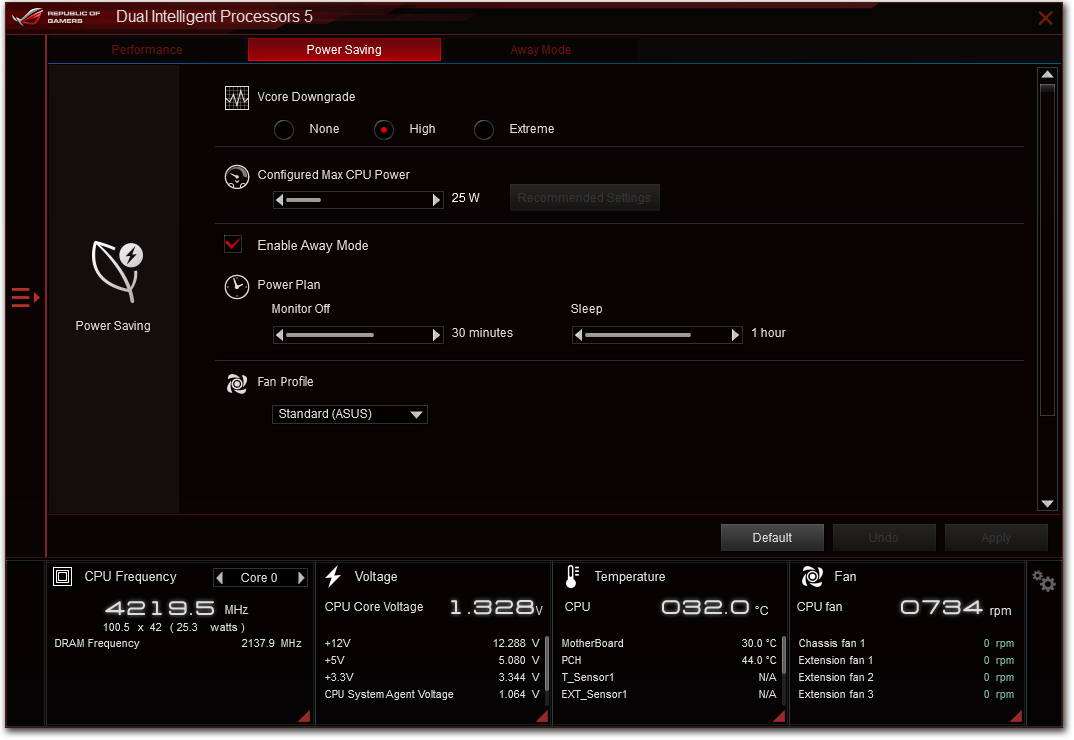
The EPU option is a way for the system to configure different power modes, with the idea of saving energy by running in a more efficient state when latency is not a factor. In this case, when the user is idle, the EPU will attempt to limit the CPU power to 25W and reduce the voltage/fan profiles to do so.
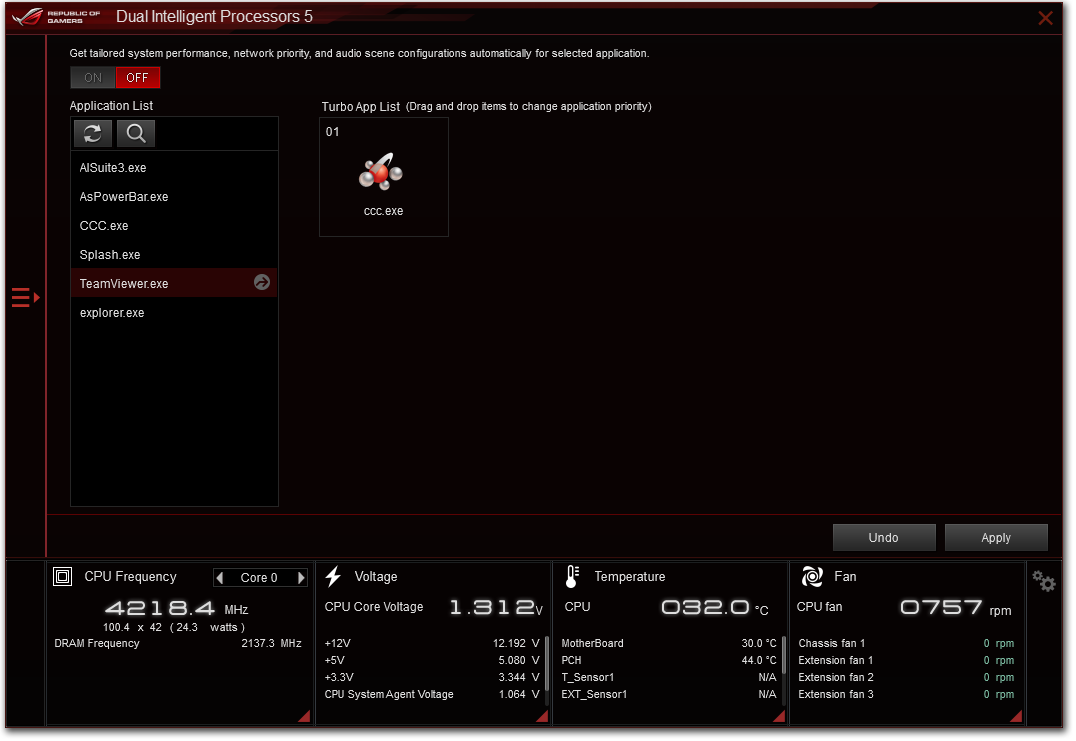
The last stage is Turbo App, which allows the user to configure certain overclocks or LAN prioritization modes to various applications and then rank them in a priority list.
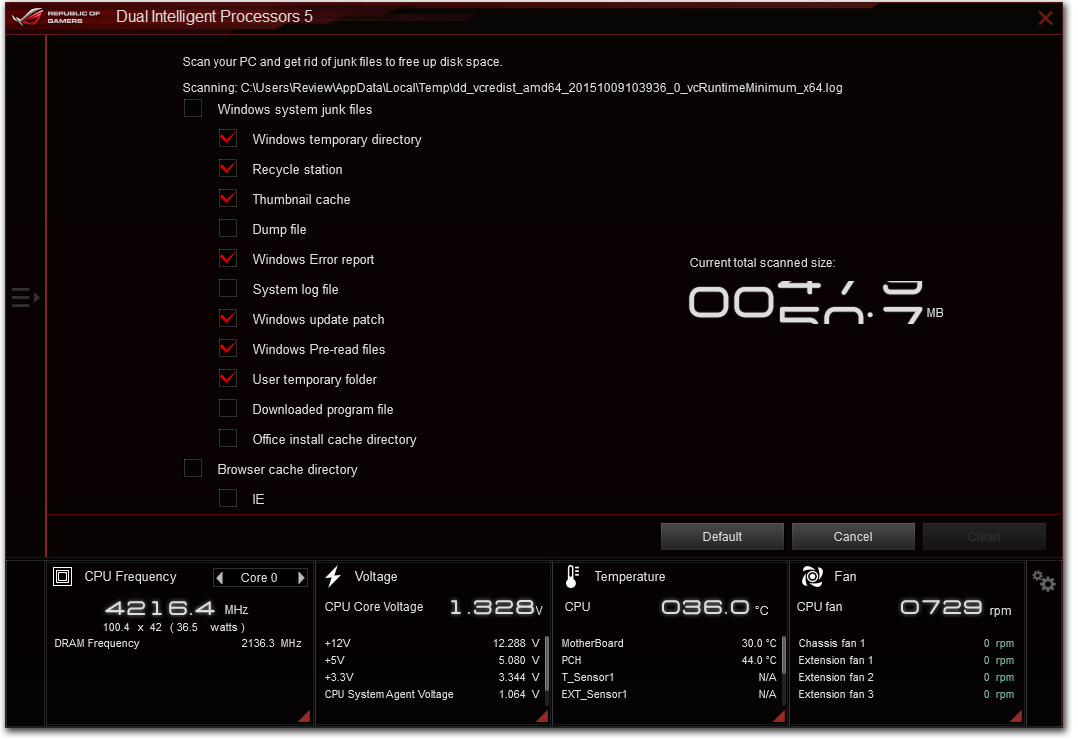
New to the ASUS software package is a temporary file remover called Free Space. With a preset list of directories that typically harbor temporary files or caches, the system will look through the ones selected and let the user know how much space can be saved. The software can then delete these files to save space. This is similar to freeware software I already use on most of my rigs called CCleaner, which has been in the industry for many years and works quite well, as it also probes the registry, offers a mass uninstall feature, and also has a data security overwrite mode (overwrite a drive seven times to ensure data is destroyed). I’d suggest motherboard manufacturers organize a licensing deal with CCleaner if they really want to pursue this line of software.
Other software in AI Suite we have covered in previous reviews:
USB Boost: For suitable devices, implements a newer USB protocol to improve USB 3.0 and USB 3.1 speed.
System Information: Breakdown of the hardware specifications for motherboard, CPU and DRAM.
USB BIOS Flashback: Prepare a USB with a BIOS for updating, or save the current BIOS.


System Performance
Not all motherboards are created equal. On the face of it, they should all perform the same and differ only in the functionality they provide - however this is not the case. The obvious pointers are power consumption, but also the ability for the manufacturer to optimize USB speed, audio quality (based on audio codec), POST time and latency. This can come down to manufacturing process and prowess, so these are tested.
Power Consumption
Power consumption was tested on the system while in a single MSI GTX 770 Lightning GPU configuration with a wall meter connected to the OCZ 1250W power supply. This power supply is Gold rated, and as I am in the UK on a 230-240 V supply, leads to ~75% efficiency > 50W, and 90%+ efficiency at 250W, suitable for both idle and multi-GPU loading. This method of power reading allows us to compare the power management of the UEFI and the board to supply components with power under load, and includes typical PSU losses due to efficiency. These are the real world values that consumers may expect from a typical system (minus the monitor) using this motherboard.
While this method for power measurement may not be ideal, and you feel these numbers are not representative due to the high wattage power supply being used (we use the same PSU to remain consistent over a series of reviews, and the fact that some boards on our test bed get tested with three or four high powered GPUs), the important point to take away is the relationship between the numbers. These boards are all under the same conditions, and thus the differences between them should be easy to spot.
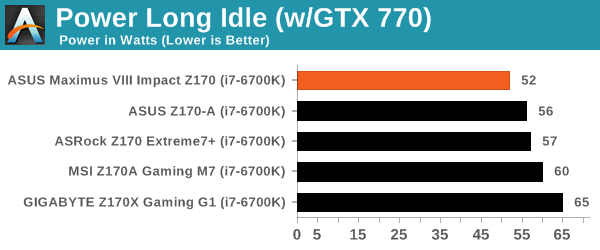
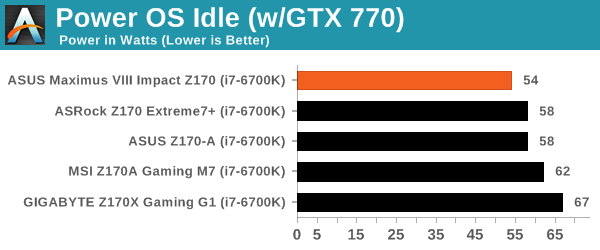
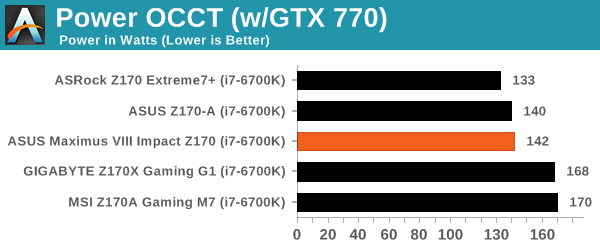
The Impact uses MultiCore Turbo, which typically increases the voltage at load to ensure a consistent top multiplier no matter what the loading is. The result of this increased performance is typically increased power consumption, and we’ve seen motherboards cause the i7-6700K CPU to consume 76W (from idle to OCCT load) up to 110W. With the Impact, perhaps due to its size, makes that delta only 90W, which isn’t as good as the non-MCT motherboards, but it currently the best MCT motherboard for power draw we’ve tested.
Non UEFI POST Time
Different motherboards have different POST sequences before an operating system is initialized. A lot of this is dependent on the board itself, and POST boot time is determined by the controllers on board (and the sequence of how those extras are organized). As part of our testing, we look at the POST Boot Time using a stopwatch. This is the time from pressing the ON button on the computer to when Windows 7 starts loading. (We discount Windows loading as it is highly variable given Windows specific features.)

Anything over 20 seconds for a mainstream motherboard is usually seen as odd, which is why question marks come over the Impact sitting at 22 seconds when the Maximus VIII Extreme (which is being tested) only needs 16.50 seconds.
Rightmark Audio Analyzer 6.2.5
Rightmark:AA indicates how well the sound system is built and isolated from electrical interference (either internally or externally). For this test we connect the Line Out to the Line In using a short six inch 3.5mm to 3.5mm high-quality jack, turn the OS speaker volume to 100%, and run the Rightmark default test suite at 192 kHz, 24-bit. The OS is tuned to 192 kHz/24-bit input and output, and the Line-In volume is adjusted until we have the best RMAA value in the mini-pretest. We look specifically at the Dynamic Range of the audio codec used on board, as well as the Total Harmonic Distortion + Noise.
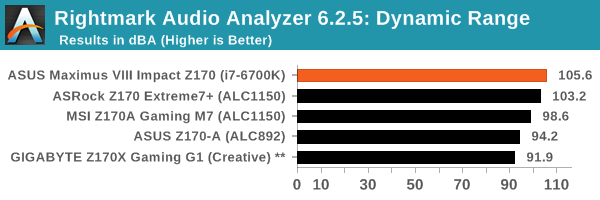
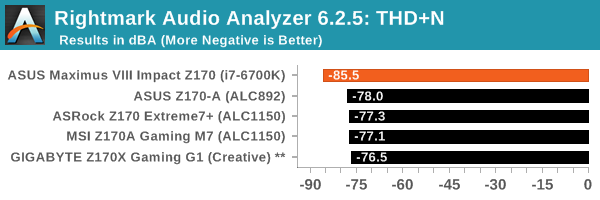
ASUS’ audio results in our test keep hitting high notes (pun intended), and the Impact is no different with a good SNR but also great distortion numbers.
USB Backup
For this benchmark, we transfer a set size of files from the SSD to the USB drive using DiskBench, which monitors the time taken to transfer. The files transferred are a 1.52 GB set of 2867 files across 320 folders – 95% of these files are small typical website files, and the rest (90% of the size) are small 30 second HD videos. In an update to pre-Z87 testing, we also run MaxCPU to load up one of the threads during the test which improves general performance up to 15% by causing all the internal pathways to run at full speed.
Due to the introduction of USB 3.1, as of June 2015 we are adjusting our test to use a dual mSATA USB 3.1 Type-C device which should be capable of saturating both USB 3.0 and USB 3.1 connections. We still use the same data set as before, but now use the new device. Results are shown as seconds taken to complete the data transfer.
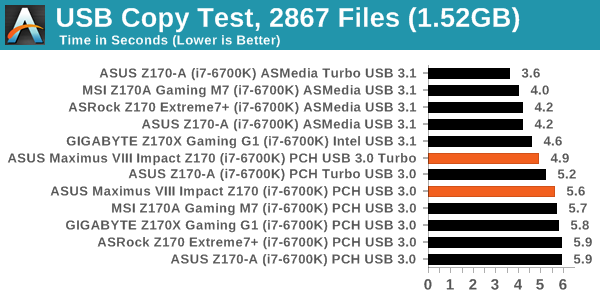
The USB 3.0 performance for the Impact was good to take top spot in our non-Turbo testing, but we had issues on the Impact testing the Alpine Ridge controller in USB 3.1 mode, as well as either mode using the Boost software. The test would end quickly, but say all the data is transferred and yet the drive is still working, showing that reporting the complete transfer is happening before the data is committed. Thus always make sure the drive is finished before removing! It also means we can’t run our tests properly.
DPC Latency
Deferred Procedure Call latency is a way in which Windows handles interrupt servicing. In order to wait for a processor to acknowledge the request, the system will queue all interrupt requests by priority. Critical interrupts will be handled as soon as possible, whereas lesser priority requests such as audio will be further down the line. If the audio device requires data, it will have to wait until the request is processed before the buffer is filled.
If the device drivers of higher priority components in a system are poorly implemented, this can cause delays in request scheduling and process time. This can lead to an empty audio buffer and characteristic audible pauses, pops and clicks. The DPC latency checker measures how much time is taken processing DPCs from driver invocation. The lower the value will result in better audio transfer at smaller buffer sizes. Results are measured in microseconds.
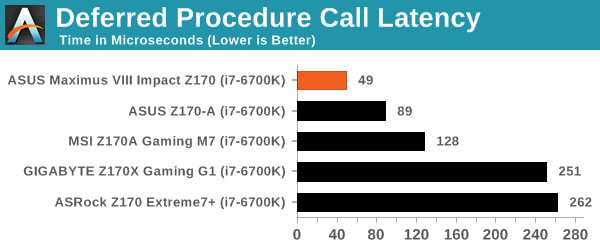
ASUS has been on a recent march towards low DPC numbers, and the Impact scores under 50 microseconds, making it one of our best ever results. The victory is short lived however, as we’re currently testing the Maximus VIII Extreme, and that scored under 25.
CPU Performance, Short Form
For our motherboard reviews, we use our short form testing method. These tests usually focus on if a motherboard is using MultiCore Turbo (the feature used to have maximum turbo on at all times, giving a frequency advantage), or if there are slight gains to be had from tweaking the firmware. We leave the BIOS settings at default and memory at JEDEC (DDR4-2133 C15) for these tests, making it very easy to see which motherboards have MCT enabled by default.
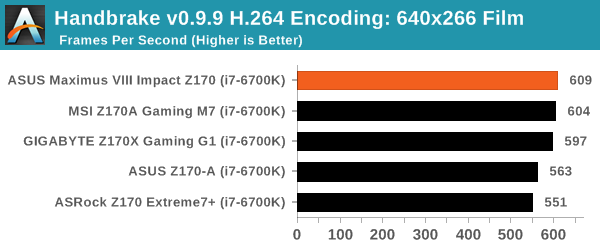
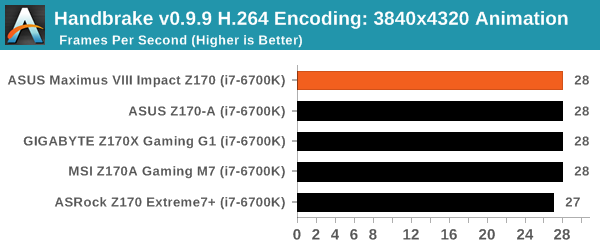
Video Conversion – Handbrake v0.9.9: link
Handbrake is a media conversion tool that was initially designed to help DVD ISOs and Video CDs into more common video formats. For HandBrake, we take two videos (a 2h20 640x266 DVD rip and a 10min double UHD 3840x4320 animation short) and convert them to x264 format in an MP4 container. Results are given in terms of the frames per second processed, and HandBrake uses as many threads as possible.
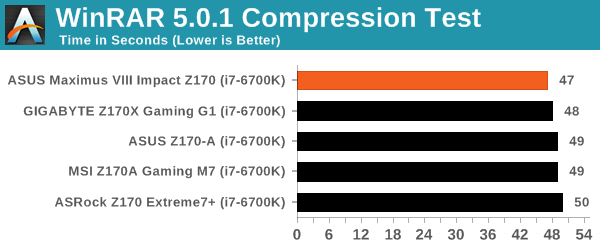
Compression – WinRAR 5.0.1: link
Our WinRAR test from 2013 is updated to the latest version of WinRAR at the start of 2014. We compress a set of 2867 files across 320 folders totaling 1.52 GB in size – 95% of these files are small typical website files, and the rest (90% of the size) are small 30 second 720p videos.
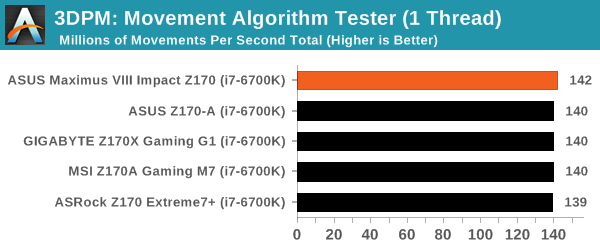
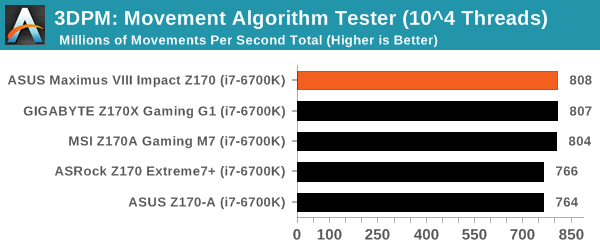
Point Calculations – 3D Movement Algorithm Test: link
3DPM is a self-penned benchmark, taking basic 3D movement algorithms used in Brownian Motion simulations and testing them for speed. High floating point performance, MHz and IPC wins in the single thread version, whereas the multithread version has to handle the threads and loves more cores. For a brief explanation of the platform agnostic coding behind this benchmark, see my forum post here.
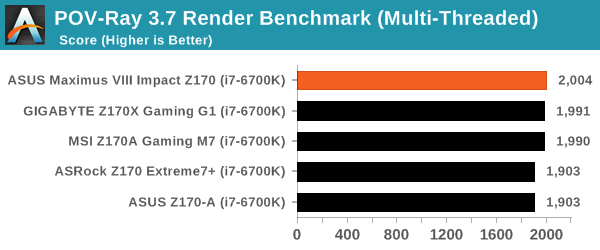
Rendering – POV-Ray 3.7: link
The Persistence of Vision Ray Tracer, or POV-Ray, is a freeware package for as the name suggests, ray tracing. It is a pure renderer, rather than modeling software, but the latest beta version contains a handy benchmark for stressing all processing threads on a platform. We have been using this test in motherboard reviews to test memory stability at various CPU speeds to good effect – if it passes the test, the IMC in the CPU is stable for a given CPU speed. As a CPU test, it runs for approximately 2-3 minutes on high end platforms.
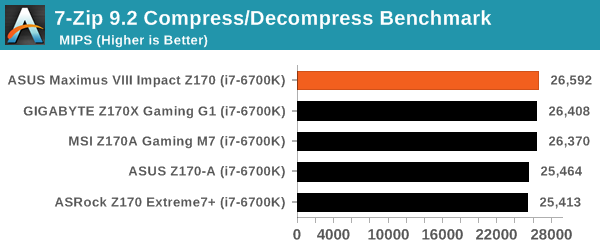
Synthetic – 7-Zip 9.2: link
As an open source compression tool, 7-Zip is a popular tool for making sets of files easier to handle and transfer. The software offers up its own benchmark, to which we report the result.
Gaming Performance 2015
Our 2015 gaming results for Z170 are still relatively new, but the issue of FCLK settings might play a big role here. At launch, the default setting for the communication buffer between the CPU and PCIe stack was 800 MHz, even though Intel suggested 1000 MHz, but this was because of firmware limitations from Intel. Since then, there is firmware to enable 1000 MHz, and most motherboard manufacturers have this - but it is unclear if the motherboard will default to 1000 MHz and it might vary from BIOS version to BIOS version. As we test at default settings, our numbers are only ever snapshots in time, but it leads to some interesting differences in discrete GPU performance.
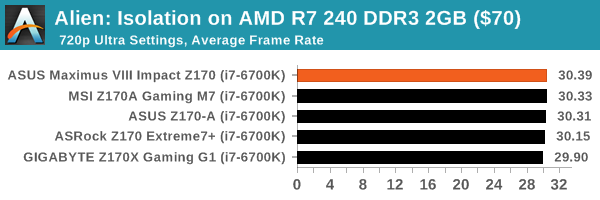
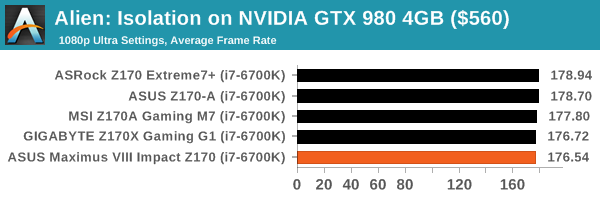
Alien: Isolation
If first person survival mixed with horror is your sort of thing, then Alien: Isolation, based off of the Alien franchise, should be an interesting title. Developed by The Creative Assembly and released in October 2014, Alien: Isolation has won numerous awards from Game Of The Year to several top 10s/25s and Best Horror titles, ratcheting up over a million sales by February 2015. Alien: Isolation uses a custom built engine which includes dynamic sound effects and should be fully multi-core enabled.
For low end graphics, we test at 720p with Ultra settings, whereas for mid and high range graphics we bump this up to 1080p, taking the average frame rate as our marker with a scripted version of the built-in benchmark.

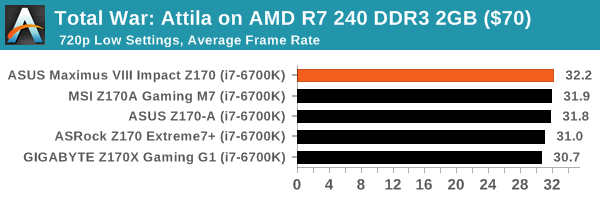
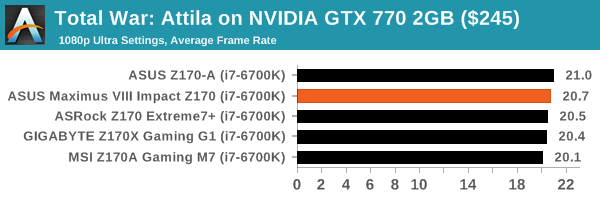
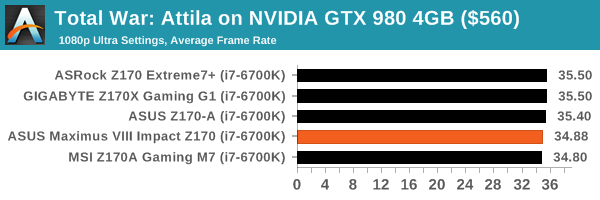
Total War: Attila
The Total War franchise moves on to Attila, another The Creative Assembly development, and is a stand-alone strategy title set in 395AD where the main story line lets the gamer take control of the leader of the Huns in order to conquer parts of the world. Graphically the game can render hundreds/thousands of units on screen at once, all with their individual actions and can put some of the big cards to task.
For low end graphics, we test at 720p with performance settings, recording the average frame rate. With mid and high range graphics, we test at 1080p with the quality setting. In both circumstances, unlimited video memory is enabled and the in-game scripted benchmark is used.

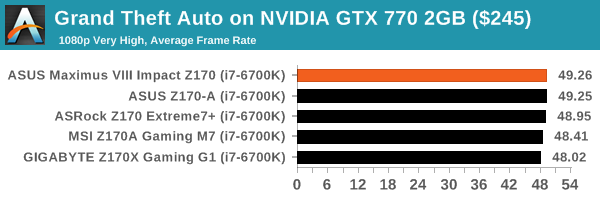
Grand Theft Auto V
The highly anticipated iteration of the Grand Theft Auto franchise finally hit the shelves on April 14th 2015, with both AMD and NVIDIA in tow to help optimize the title. GTA doesn’t provide graphical presets, but opens up the options to users and extends the boundaries by pushing even the hardest systems to the limit using Rockstar’s Advanced Game Engine. Whether the user is flying high in the mountains with long draw distances or dealing with assorted trash in the city, when cranked up to maximum it creates stunning visuals but hard work for both the CPU and the GPU.
For our test we have scripted a version of the in-game benchmark, relying only on the final part which combines a flight scene along with an in-city drive-by followed by a tanker explosion. For low end systems we test at 720p on the lowest settings, whereas mid and high end graphics play at 1080p with very high settings across the board. We record both the average frame rate and the percentage of frames under 60 FPS (16.6ms).

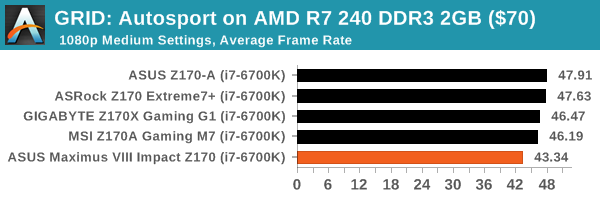
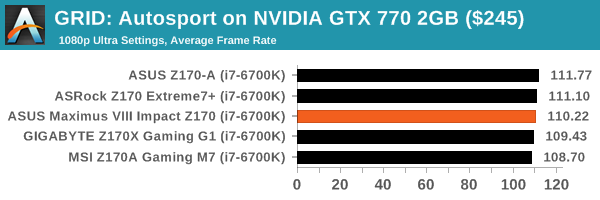
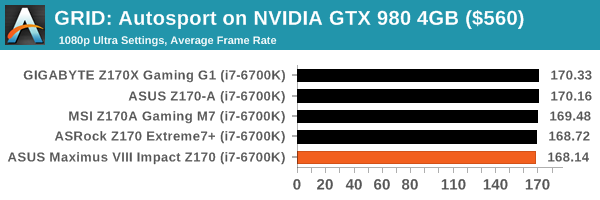
GRID: Autosport
No graphics tests are complete without some input from Codemasters and the EGO engine, which means for this round of testing we point towards GRID: Autosport, the next iteration in the GRID and racing genre. As with our previous racing testing, each update to the engine aims to add in effects, reflections, detail and realism, with Codemasters making ‘authenticity’ a main focal point for this version.
GRID’s benchmark mode is very flexible, and as a result we created a test race using a shortened version of the Red Bull Ring with twelve cars doing two laps. The car is focus starts last and is quite fast, but usually finishes second or third. For low end graphics we test at 1080p medium settings, whereas mid and high end graphics get the full 1080p maximum. Both the average and minimum frame rates are recorded.

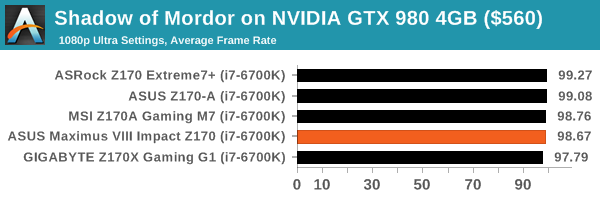
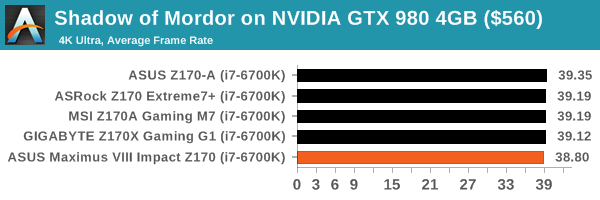
Middle-Earth: Shadow of Mordor
The final title in our testing is another battle of system performance with the open world action-adventure title, Shadow of Mordor. Produced by Monolith using the LithTech Jupiter EX engine and numerous detail add-ons, SoM goes for detail and complexity to a large extent, despite having to be cut down from the original plans. The main story itself was written by the same writer as Red Dead Redemption, and it received Zero Punctuation’s Game of The Year in 2014.
For testing purposes, SoM gives a dynamic screen resolution setting, allowing us to render at high resolutions that are then scaled down to the monitor. As a result, we get several tests using the in-game benchmark. For low end graphics we examine at 720p with low settings, whereas mid and high end graphics get 1080p Ultra. The top graphics test is also redone at 3840x2160, also with Ultra settings, and we also test two cards at 4K where possible.

ASUS Maximus VIII Impact Conclusion
The ROG line is a long standing brand of ASUS, approaching its 10 year anniversary in 2016. At CES during the early part of January, we are syncing up with AnandTech's senior motherboard editors from the last decade for a round table mixed with readers’ questions on the Republic of Gamers. Part of that discussion will be directed to the ROG Impact motherboard line, in which ASUS essentially stands alone in the premium Mini-ITX form factor market.
But therein lays a crucial part of the discussion. The Impact is premium; matching the price of a mid-to-high ATX sized motherboard while providing less expandability. In order to counteract this, the Mini-ITX product had to offer something more than the small size, and ASUS has done this over the Maximus VI, VII and now the latest VIII version. All of these have been award winning in various ways due to a high level of engineering prowess, but also a lack of competition in that premium space. The Mini-ITX form factor, although an exciting topic, is only a small chunk of the market, and perhaps gets a disproportionate amount of attention.
So if you're the sole premium player in a market, and the product is successful, how do you innovate each generation? On some level you can't keep adding or upgrading parts, purely due to space constraints and rising cost. Each generation has to offer something new - either hardware or software. In some respects the Z170 chipset takes care of this: DDR4, PCIe storage through U.2, and the move to USB 3.1.
But what ASUS specific improvements are there? The SupremeFX audio gets a full on EM shield to reduce external sources of noise, and it also gets internal LEDs making it easier to see where the ports are in a dark environment behind the system. Some may see this as an easy gimmick, but others will find it useful. We also had a great overclocking run, hitting 4.8 GHz at only 1.375 volts in the BIOS. As for DPC Latency, the Impact sits as the best board we've ever had, showing that on some level ASUS is keeping DPC Latency as a mental note during design.
On performance, the Impact implements MultiCore Turbo, which increases power consumption at default frequencies but puts CPU performance ahead of motherboards with MCT disabled on anything that can use multiple threads. In our benchmarks, all the CPU results are #1 for the Impact, the audio results of the Impact come out on top of all the motherboards we have tested, and the aforementioned DPC Latency is great. One downside on the BIOS we tested (v1101) was POST time, coming in at over 20 seconds. Aside from this, the BIOS and Software tools (which includes items such as RAMCache, RAMDisk, GameFirst III and Free Space) mark an ever evolving platform.
The main competition for the Impact comes from ASUS’ mainstream motherboard line, and the mini-ITX models, which have many of the features of the Impact except U.2, daughterboards and ROG software, but is also cheaper. Or any sub-$160 mini-ITX motherboard with ‘gaming’ in the name can offer similar stock performance for much less cost. When it comes to high priced motherboards, it comes down to the value-adds, and it becomes a user-focused question as to how many will be used. Playing Devil’s Advocate, something like U.2 could arguably be used via an M.2 to U.2 converter on other mini-ITX boards, and not a lot of users are enthused by onboard audio these days. Either Thunderbolt 3 support, or HDMI 2.0 through the Alpine Ridge as an LSPCON, could have put the Impact far over the edge for premium. But over the years, we’ve reviewed the Maximus VI Impact, the VII Impact and now the VIII Impact . Reading through those reviews, they all have sat at the top of the mini-ITX motherboard stack for both price but also feature set, and the Impact line has become difficult to ignore when building a premium small system. The extra features on the Impact are certainly worth the increased cost, but it’s all a question of use. Thankfully, when we did use it, it came top in pretty much all our system/CPU benchmarks in our Z170 motherboard testing so far, and that is quite hard to ignore.

Recommended by AnandTech
The ASUS Maximus VIII Impact


