Original Link: https://www.anandtech.com/show/8176/gigabyte-z97xsoc-force-review
GIGABYTE Z97X-SOC Force Review
by Ian Cutress on June 17, 2014 1:00 PM EST- Posted in
- Gigabyte
- Motherboards
- Overclocking
- Z97
Overclocking motherboards are here to stay. The $200 overclocking motherboard market seems to be growing, even when overclocking is limited to specific processor SKUs. Intel’s Devil’s Canyon models or Anniversary Pentium have been launched recently, specifically for overclockers to have more fun until the next generation. GIGABYTE’s 8-series overclocking motherboards were very well received, so it was a no-brainer to release upgraded models for 9-series. Today we are reviewing the Z97X-SOC Force, a $210 member of the punch-counterpunch in this market segment.
GIGABYTE Z97X-SOC Force Overview
In the past I have mentioned why pure overclocking motherboards are often a bad idea: in the extreme version of overclocking (as in, using sub-zero coolants purely to score higher than someone else), motherboards are chosen for their ability to achieve high clocks, high scores and nothing else matters. The downside of this direction is that this board will not sell well – extreme overclockers number thousands at most, and even less in sales when you factor in the competition. As a compromise, the motherboard often has a number of gaming elements on board to appeal to regular users who might want to use those OC tools for a stable system.
If you have been covering our Z97 coverage so far, one of the big elements of the equation has been the new storage options (M.2 or SATAe), and the inherent problems with routing. One of the first things I noticed with the Z97X-SOC Force was how this was not an issue. While the Z97X-SOC Force has a SATAe, it only shares bandwidth with the ports it uses anyway, rather than disabling another feature, and there is no M.2.
The main features on the Z97X-SOC Force all relate to the overclocking buttons on the top right. Here there are buttons for:
- Power and Reset,
- Adjusting CPU Ratio,
- Adjusting CPU base frequency,
- A button for adjusting the step that the base frequency button uses,
- A one-button overclock,
- A tag button for pre-calibrated overclocks,
- An OC Ignition switch to keep the chipset/fans on when the system is turned off,
- A Memory Safe button to recover from bad memory overclocks,
- A Direct To BIOS button,
- A settings lock,
- BIOS selection switches,
- An OC trigger switch,
- Voltage check points,
- A set of DIP switches to disable PCIe slots
- A set of DIP switches to disable DIMM channels and
- A Clear CMOS button.
Arguably one could say that most of these features are on other overclocking motherboards, although none of the others have them all in the same place – some competitors put options in the BIOS or on separate physical panels. One could imagine that under sub-zero cooling, this area of the motherboard might succumb to condensation issues due to the temperature, however a string of records from Computex using this model and derivatives of this model would suggest otherwise. The system also comes with an OC Brace to help on-desk overclockers fit GPUs, and two onboard USB connectors for ease of use backup up benchmark scores and screenshots. The rear of the motherboard has a different mounting mechanism for the DRAM slots, allowing the rear to be insulated easier for sub-zero cooling.
The DRAM area on the rear of the Z97X-SOC Force
Other than the overclocking features, the gaming side of the equation gets a Killer NIC (E2201), which is in essence a bundle of a NIC and program prioritization software. There is also the potential of four-way CrossFire, with an x8/x4/x4 + x4 PCIe lane layout. Here GIGABYTE is using PCIe 3.0 x8/x4/x4 from the CPU and PCIe 2.0 x4 from the PCH. This means four-way CrossFire, but due to SLI limitations requiring x8 lanes per card, only two way SLI.

Audio is provided by a Realtek ALC1150 audio codec with PCB separation and filter caps to provide a cleaner signal. This is not the full on audio experience that GIGABYTE could implement, as that is more of a Gaming range feature.
We have covered the GIGABYTE BIOS and software in our review of the Z97X-UD5H, and although the software is updated in color to match the overclocking livery, the conclusions are similar. The main BIOS is hard to look at and focus due to the color scheme, at least enough so that during the overclocking contests at Computex, most GIGABYTE overclockers were using classic mode. Given that this is a motherboard for extreme overclocking, there are a number of memory presets for users of special/near-unique memory kits. The software for the OS gets a nice update over Z87, making it easier to adjust fan speeds as well as overclocks. The automatic overclocking feature was still particularly aggressive on our average i7-4770K, using 1.35 as a base voltage with an additional +0.2 volts offset in Extreme mode, making 1.545 volts at load which caused errors on our cooling in 77 seconds.
There are a range of automatic overclock options, and manual overclocking performance matched that of other motherboards in the air/water cooling segment due to our CPU sample. General performance levels are also similar to other motherboards, although it is worth nothing that our IGP was overclocked to 1300 MHz by default on the Z97X-SOC Force, which gave minor (~4%) frame rate increases in IGP gaming. DPC Latency for 9-series continues to perform well, with 56 microseconds for the Z97X-SOC Force, although the audio issue we experienced with the UD5H at 100% output volume still remains. Finding a good balance between output and input resulted in a lower dynamic range result than expected for an ALC1150.
The Z97X-SOC, the non Force edition, is also available and is one of this motherboard’s main competitors. For $20 less, there are fewer power phases (eight rather than four) on the SOC, an Intel NIC rather than a Killer, no OC Brace and no network management software. For a gaming user, that $20 could be put towards moving up a GPU class, or better CPU cooling, as arguably a gamer will not be sub-zero overclocking or need the OC Brace. That ultimately puts a $20 premium for the Killer NIC and management software, which should be a gaming feature, although I have heard many users prefer the lower CPU usage of the Intel NIC and the software can be purchased for $22 that will work with the Intel NIC. The choice will be dependent if the focus is on-the-desk overclocking, or if networking features are important to the user.
Visual Inspection
It would seem that the motherboard industry is in a cycle of colors right now. Most gaming motherboard ranges are red, whereas overclock ranges are either red, yellow or orange. Blue is usually reserved for the mainstream $100-$150 segment, and it would seem that some motherboard manufacturers are also looking into green and white. For the Z97X-SOC Force, like GIGABYTE’s overclocking oriented motherboards in the past, orange is the main part of the equation for looks.
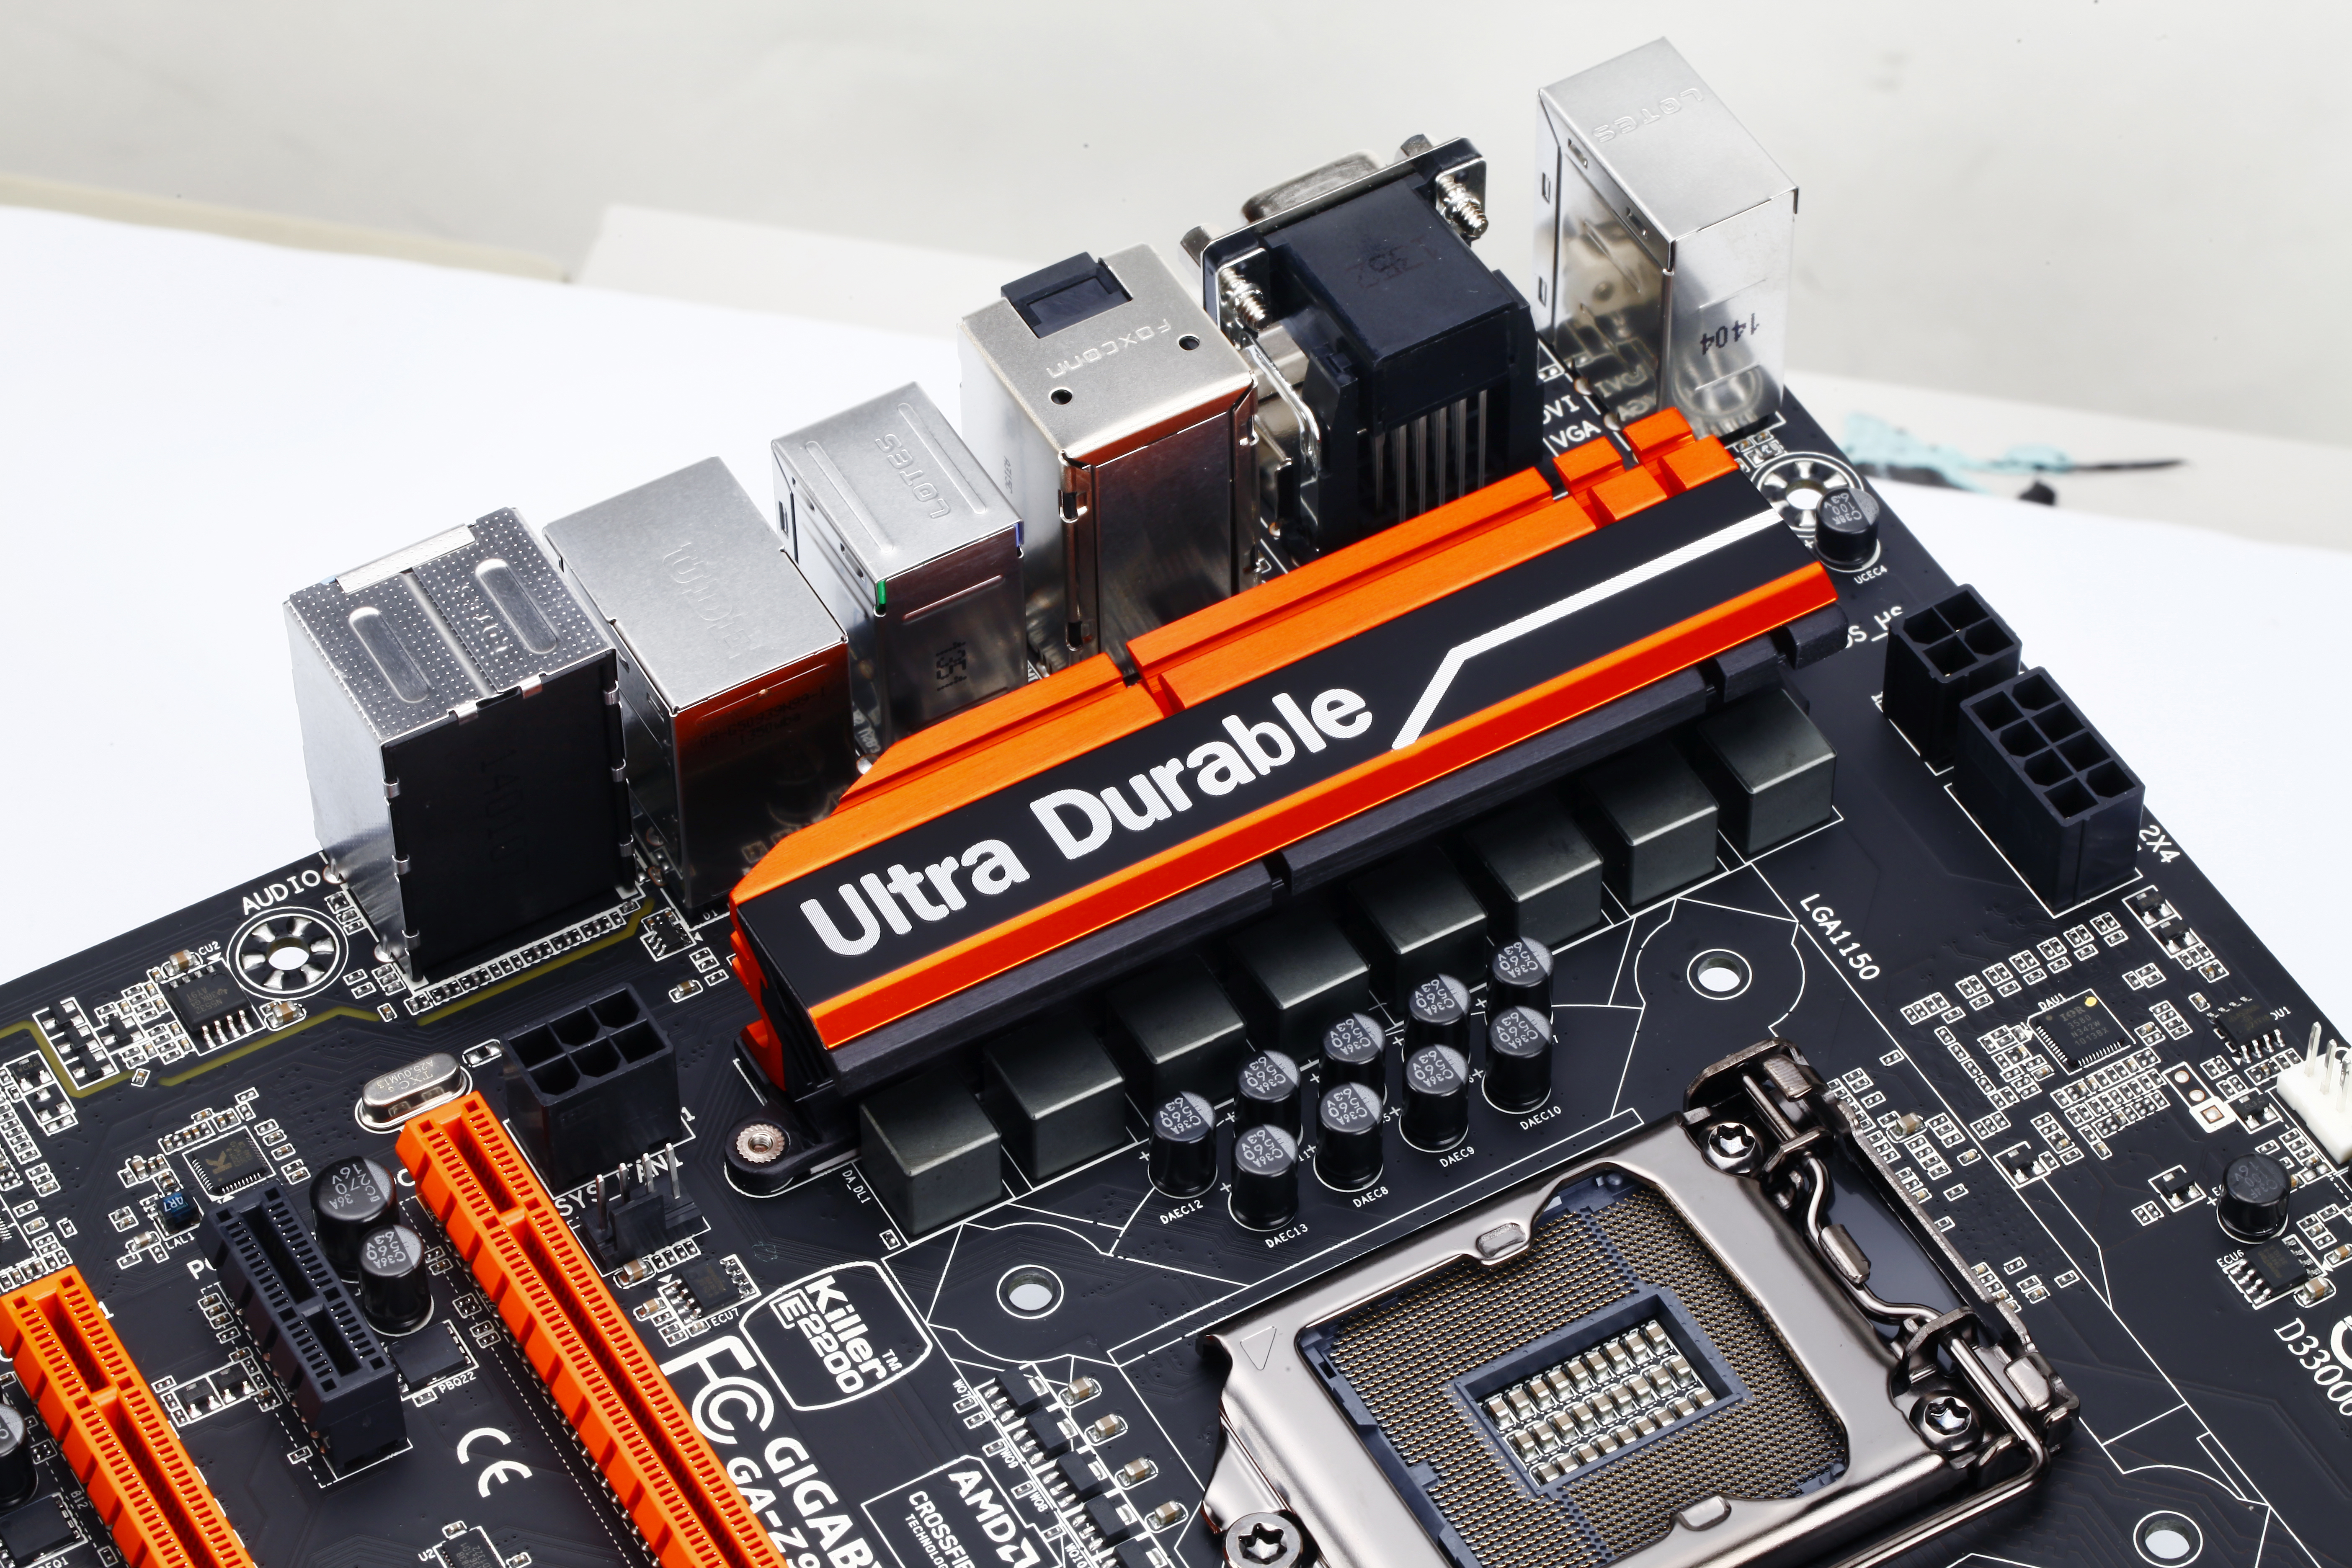
In the past, GIGABYTE has pushed forward with 12-16 phase motherboards for overclocking, often being much more north of $250. At the $200 price point, we get an eight phase solution that relies on 40A ICs but also offers a lot more ‘room’ around the socket area to make it easier for extreme overclockers to insulate for sub-zero. For regular users, having the space at the top might help some larger heatsink and fan combinations, although the DRAM slots are close to the minimum socket area suggesting that large heatsinks or coolers might conflict with tall DRAM. Power delivery for the socket uses 8-pin and 4-pin 12V ATX power connectors, indicating that GIGABYTE’s focus is more at the high end sub-zero overclocking.
The motherboard has a total of eight fan headers, five within reach of the socket. The CPU and CPU_OPT 4-pin headers are directly above the socket, along with a 3-pin SYS header. There is another 3-pin SYS fan header below the 24-pin ATX connector, and a 4-pin below the VRM heatsink, next to the 6-pin PCIe connector for the PCIe slots. The final three headers are all on the bottom of the motherboard, all of which are 4-pin.
The DRAM slots use single sided latches so as to not interfere with the first GPU installed, but it also means that users should take care when installing memory such that it is firmly put into place.
Moving clockwise around the motherboard, we come to the main area of on-the-bench overclocking:
All the features are mentioned in the overview on this page, although it is worth looking into the main new one - the OC DIMM switch. With four switches and four DIMM slots, one would imagine that each switch could disable a single DRAM slot, but a quick look in the manual means that each of these switches is for a pair of slots. This means that the first two switches are the only ones that do anything, with the first being for channel A/B and the second for C/D. It does leave scope that in for future platforms that use quad channel, a similar system could be put in place. The purpose of this system is for users attempting memory frequency records, in order to disable as much of the system as possible to keep it more stable.
The OC buttons on the side of the motherboard also include the OC Ignition button, which keeps the chipset and fans powered when the system is formally switched off. The primary purpose of this is to keep fans spinning to either remove liquid nitrogen vapor or to keep components continuously cooled by air and to reduce condensation.
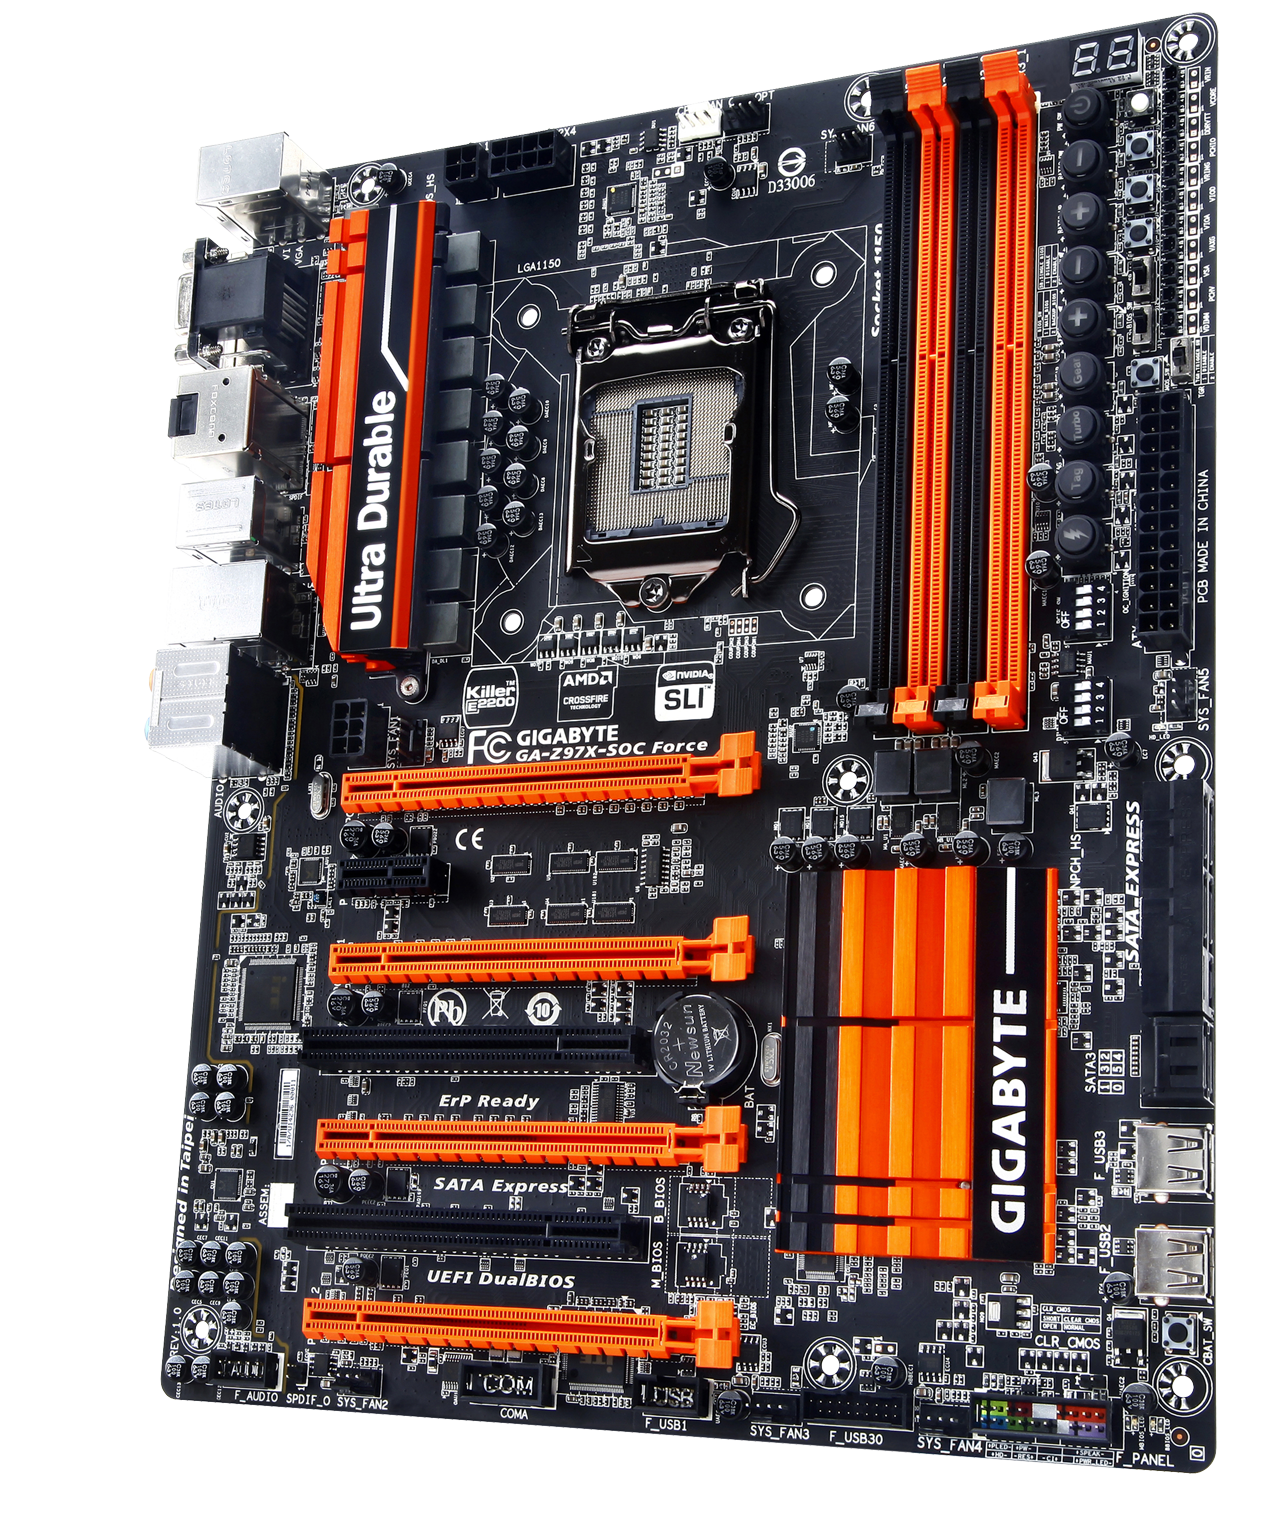
Moving further around the motherboard we come to the SATA ports, for which GIGABYTE has implemented the single SATA Express connector into two of the chipset SATA ports. There are also four other SATA ports on board. This implementation ensures that there is no confusion about what gets disabled when – using a SATA Express uses two SATA ports, and that is about it. Inevitably if SATA Express does take off, I see this as the major implementation of SATA Express mixed with standard SATA. Beneath these are two USB 2.0 ports, used by overclockers to attach USB sticks rather than reaching around to the rear IO, which might knock something and destabilize the system. Standard users can also implement their permanent USB drives for storage or ReadyBoost or for license dongles for older software – it is a common server feature as well.
In the bottom right corner we have a CBAT_SW button, which is a quick battery disable switch, doubling as a reset for the BIOS chips. This is near the front panel header and a USB 3.0 header, the latter using ports from the PCH. GIGABYTE also includes a USB 2.0 header, a COM port header and front panel audio headers along the bottom row.

The PCIe layout, as mentioned in the Overview, is aimed many different usage scenarios. Considering only graphics, the PCIe 3.0 x8/x4/x4 layout from the CPU is paired with a PCIe 2.0 x4 port from the PCH leading to two-way NVIDIA users or four-way AMD users (NVIDIA has an x8 requirement, regardless of PCIe 2.0 or PCIe 3.0 which is odd). Using that final PCIe 2.0 x4 disables the PCIe 2.0 x1 port nearer the top, meaning that users who want to plug in other PCIe devices should take note.
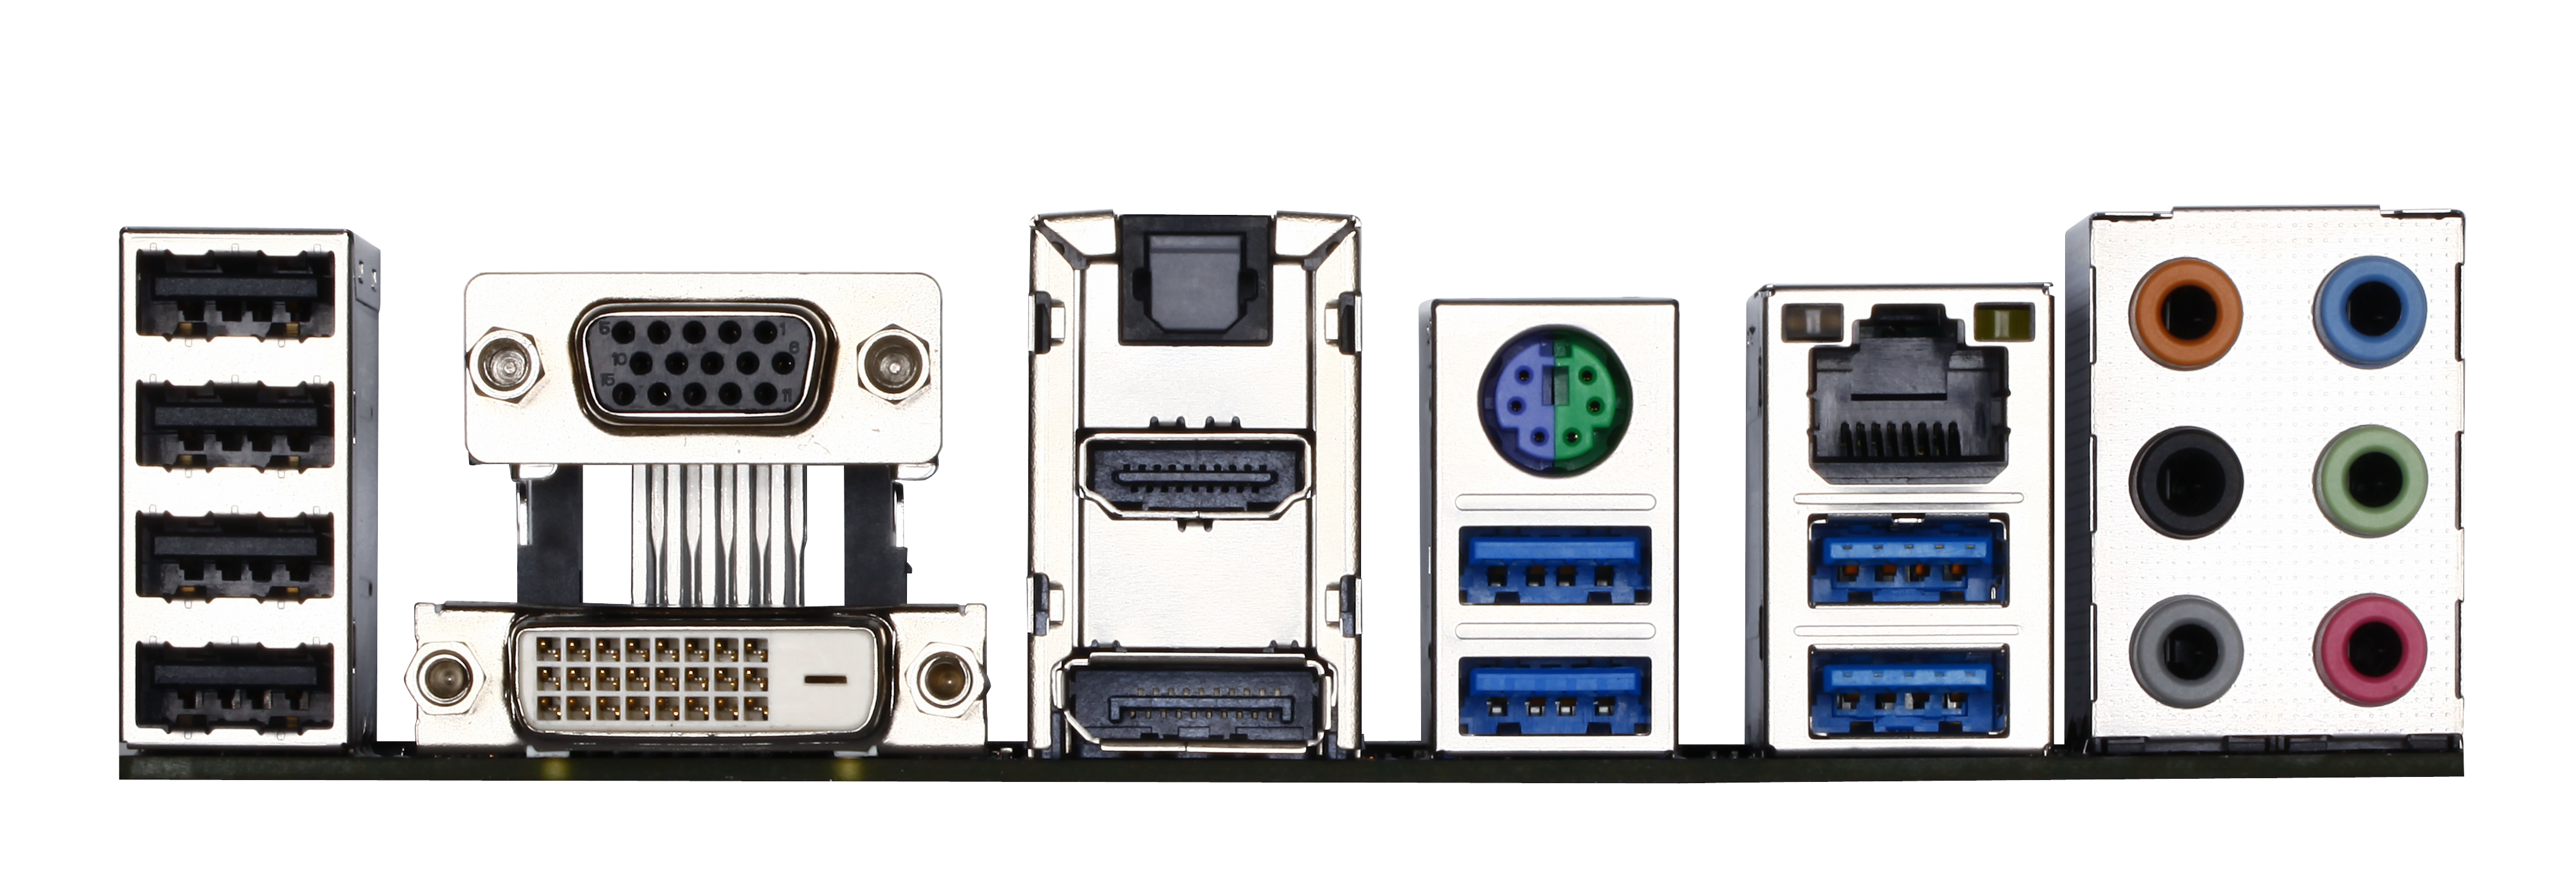
The rear panel is a little different to most of the other 9-series motherboards that we have tested or will test. I point directly at the combination PS/2 port, which we find to the right of center, rather than at the far left in normal orientations. GIGABYTE now puts a flat four USB 2.0 ports at the top, which I prefer. It does seem odd that GIGABYTE included all four video outputs on the SOC Force, given its orientation towards discrete GPU usage, although I imagine this is more to include as many different usage scenarios as possible. The four USB 3.0 ports are all from the chipset, and the NIC is the Atheros Killer E2201 which comes with network prioritization software. The Realtek ALC1150 audio jacks finish the lineup.
Board Features
| GIGABYTE Z97X-SOC Force | |
| Price | US (Newegg) |
| Size | ATX |
| CPU Interface | LGA-1150 |
| Chipset | Intel Z97 |
| Memory Slots |
Four DDR3 DIMM slots supporting up to 32 GB Up to Dual Channel, 1333-3300 MHz |
| Video Outputs |
VGA (1200p at 60Hz) DVI-D (1200p at 60Hz) HDMI (2160p at 24 Hz or 1600p at 60 Hz) DisplayPort (4096x2160 at 24 Hz or 2160p at 60 Hz) |
| Onboard LAN | Qualcomm Atheros Killer E2201 |
| Onboard Audio | Realtek ALC1150 |
| Expansion Slots |
3 x PCIe 3.0 (x16, x8/x8 or x8/x4/x4) 1 x PCIe 2.0 x4 (shares bandwidth with PCIEX1) 1 x PCIe 2.0 x1 2 x PCI |
| Onboard SATA/RAID |
6 x SATA 6 Gbps (PCH), RAID 0,1,5,10 1 x SATAe (PCH, shares with SATA3_4/5) |
| USB 3.0 | 6 x USB 3.0 (PCH) [4 back panel, one header] |
| Onboard |
6 x SATA 6 Gbps 1 x SATAe 8 x Fan Headers 1 x USB 3.0 Header 1 x USB 2.0 Header 2 x USB 2.0 Ports 1 x COM Header Clear CMOS Butoon Power/Reset Buttons Voltage Measurement Points BIOS Switches OC Touch Buttons Front Audio Header Front Panel Header |
| Power Connectors |
1 x 24-pin ATX 1 x 8-pin ATX 1 x 4-pin ATX 1 x 6-pin VGA |
| Fan Headers |
2 x CPU (4-pin) 6 x SYS (4 x 4-pin, 2 x 2-pin) |
| IO Panel |
4 x USB 2.0 4 x USB 3.0 VGA DVI-D HDMI DisplayPort Combination PS/2 Port Atheros Killer NIC Audio Jacks |
| Warranty Period | 3 Years |
| Product Page | Link |
Normally a $210 motherboard would command a lot of extras in the way of basic functionality – more SATA or more USB 3.0 ports for example. GIGABYTE has done away with these and focused more on the overclock functions, the increased power delivery, the included OC Brace, and four-way GPU implementations without a PLX 8747 chip (which would have raised the price north of $280). Upgraded over the basic is that Killer network chip, which is a contentious upgrade over the Intel I218-V NIC depending on your usage scenario, but helps position the motherboard further towards the side of gamers.
Because of the distinct similarities between the BIOS of the SOC Force and the UD5H we previously reviewed, the BIOS and software overviews are to be almost identical. Rather than refer back to the UD5H, this has been updated with options specific to the SOC Force.
GIGABYTE Z97X-SOC Force BIOS
For Z97, the graphical BIOS ecosystem (either UEFI or EFI) has the opportunity for incremental updates. This might be fully fledged adjustments graphically, the addition of new features or the results of the engineers internally flexing some talent. For GIGABYTE, the Z97 BIOS in general uses the same topology from Z87 – a high definition mode on top of the classic mode from Z77. The main difference is the use of a ‘Startup Guide’ akin to an easy mode when you first enter the BIOS:
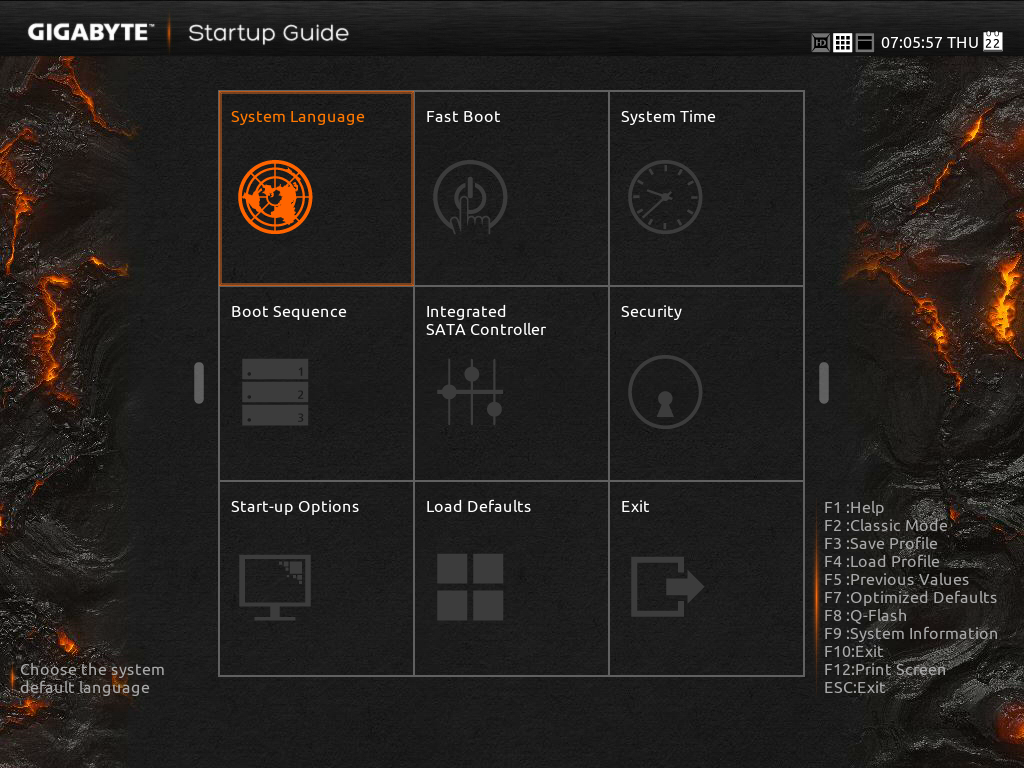
The options in the startup guide include Fast Boot options, Boot Sequence adjustment, SATA adjustment, security, start-up options (which mode to start in) and basic time adjustment. Unfortunately I have to become highly critical to this easy mode: if I had no idea what system I was dealing with and I moved into this BIOS, the only thing I now know about the system is that it is a GIGABYTE system. There is nothing on the front page about the CPU, the Motherboard, the speed settings, the temperatures or the BIOS revision. It is only because I have used GIGABYTE BIOSes before that I understand that pressing F2 will adjust to one of the other modes that will tell me this information. This menu uses a discordant amount of blank space for not very detailed icons and is not particularly that helpful as a startup guide beyond boot sequencing.

When a user clicks one of the icons the other options fade away and others take its place relating to the option chosen. Here the Integrated SATA Controller offers two options, enabling (one would wonder why it would need to be disabled in a startup guide) and the other is SATA Mode selection. Aside from the image above having text clipped, the information on the help description on the left does not correlate with the options on the right. Aside from being slightly unreadable (grey text on grey/black background), there are no options for hot-plug status as mentioned, and the text says this option only covers chipset ports. Chances that a new user might not know which ones are the chipset ports, however this is a graphical BIOS and the opportunity to put in a basic image to identify the relevant ports is missed.

The Start-up Options tab gives the four modes which a user can set for future booting: the Startup Guide, Smart Tweak Mode/HD and Classic Mode. Note that when a BIOS is flashed to a later version, this option has to be reset. Unfortunately there is nothing GIGABYTE can do about this. However, the Smart Tweak and Classic modes are those that we saw on Z87, the first being a full 1920x1080 HD platform that shows all the information we need:
Unfortunately taking screenshots on my 1440p monitor with the BIOS cuts off some of the bottom (it screen captures to 1600x1080 for whatever reason), but it does show fully on a 1440p monitor. The information at the bottom and around the sides is just what we need in a BIOS – model names, frequencies, CPU installed, memory installed, memory speeds, temperatures, voltages, fan speeds, the whole lot. While I still have a mild dislike of the color scheme (I find it hard to focus on relevant data when quick glancing), the menus themselves are slightly rearranged better than on Z87.
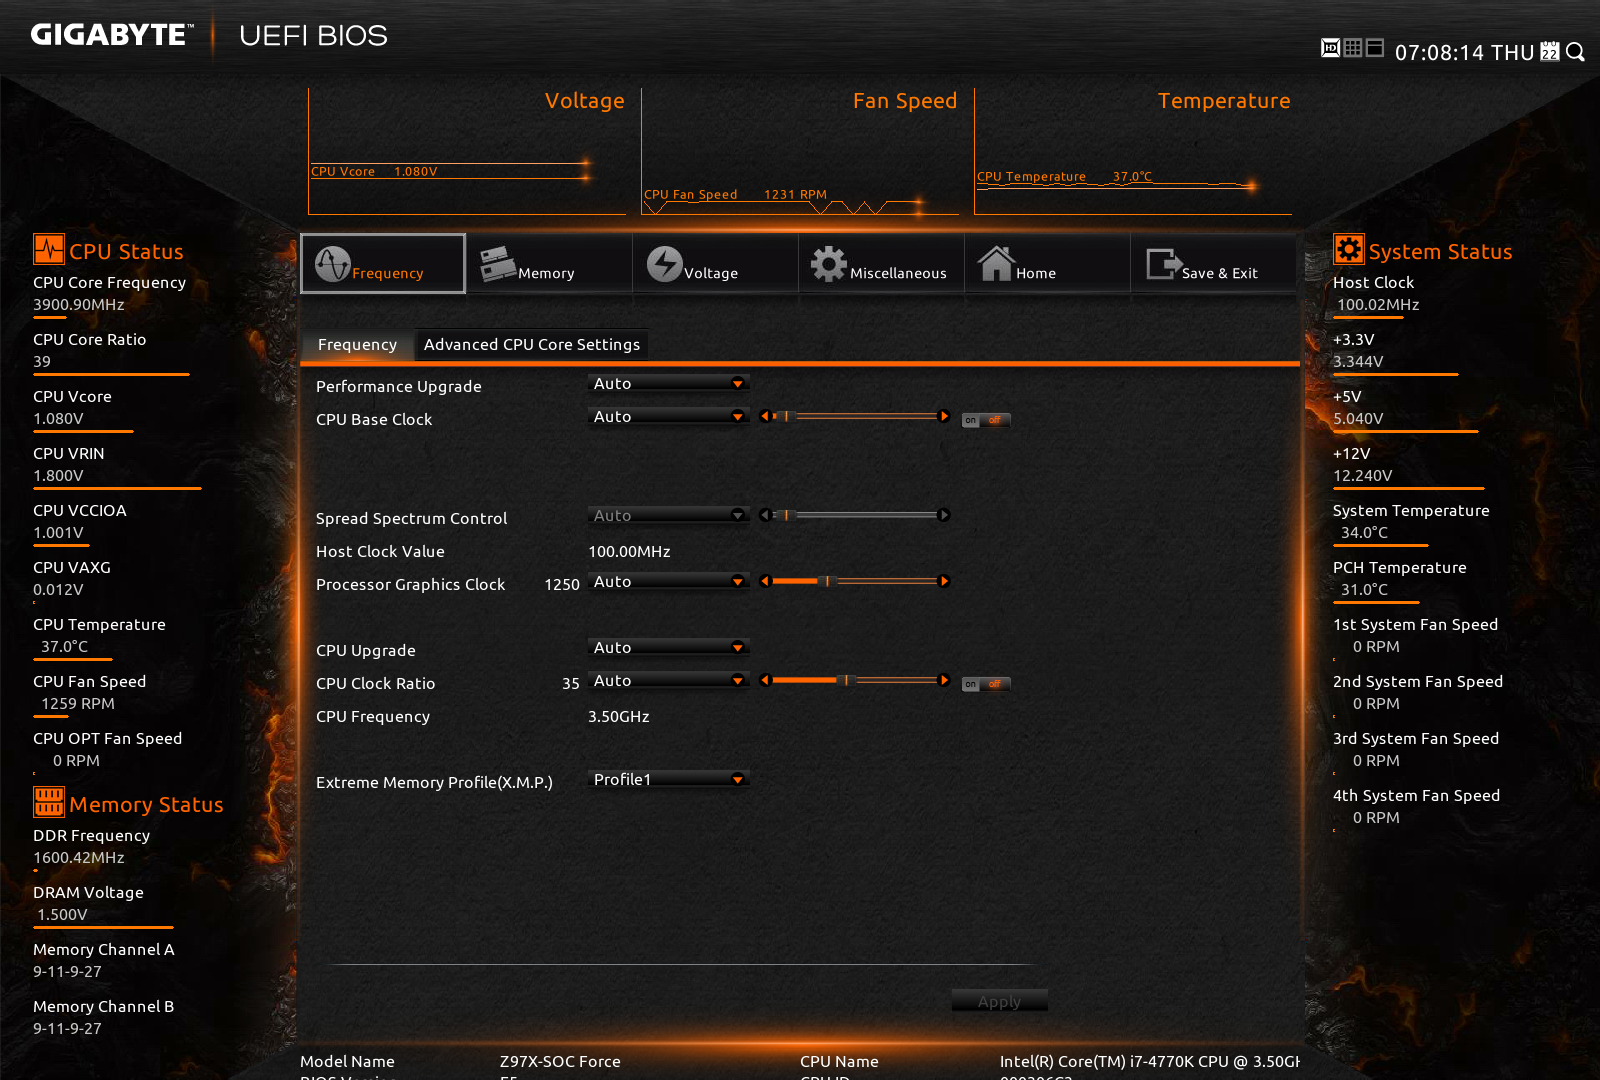
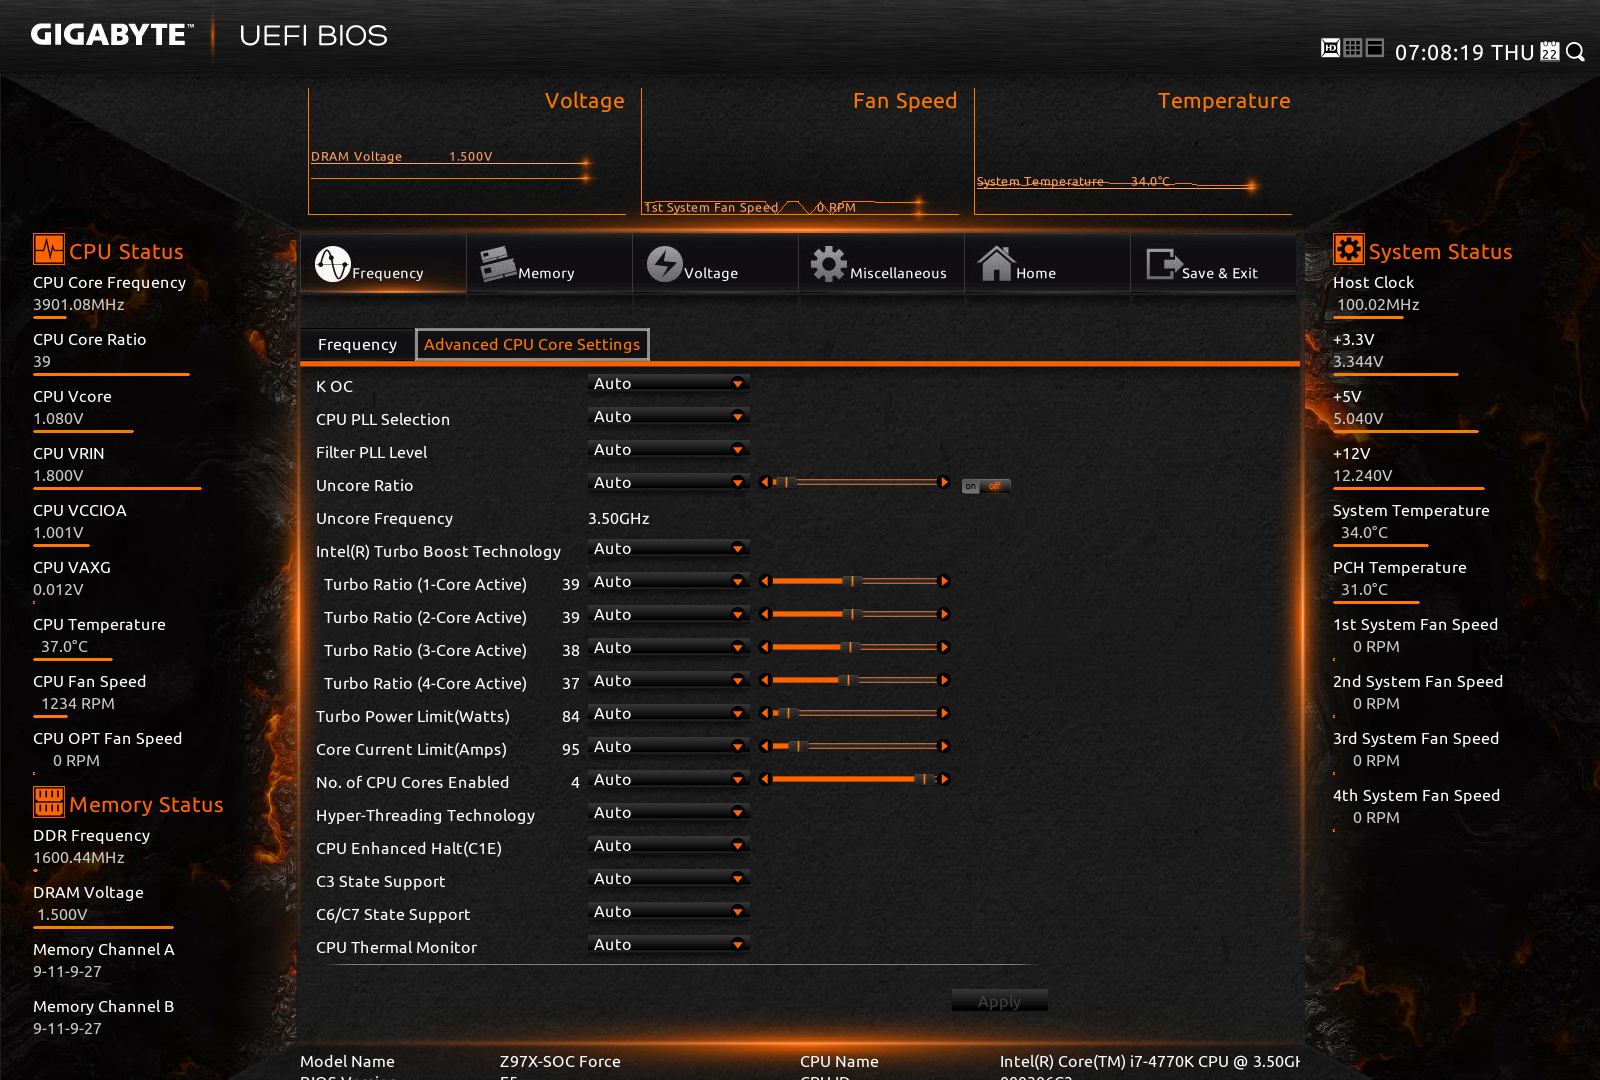
Shown above we have the Frequency Tab, which splits into the frequencies for overclocking and the Advanced CPU Core Settings. In this menu users can apply frequency overclocks on the CPU, the IGP and enable XMP. The Advanced CPU Core Settings menu opens up the options into more detail including turbo rations, power limits and C-states:
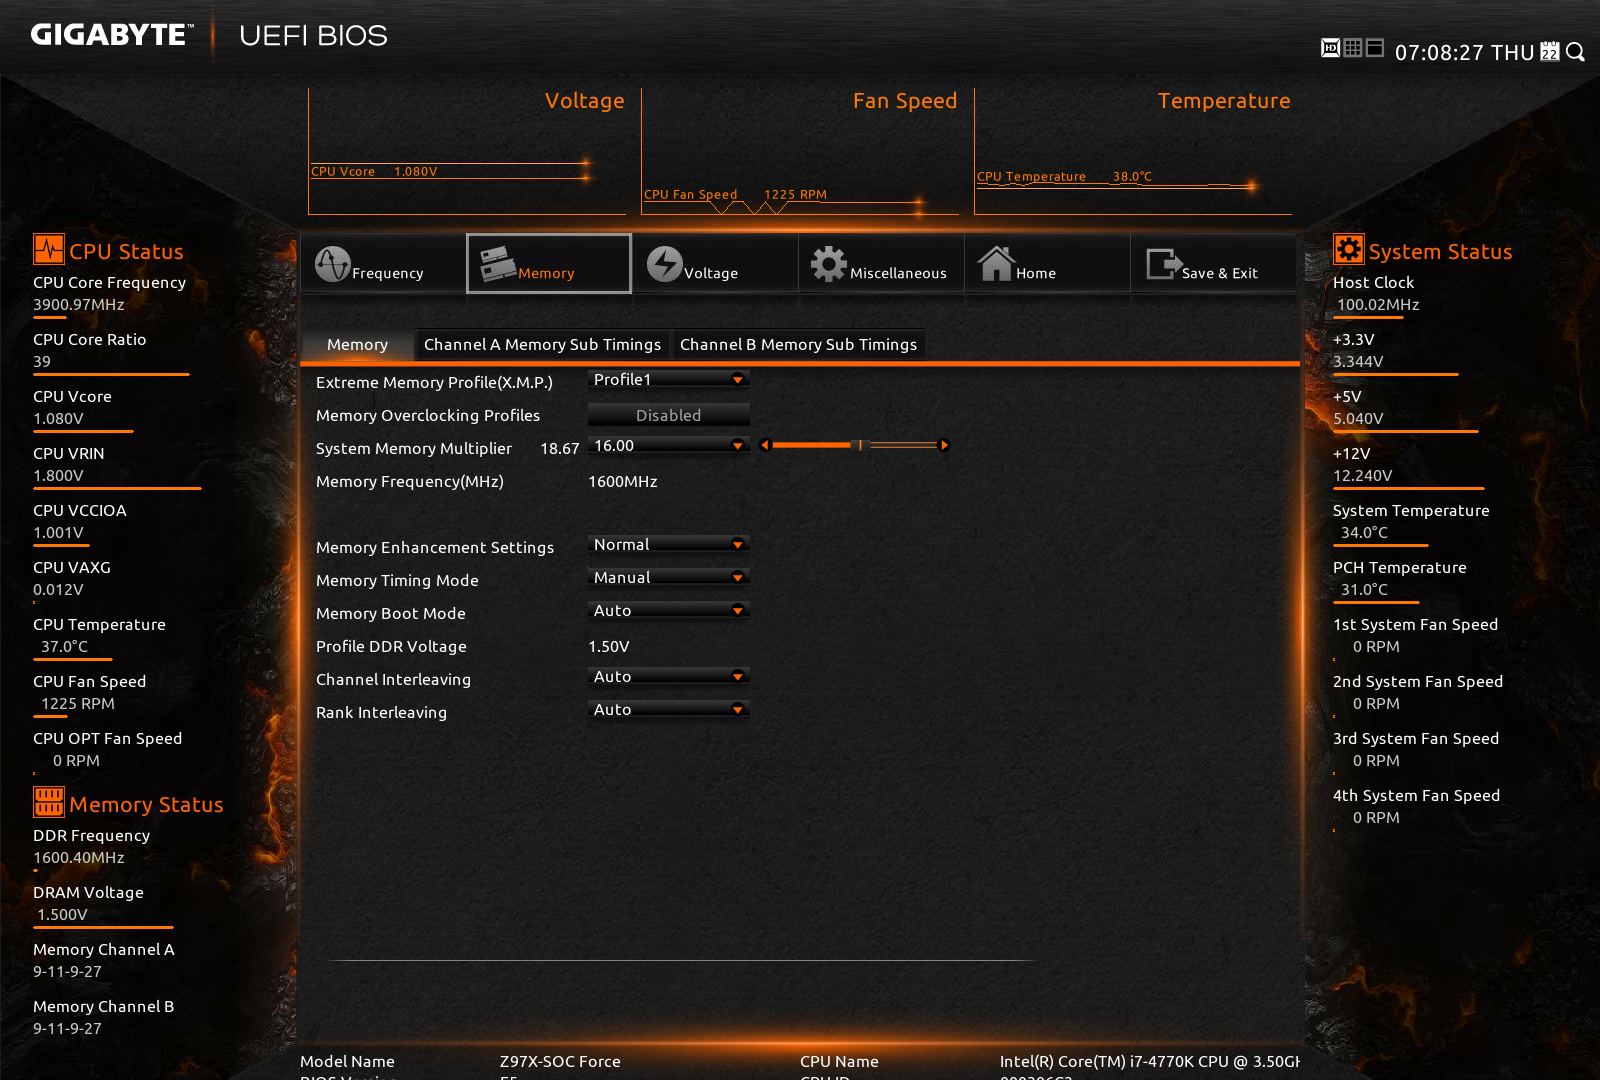
Similarly moving to the Memory main tab gives the advanced memory options, with a further tab for sub-timings and memory overclocking profiles, should a user have one of the super-unique kits that extreme overclockers like to play with:
The third tab relates to the advanced voltage options. Users of the Classic Mode in previous GIGABYTE BIOSes will notice that these three main tabs in Smart Mode mimic the main OC options from Classic Mode. This is an important level of integration, allowing users that are more accustomed to the older design to get up to speed on the new design because the two are laid out the same.
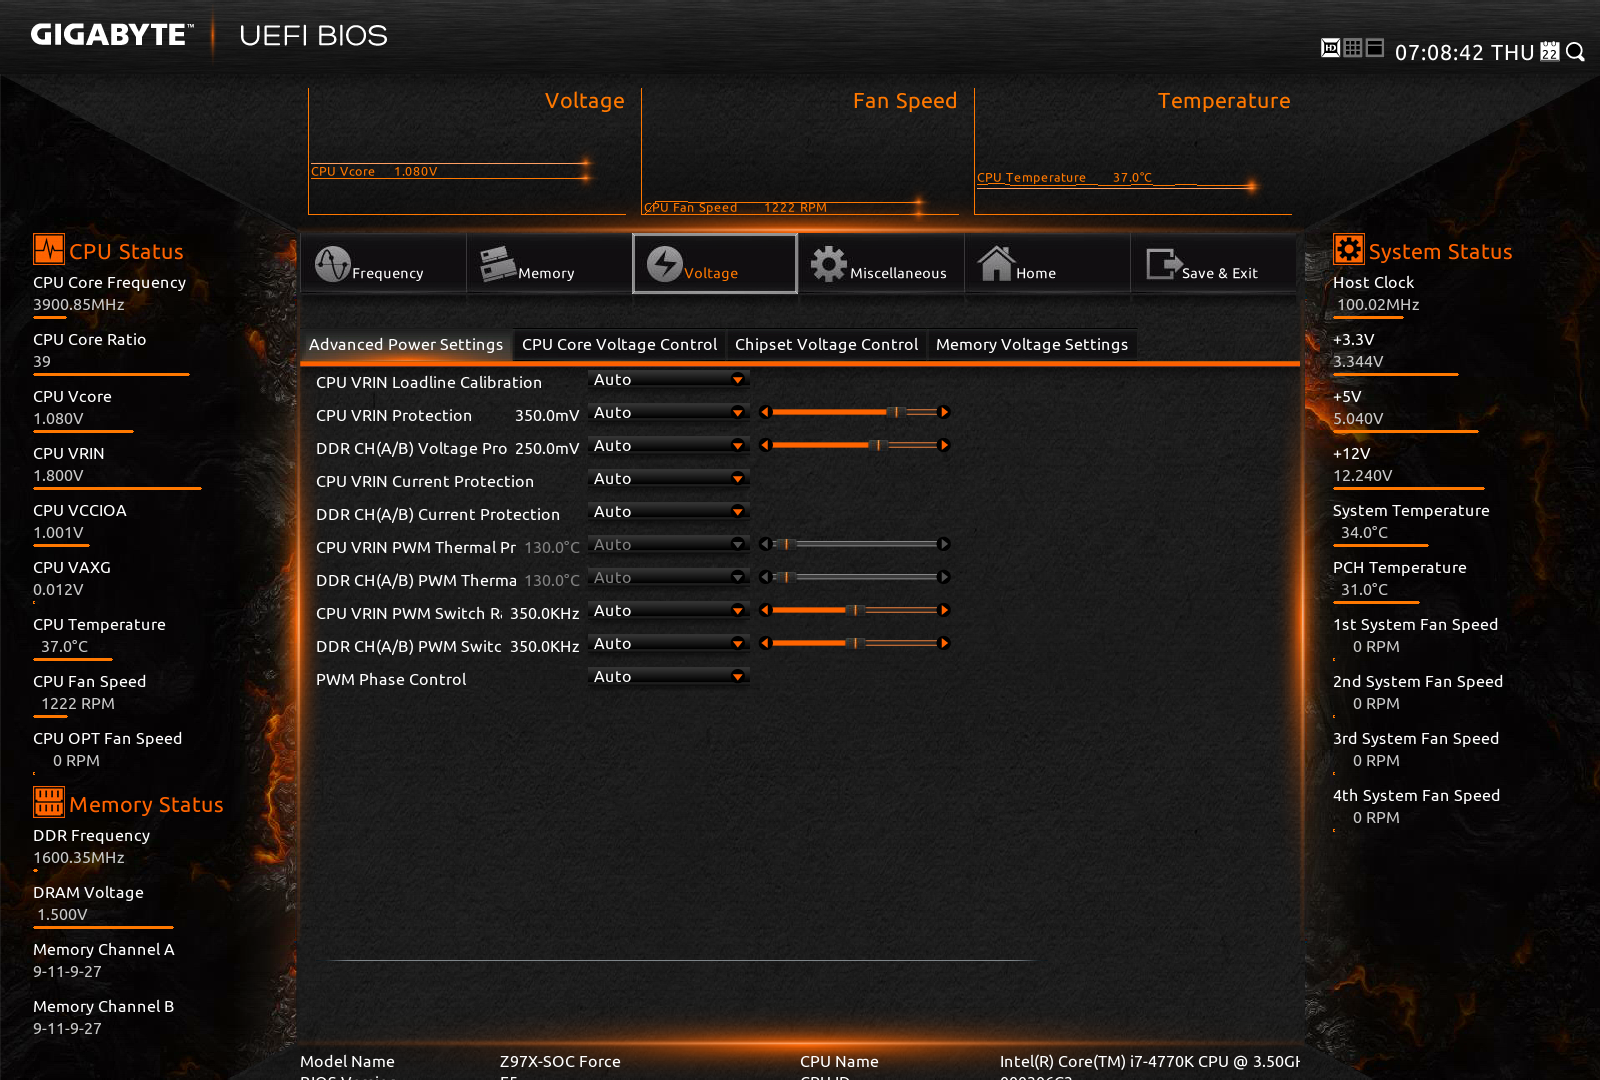
The voltage tabs are split into power settings (load line calibrations and thermal protections), CPU core voltages (VCore, VRIN, RING voltage, VCCSA), Chipset voltages and DRAM voltages. One point to note is the text overflow issue in English shown above – some options are too many characters for the designated spaces to hold, and yet there is plenty of blank space to the side unused.
The Miscellaneous tab offers a couple of the more obscure settings as well as PC Health, including the fan controls. For another generation GIGABYTE is giving BIOS fan controls as a function of PWM value/ºC. This is an unexplained metric in the BIOS (making it harder to understand from a user experience perspective), but I will try here.

Each fan header on the motherboard can apply a power from 0 to 255 to a fan. The fan will speed up according to the power profile of the fan (e.g. nothing until 10% power, then linear increase – this is determined by the fan design, not the motherboard). The fan power is not a direct linear correlation relationship to the fan speed; however the gradient of the power increase can be controlled in the BIOS. Thus a choice of 0.75 PWM value/ºC will increase the power of the fan by 0.75 units every degree Celsius that the CPU increases.
Given the leaps and bounds that other motherboard manufacturers have made on the fan front in the BIOS, as well as GIGABYTE’s own efforts on fan controls in the OS, I was hoping that the BIOS fan control would have been improved for Z97; however it is the same method as previous generations.

The Home screen is what GIGABYTE wants the HD BIOS to actually jump in to, which it did back with Z87. Here we have a group of overclock options such as BCLK, Clock Ratio, DRAM Multiplier and voltages. The next tab along the line is labeled ‘Standard’ and offers options such as display output and SATA options. The ‘Your Name 1/2/3/4’ menus are the custom menus that allow users to pull options from other menus and place them into a custom menu. This was also introduced with Z87; however I think the menus GIGABYTE offers here will cater for almost everyone.
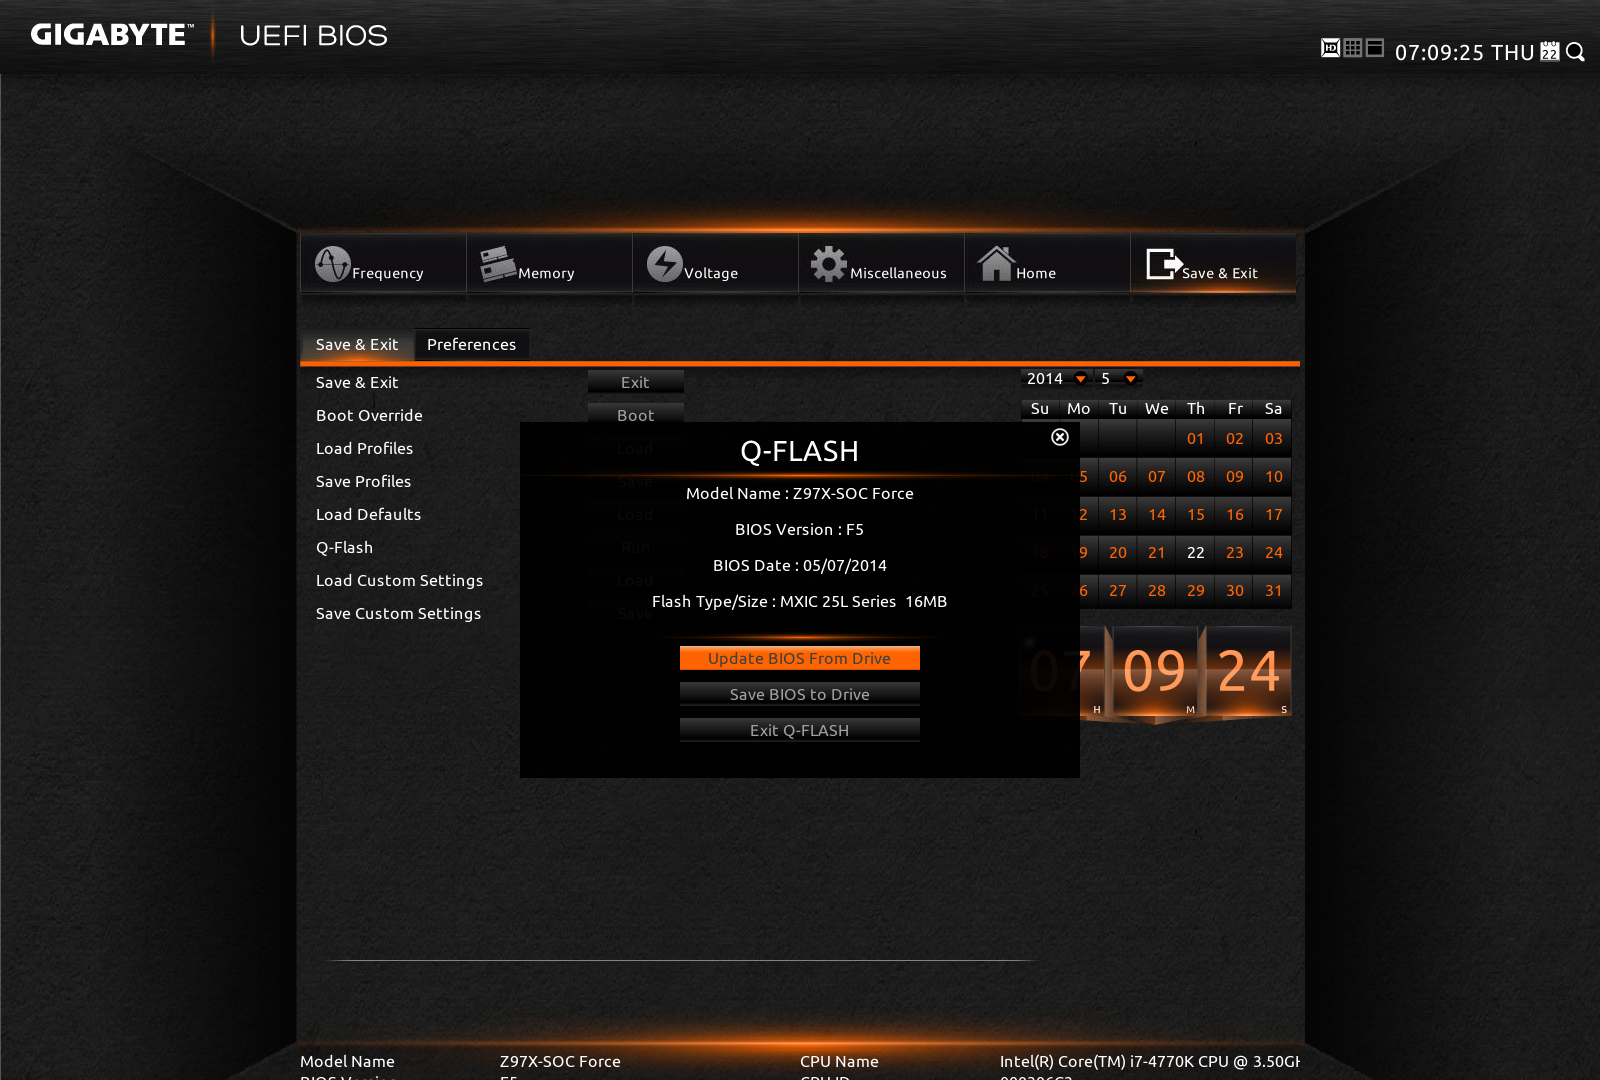
Updating the BIOS while in the BIOS uses GIGABYTE’s Q-Flash interface. Attach a drive to the USB 2.0 port with the BIOS file in the root drive to ensure compatibility and ease of use.
The other mode in the BIOS is classic mode.

We have gone through Classic mode in many reviews before [1,2,3,4,5] so I will not dwell on it here, but Classic mode tends to be the go-to option for many enthusiast overclockers. I feel this is because (a) it has been part of the GIGABYTE ecosystem for a number of years and they are used to it, and (b) due to the differing contrast it is a lot easier to read. It also happens to have a lot of the peripheral options:

For a full visual outlook of the BIOS we tested, see the gallery below.
With the new graphical BIOS there are many different ways a motherboard company can adjust the BIOS to be more interactive, but sometimes the graphically simpler interfaces are the easiest to use. There has to be the right leap from old to new for everyone to change.


GIGABYTE Z97X-SOC Force Software
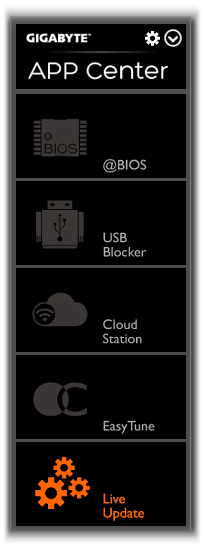
In the last generation, GIGABYTE upgraded its software package to a new version of EasyTune. The number denoting the version was gone and the interface got an overhaul onto a black background and colored text. Rather than having all the tools associated with the motherboard as different applications, the layout was homogenized from a single interface called the ‘APP Center’, with different ‘APPs’ for each software function. Back at Z87 launch it was an excellent direction to take the software, although for a first public release it was a little rough around the edges. For Z97 we get the next iteration of APP Center and the APPs, and suffice to say it comes across as a lot easier to use and a lot of the sharp pointy corners that might have affected user experience are smoothed rather nicely.
There can still be an argument made for a color-on-black livery. Typically this high-contrast layout is more suited for low power environments and to reduce eye-strain; however after a while the effect of reading color-on-black can affect a user more than the usual black-on-white (which also tends to offer better readability).
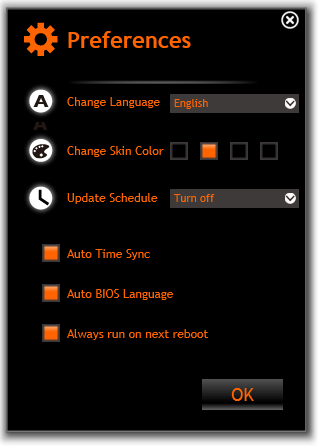
That aside, the above image shows the APP Center and the preferences. The user can change the skin color to one of four colors (to match each of the GIGABYTE product lines), as well as adjust update schedules. The APP Center list is scrollable; however the Live Update application remains fixed. If there are no updates, then Live Update will not offer a window to show no updates, but a dialog box. When updates are available, the following shows:
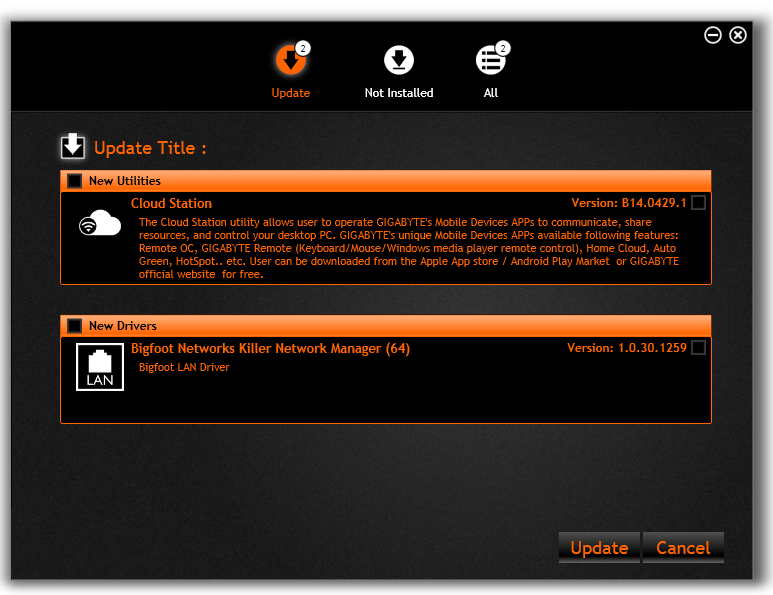
Here we see two updates, although my main criticism at this point is that it does not say how big these updates are. If I were on a limited bandwidth connection, or pay per data, I do not want to download a 400 MB update if one exists. GIGABYTE needs to implement listing the download size next to the update as soon as possible.
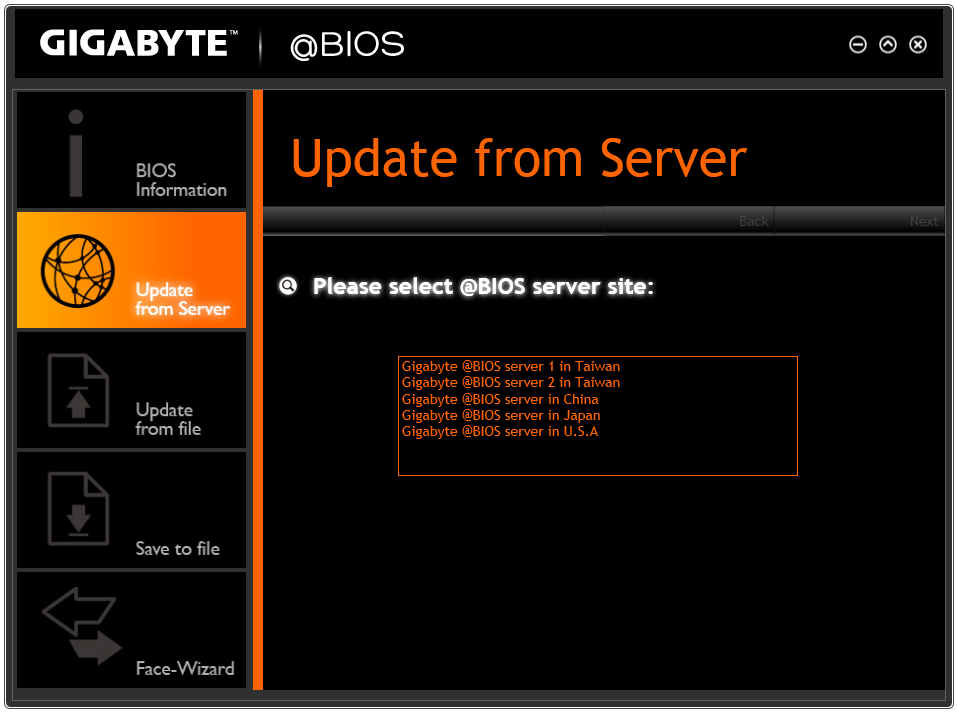
@BIOS

The tool to update the BIOS in the OS is @BIOS (‘at-BIOS’), and this version seems identical to that shown with Z87. Users can update from a global server or a file:
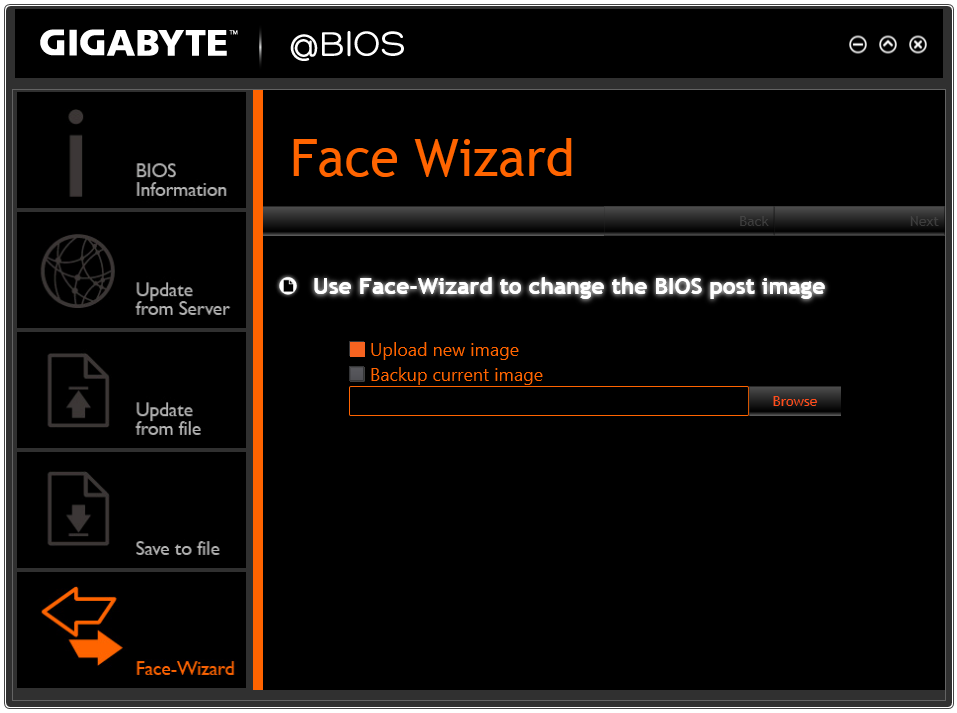
We also have the option to adjust the boot-up POST image in the Face Wizard tab:
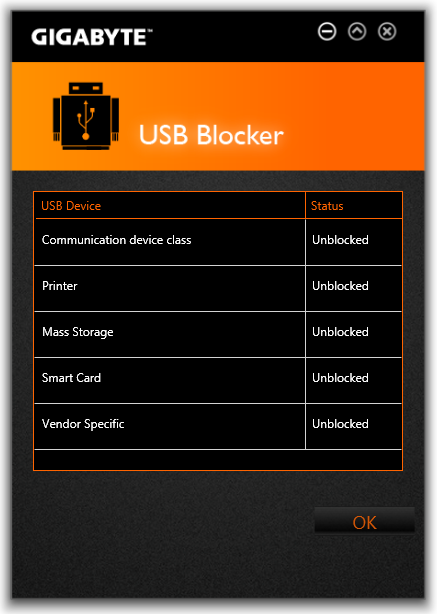
USB Blocker
The USB Blocker tool allows businesses to reject certain types of USB device inserted in the machine. As such, if you have a touch interface system or one that is to be controlled remotely, with this software you should be able to disable any other USB Input devices (mouse/keyboard) from being inserted, along with storage devices.
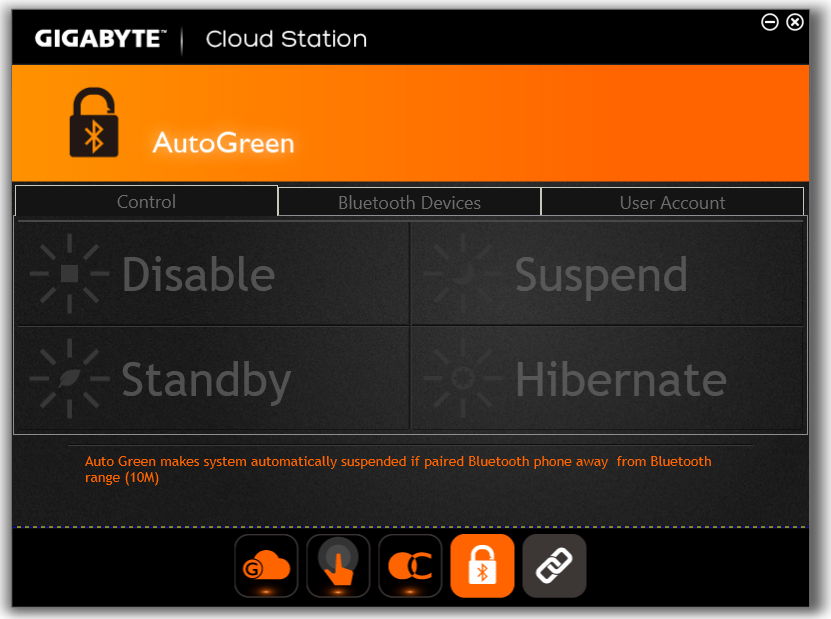
Cloud Station
One of the new features in APP Center is the Cloud Station. As more motherboard manufacturers move to tools that influence other devices other than the PC, Cloud Station is GIGABYTE’s solution. It offers several different options:
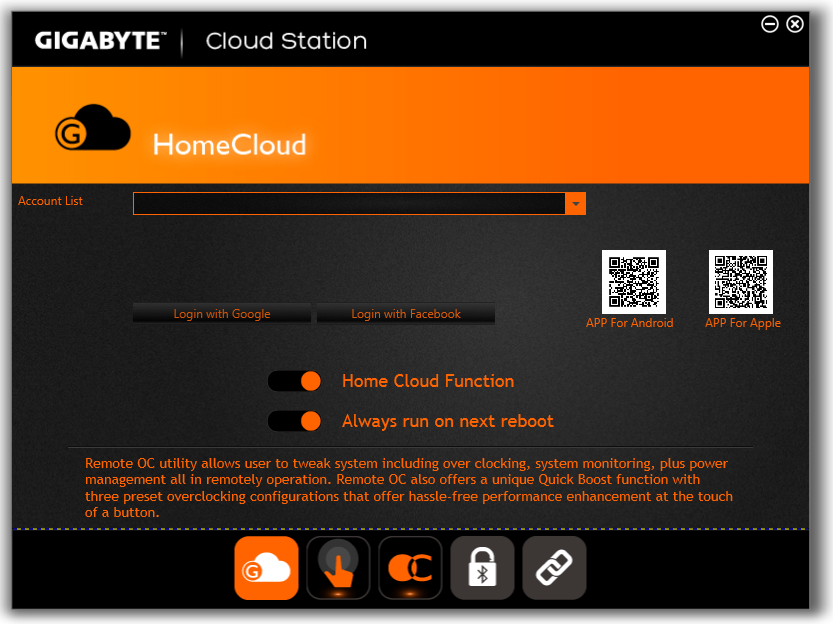
Home Cloud: Build a storage cloud for home use to synchronize data, music and photographs.
Remote OC: Use the Apple/Android apps to remotely overclock from a smartphone or tablet.
GIGABYTE Remote: Use a smartphone or tablet as a keyboard and/or touchpad.
Auto Green: Pairs with a Bluetooth smartphone and will auto-lock Windows when out of range.
HotSpot: Turn the PC into a WiFi hotspot.
Note that as the SOC Force does not come with a WiFi card, some of these tools will only be available if a WiFi module is installed. However the other features should work if the system is connected to a WiFi router, either wirelessly or wired.
EasyTune
The overclocking software paired with a GIGABYTE motherboard has historically been named EasyTune, and with Z97 it further lives up to its name by improving the controls for advanced overclocking. The main screen shows the quick overclock options:
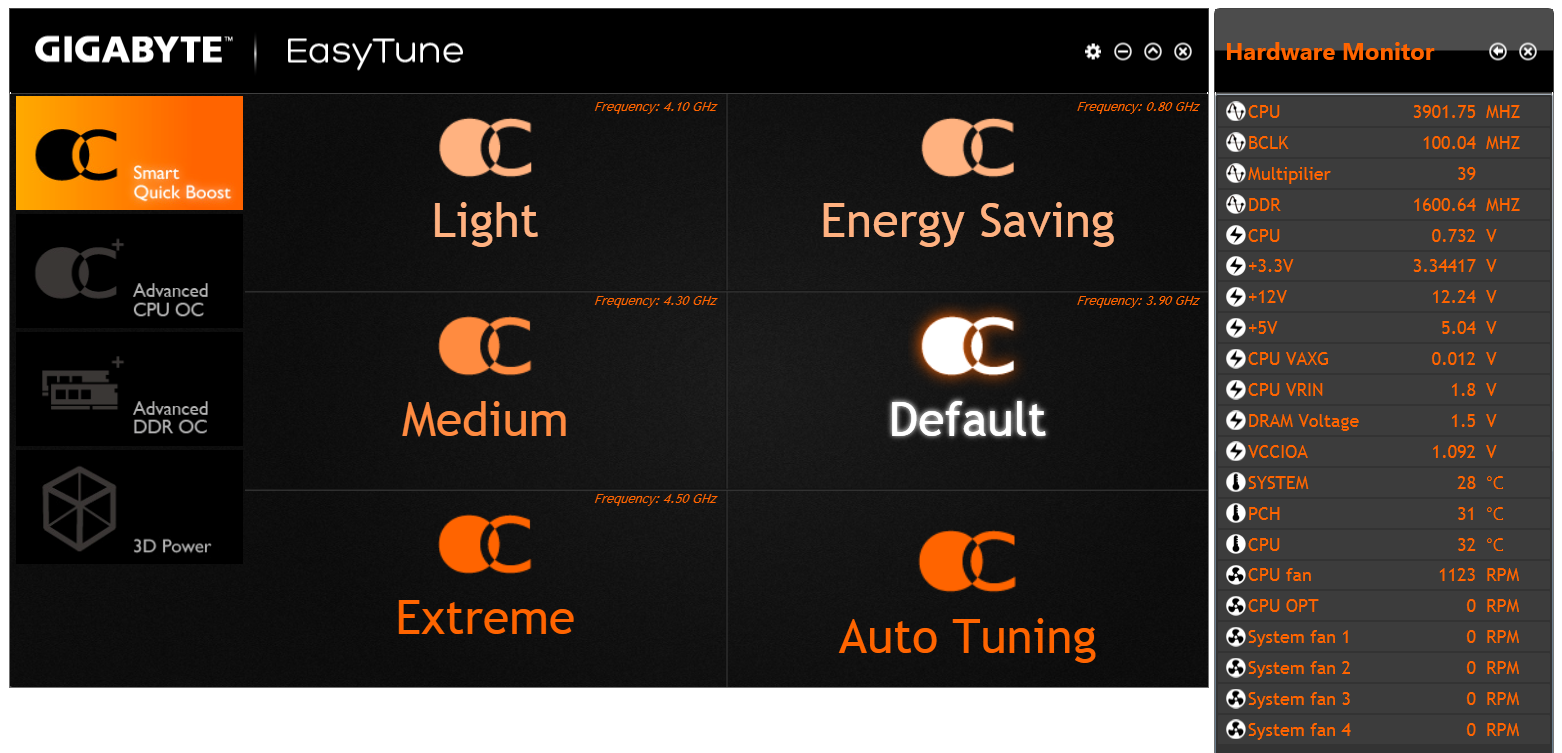
Loading up EasyTune also gives the Hardware Monitor shown on the right, useful for cross checking values. Each of the options in the Smart Quick Boost tab offers a setting from Default, Light, Medium, Extreme, Energy Saving to Auto Tuning. The results of these settings will be later in the review during our overclocking segment.
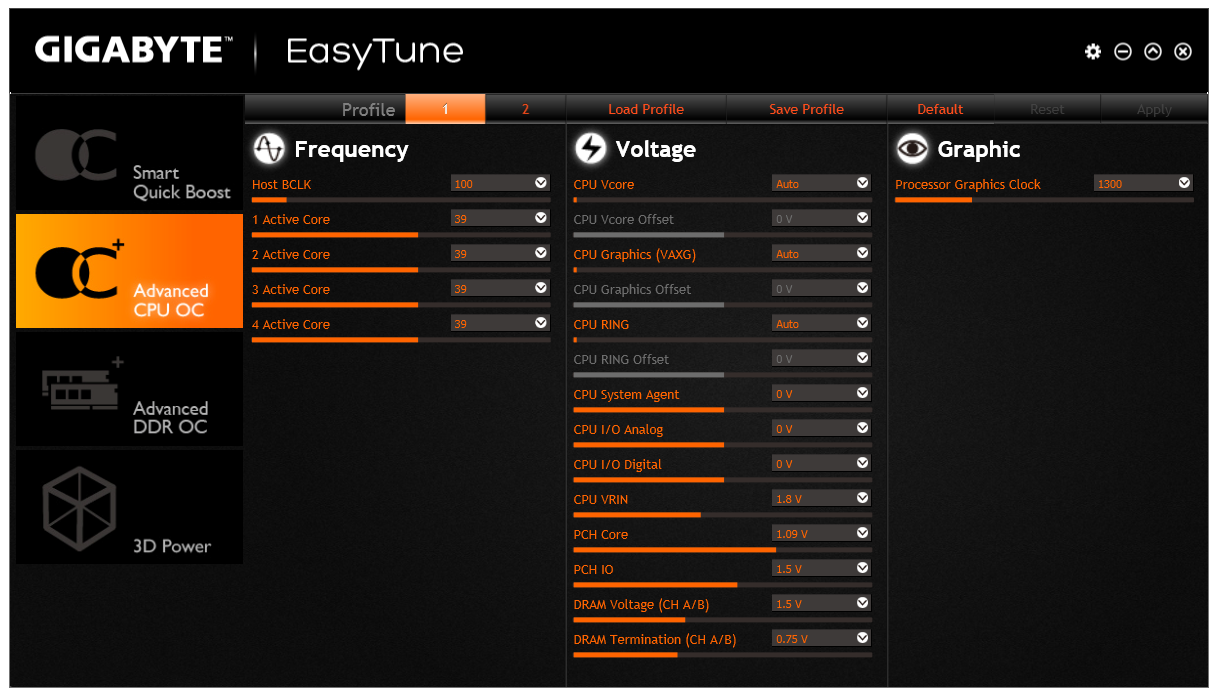
By reducing the size of the screen for EasyTune advanced overclocking options, and separating them into several different menus, EasyTune is easier to use than the Z87 version. In the Advanced CPU tab, we can adjust the BCLK, per-core multipliers, the CPU voltages and IGP frequencies.

As DRAM tweaking can be a magician’s game, users can either use XMP directly, or play with all the sub-timings. I would have preferred the DRAM voltage to be in this menu as well, but GIGABYTE has located that option back in the CPU OC menu.
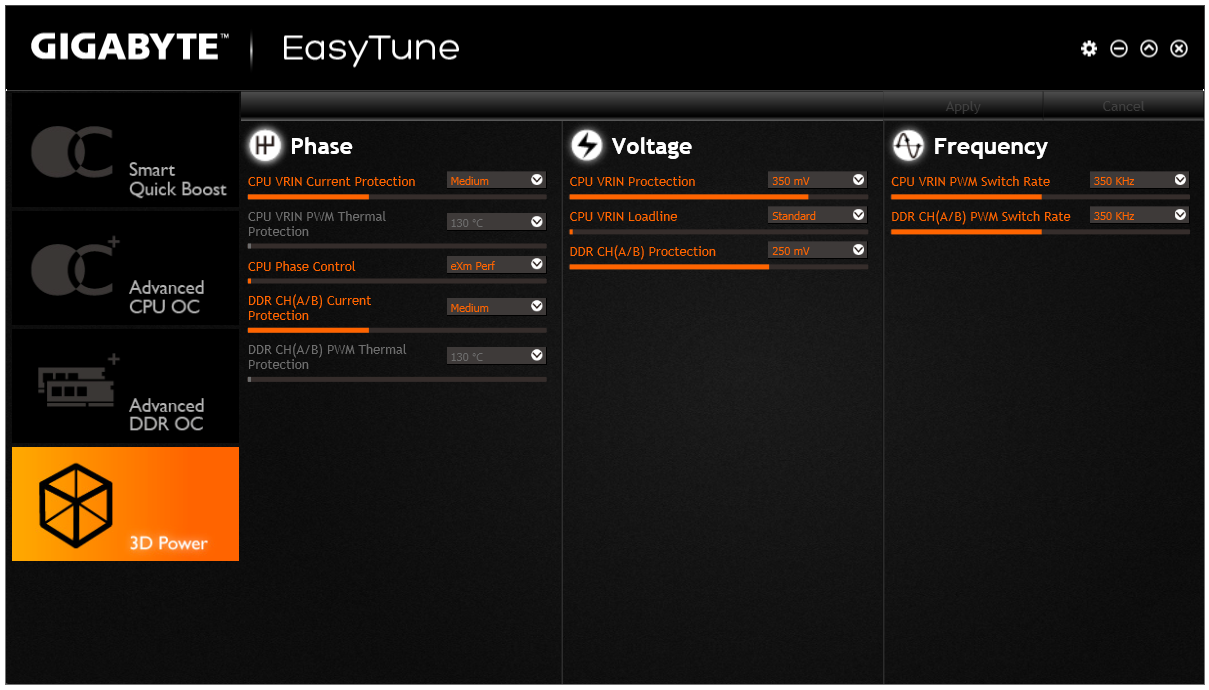
For load line calibration, phase control and switching rates, GIGABYTE has grouped these options into the 3D Power menu.
EZ Setup
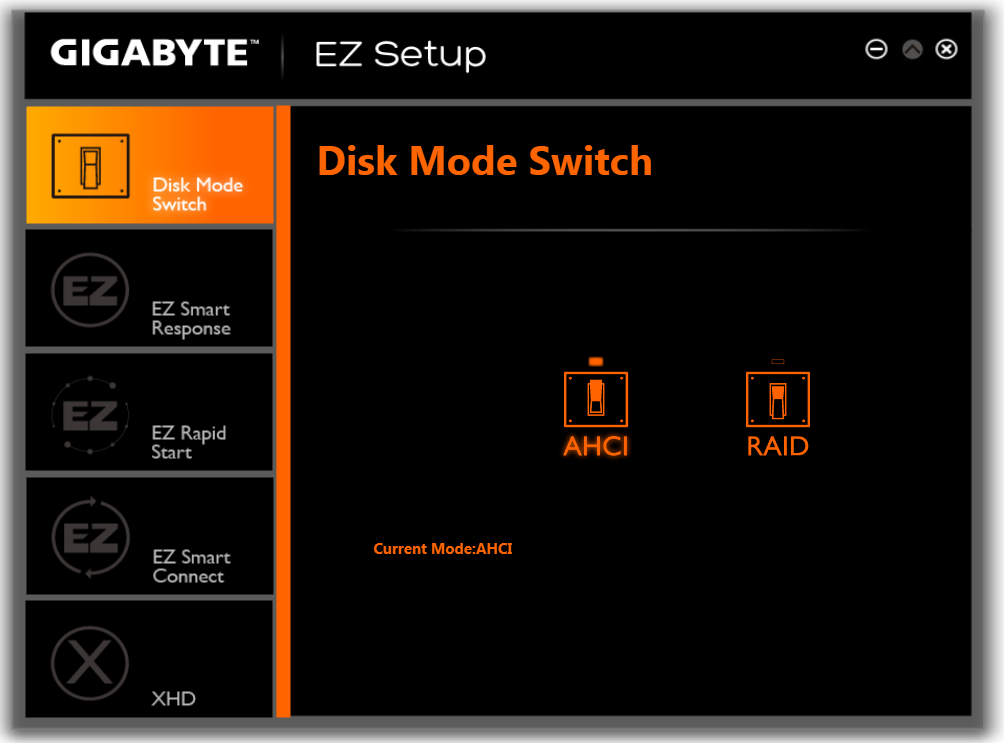
While ‘EZ’ does not translate to my part of the Atlantic (‘ee-zed’ makes no sense here), for those that derive their alphabet via the North American vernacular, the Easy Setup menu allows users to adjust their storage options. The first Disk Mode Switch tab selects AHCI/ RAID:
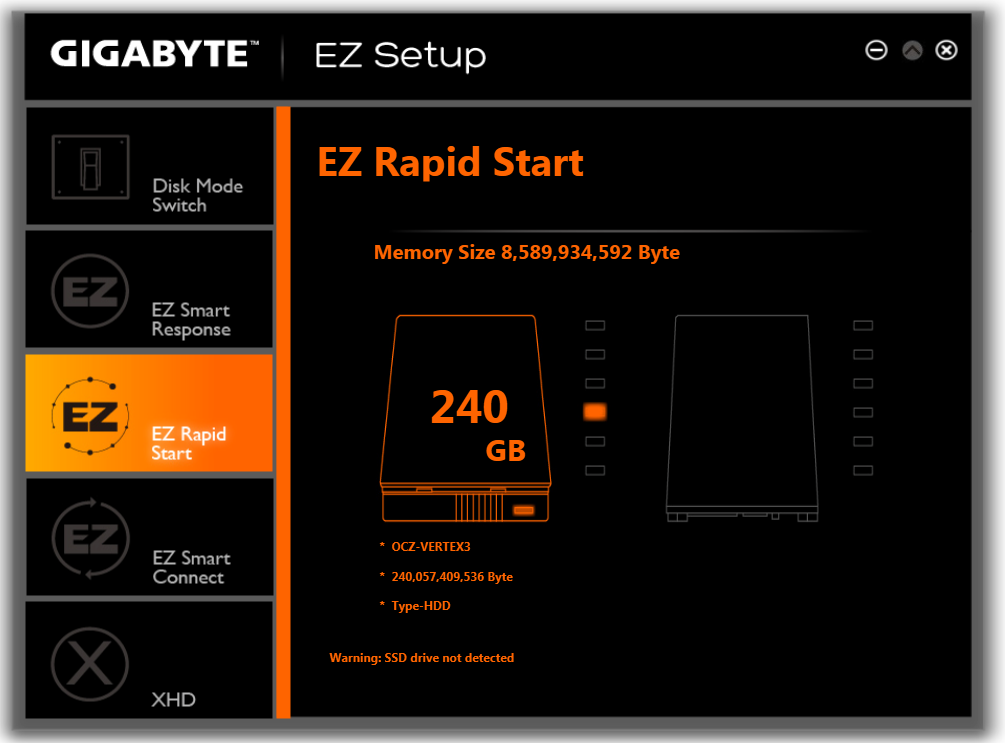
The Rapid Start tab helps implement Intel RST by pairing an SSD with the boot drive as a caching device:
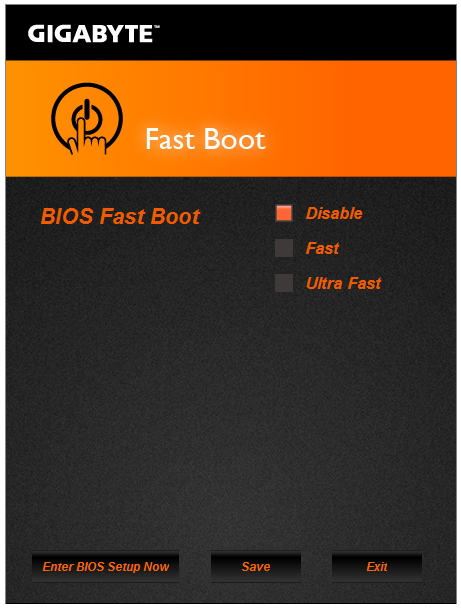
Fast Boot
Due to the new UEFI/EFI topology, users of Windows 7/8 systems can decrease their POST/booting times by using faster modes. In the case of Windows 8, this often means disabling options to allow users to re-enter the BIOS during POST. The Fast Boot APP from GIGABYTE helps deal with which booting mode the user would prefer, along with an option to reboot via the BIOS.
Game Controller
Another new tool in the APP stack is Game Controller which allows users to implement macros (via user-specified hotkeys) that follow cursor movements and button presses. The other part to Game Controller allows users to enter a ‘sniper-mode’, which reduces mouse movement speed to increase sniping accuracy.
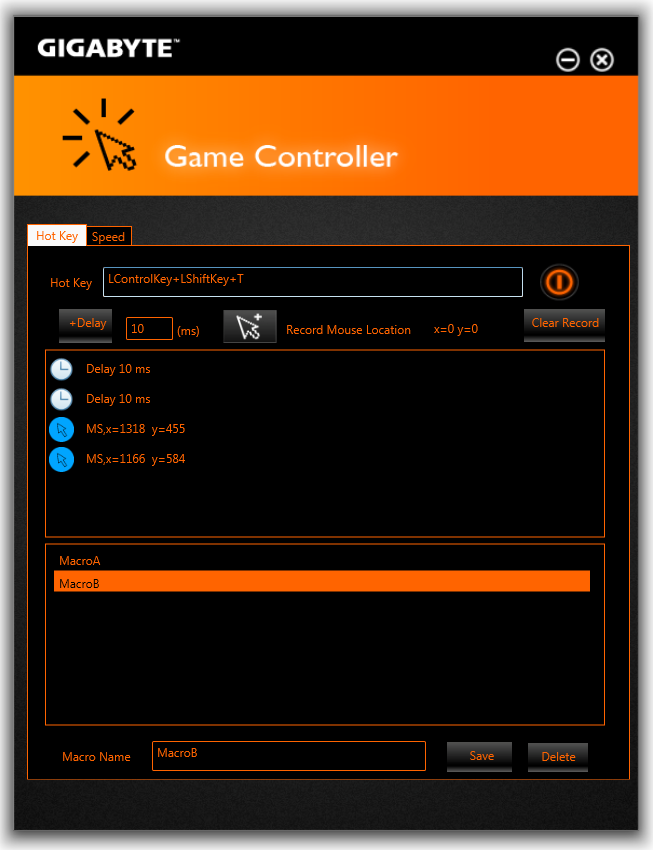
Having played with Game Controller since our UD5H review, there are several annoying issues when using it. Firstly, if a user makes a mistake on a macro, then the macro has to be deleted and restarted. When saved, a macro cannot be reloaded and edited, but it can be added to. If a user designs a macro but wants to change the hotkey, the macro is lost. When recording the mouse location, there is no information on how to use this feature – the user has to hold down the mouse button and navigate it to the part of the screen they want to click. There is no option to select a right click, or to record the position of the mouse with reference to the base location of the window being clicked (in case the window itself is in a new position). Any user with a macro enabled keyboard could perform better for keypresses, or an hour learning AutoHotKey for any coder would be a vastly better tool. GIGABYTE should be commended for attempting this software, although this is still very basic in its implementation.
System Information and Fans
As part of the reshuffle of the GIGABYTE software, fan controls have moved into the System Information section.
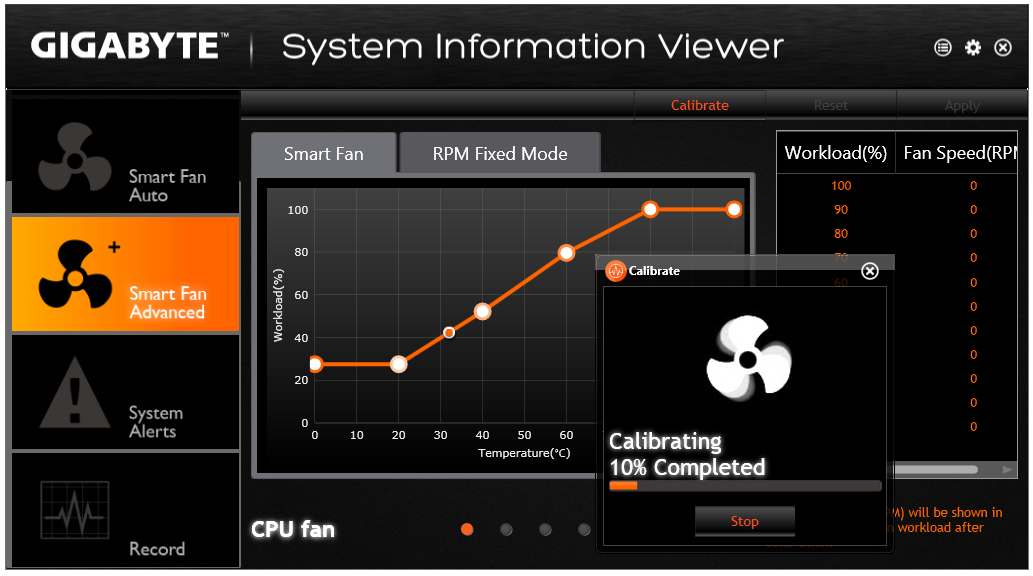
The System Information tab is self-explanatory, and the Smart Fan controls are split between Auto and Advanced. Auto offers four modes: Full Speed, Performance, Standard and Silent. The Advanced mode allows users to calibrate fans:
The calibration shows the voltage applied (as a % of maximum) against the fan speed. Users then have to do the mental calculations for the gradient of the fan speed. Ideally the mathematics should be dealt with on the software side (and the mathematics is really, really simple) and the graph axes updated appropriately, but at present few motherboard manufacturers are making that leap.
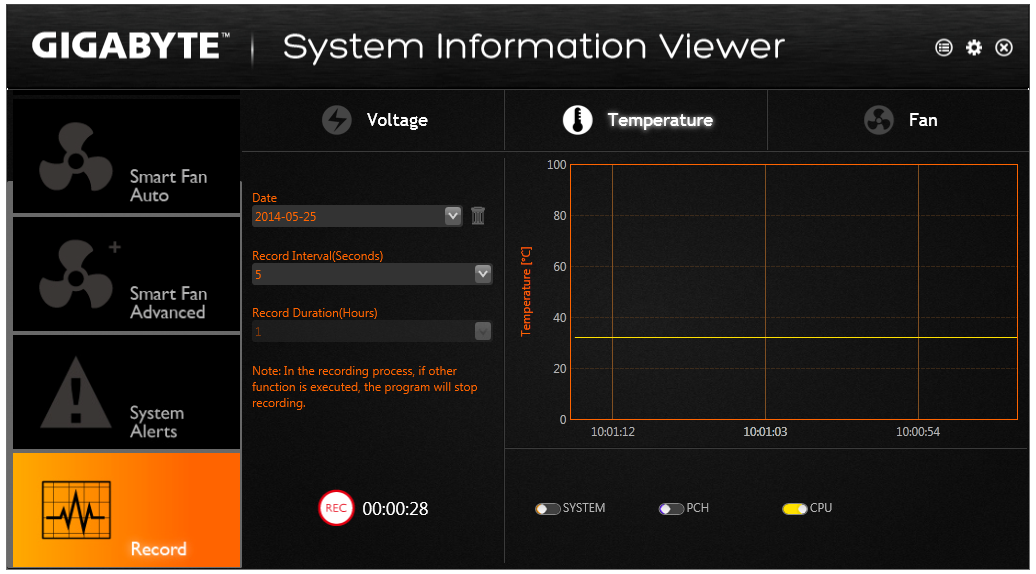
The software also allows for a recording option, with users to see some of the data as it adjusts in real time:

For whatever reason, this software failed to read any differences in my CPU temperature. I would load up the processor, but no change would be observed. I referenced this back to GIGABYTE, but even with the latest updates on both ends, they could not see the issue.
Killer Network Manager
As the Atheros Killer NIC is part of the cost of the motherboard, it makes sense to have a quick look at the software. For anyone that has used network prioritization software previously, the Killer software comes across as the Fisher-Price of network management, developed primarily for Windows 8:
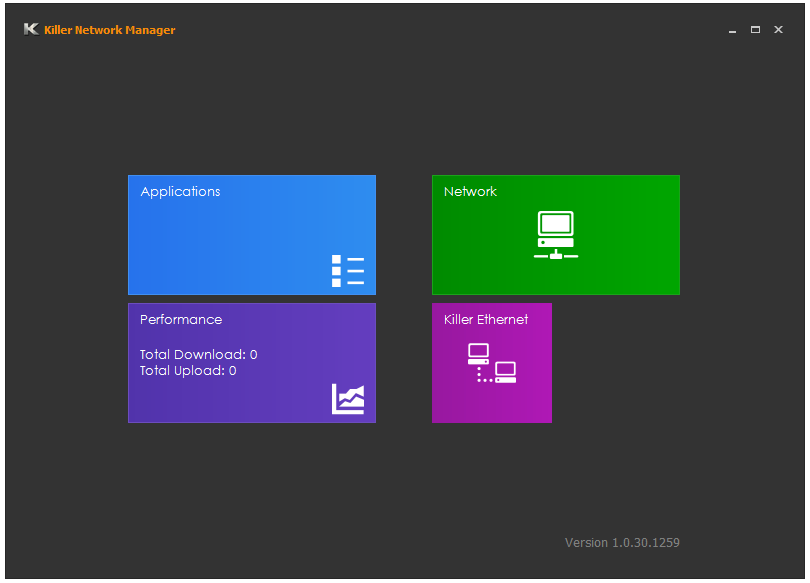
Users can decide which applications have priority:
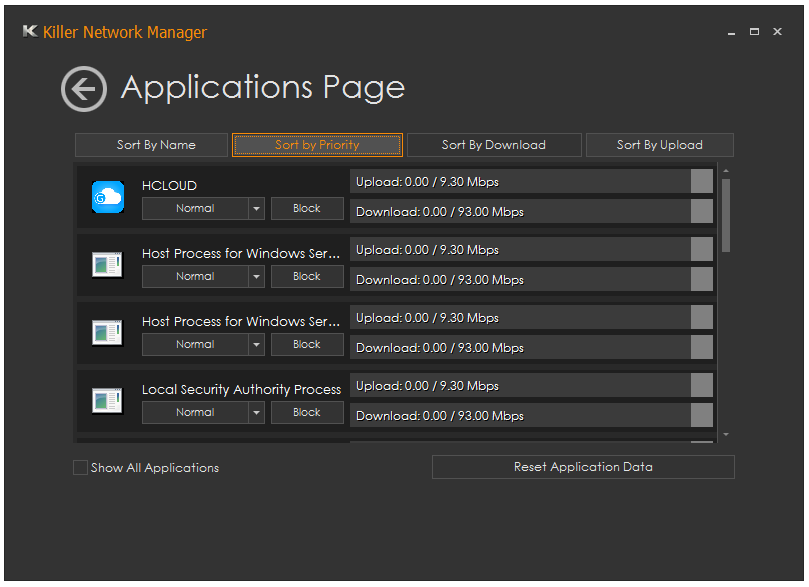
And a basic account is kept of what apps send what data:
Compared to some of the cFos implementations we have seen on motherboards that license cFosSpeed, the Killer implementation seems overly basic for what is an expensive bundle for the motherboard manufacturers. Buying the Killer bundle means the software license is included, but the Intel implementation requires purchasing a cFos license. Buying licenses in bulk is cheaper for the motherboard manufacturers, but they have to decide its worth to the consumer at the end of the day.


GIGABYTE Z97X-SOC Force In The Box
Much like with the 8-series overclocking range of motherboards, trying to hit that $200-$220 price point can be tricky. In the past, overclocking oriented motherboards go north of $250 and $300, making it easier to include extras in the box and make the purchase of the motherboard seem more than just a functional entity in order to get the system up and running. Down at $200, the Z87X-OC we reviewed had a similar issue – the cheaper end of the overclocking oriented market does not get much to make their purchase feel extra special. Similarly the Z97X-SOC Force comes with the bare essentials:
Driver Disk
Manual
Rear IO Shield
Four SATA Cables
SLI Bridge
Crossfire Bridge
Voltage Check Point cables
OC Brace
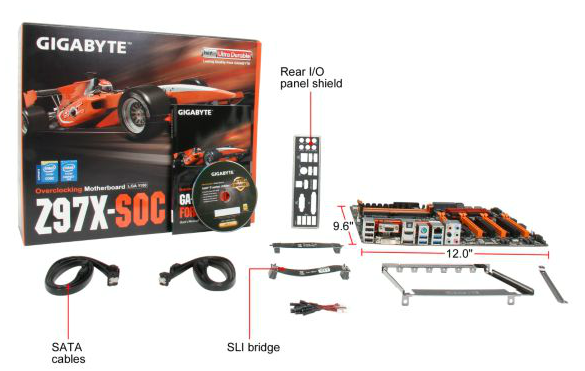
The inclusion of a Crossfire bridge is not too common and a good part from GIGABYTE, and the four SATA cables mimics what most users will eventually use the system for. We looked at the OC Brace with the Z87X-OC and the same conclusion holds true – for a system on a desk without plastic standoffs, it does aid in keeping GPU spacing consistent and is a nice addition. At my trip to GIGABYTE HQ last year, they showed me several iterations of the design, meaning that the OC Brace was a proper, well thought out project with gradual improvements to the final shape. The OC Brace still has limited appeal to the wider audience though, as with the motherboard inside a case it no longer has any use.
GIGABYTE Z97X-SOC Force Overclocking
Experience with GIGABYTE Z97X-SOC Force
While the automatic overclocking in the OS usually provides a good viewpoint in which to start manual overclocking, I feel that GIGABYTE’s automatic overclocking implementation is somewhat overly aggressive. Our test i7-4770K is somewhere around average in terms of overclock ability, normally hitting 4.6 GHz stable at around 1.35 volts (which is roughly the limit for a standard Haswell CPU in terms of voltages and temperatures on air). The GIGABYTE system goes straight for the jugular in the medium overclocking preset, with 1.380 volts on loading. This pushes the temperature right up (100C load recorded) when there is no need. It is true that some CPUs need that much voltage for 4.3 GHz (I had one), but having that much voltage period is almost criminal unless the CPU is a golden sample. This situation is overly compounded by the automatic tuning option, which implements a 1.545 volt overclock. GIGABYTE needs to implement a system that asks what the cooling is on the system and implement voltages accordingly otherwise they might be left behind in automatic overclocking options compared to their rivals.
For manual overclocking, our CPU was the limiting factor similar to the other reviews. It hit 4.6 GHz at 1.325 volts, with 94C as the peak temperature during 5 minutes of OCCT loading. Users should note that to adjust some of the frequencies in the OS using the buttons on the motherboard, the driver has to be installed from the CD.
Methodology:
Our standard overclocking methodology is as follows. We select the automatic overclock options and test for stability with PovRay and OCCT to simulate high-end workloads. These stability tests aim to catch any immediate causes for memory or CPU errors.
For manual overclocks, based on the information gathered from previous testing, starts off at a nominal voltage and CPU multiplier, and the multiplier is increased until the stability tests are failed. The CPU voltage is increased gradually until the stability tests are passed, and the process repeated until the motherboard reduces the multiplier automatically (due to safety protocol) or the CPU temperature reaches a stupidly high level (100ºC+). Our test bed is not in a case, which should push overclocks higher with fresher (cooler) air.
Overclock Results:

Many thanks to...
We must thank the following companies for kindly providing hardware for our test bed:
Thank you to OCZ for providing us with PSUs and SSDs.
Thank you to G.Skill and ADATA for providing us with memory kits.
Thank you to Corsair for providing us with an AX1200i PSU, Corsair H80i CLC and DRAM.
Thank you to ASUS for providing us with the AMD HD7970 GPUs and some IO Testing kit.
Thank you to MSI for providing us with the NVIDIA GTX 770 Lightning GPUs.
Thank you to Rosewill for providing us with PSUs and RK-9100 keyboards.
Thank you to ASRock for providing us with some IO testing kit.
Test Setup
| Test Setup | |
| Processor |
Intel Core i7-4770K ES 4 Cores, 8 Threads, 3.5 GHz (3.9 GHz Turbo) |
| Motherboard | GIGABYTE Z97X-SOC Force |
| Cooling |
Corsair H80i Thermalright TRUE Copper |
| Power Supply |
OCZ 1250W Gold ZX Series Corsair AX1200i Platinum PSU |
| Memory | G.Skill RipjawsZ 4x4 GB DDR3-1600 9-11-9 Kit |
| Memory Settings | 1600 9-11-9-27 1T tRFC 240 |
| Video Cards |
MSI GTX 770 Lightning 2GB (1150/1202 Boost) ASUS HD7970 3GB (Reference) |
| Video Drivers |
Catalyst 13.12 NVIDIA Drivers 335.23 |
| Hard Drive | OCZ Vertex 3 256GB |
| Optical Drive | LG GH22NS50 |
| Case | Open Test Bed |
| Operating System | Windows 7 64-bit SP1 |
| USB 2/3 Testing | OCZ Vertex 3 240GB with SATA->USB Adaptor |
Power Consumption
Power consumption was tested on the system as a whole with a wall meter connected to the OCZ 1250W power supply, while in a single MSI GTX 770 Lightning GPU configuration. This power supply is Gold rated, and as I am in the UK on a 230-240 V supply, leads to ~75% efficiency > 50W, and 90%+ efficiency at 250W, which is suitable for both idle and multi-GPU loading. This method of power reading allows us to compare the power management of the UEFI and the board to supply components with power under load, and includes typical PSU losses due to efficiency. These are the real world values that consumers may expect from a typical system (minus the monitor) using this motherboard.
While this method for power measurement may not be ideal, and you feel these numbers are not representative due to the high wattage power supply being used (we use the same PSU to remain consistent over a series of reviews, and the fact that some boards on our test bed get tested with three or four high powered GPUs), the important point to take away is the relationship between the numbers. These boards are all under the same conditions, and thus the differences between them should be easy to spot.
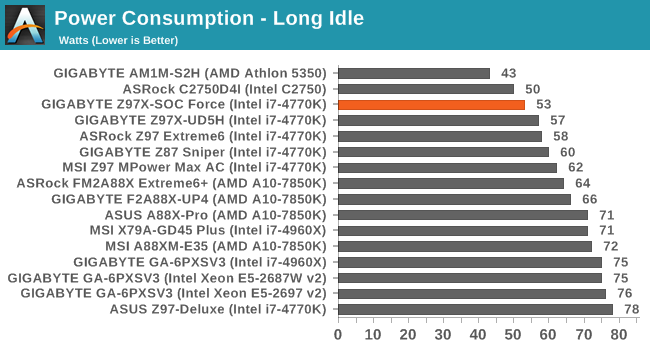
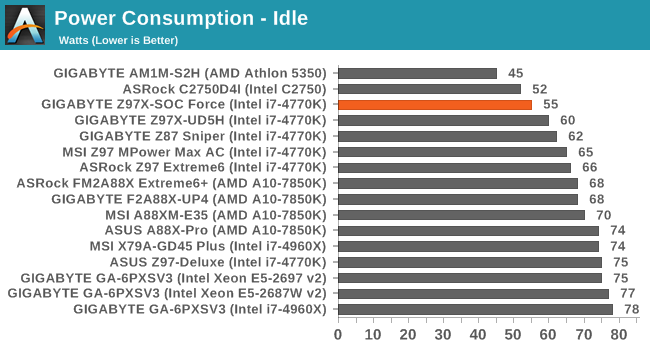

The power consumption of the Z97X-SOC Force is lower than most of the Z97 motherboards we have tested, particularly in long idle and idle. The 150W mark during OCCT seems to be a good spot to aim for in our Z97 reviews going forward.
Windows 7 POST Time
Different motherboards have different POST sequences before an operating system is initialized. A lot of this is dependent on the board itself, and POST boot time is determined by the controllers on board (and the sequence of how those extras are organized). As part of our testing, we are now going to look at the POST Boot Time - this is the time from pressing the ON button on the computer to when Windows 7 starts loading. (We discount Windows loading as it is highly variable given Windows specific features.) These results are subject to human error, so please allow +/- 1 second in these results.
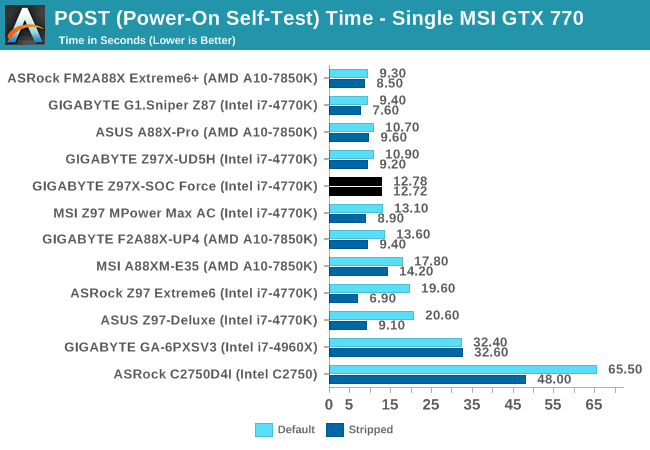
The 12-13 second POST times were not affected when the system had the options disabled in the BIOS, suggesting that if GIGABYTE wants a faster system during standard POST it would all have to come from optimization in the code.
System Benchmarks
Rightmark Audio Analyzer 6.2.5
The premise behind Rightmark:AA is to test the input and output of the audio system to determine noise levels, range, harmonic distortion, stereo crosstalk and so forth. Rightmark:AA should indicate how well the sound system is built and isolated from electrical interference (either internally or externally). For this test we connect the Line Out to the Line In using a short six inch 3.5mm to 3.5mm high-quality jack, turn the OS speaker volume to 100%, and run the Rightmark default test suite at 192 kHz, 24-bit. The OS is tuned to 192 kHz/24-bit input and output, and the Line-In volume is adjusted until we have the best RMAA value in the mini-pretest. We look specifically at the Dynamic Range of the audio codec used on board, as well as the Total Harmonic Distortion + Noise.
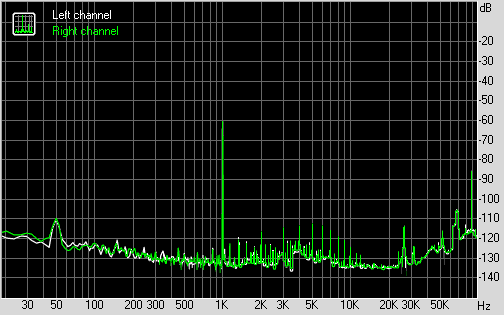
Dynamic Range of the Z97X-SOC Force
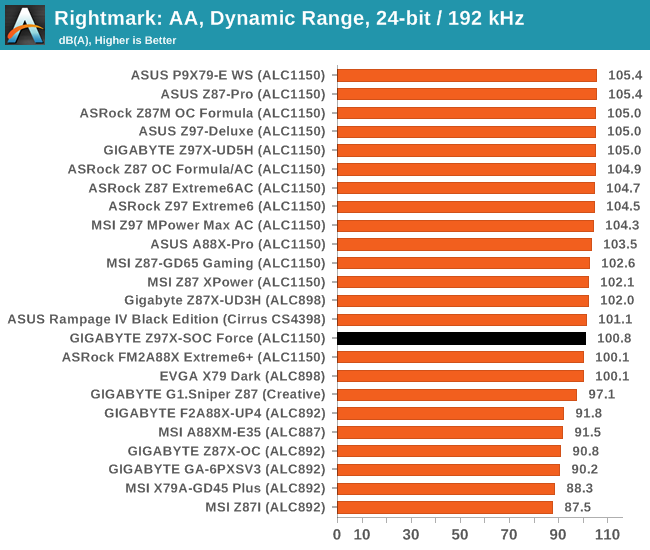
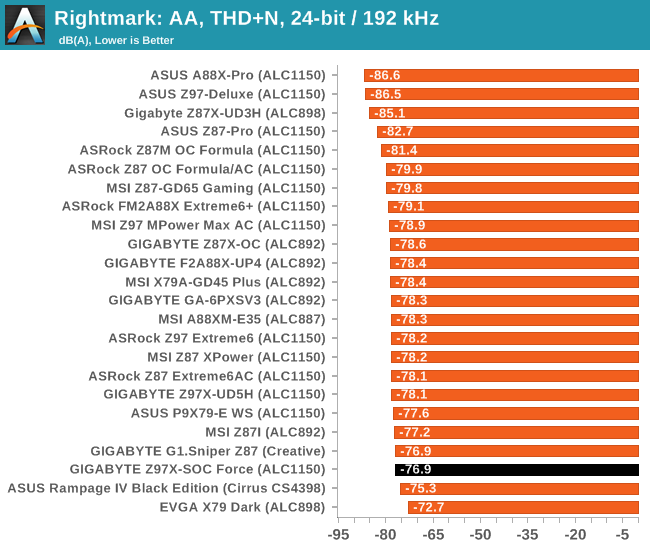
The Z97X-SOC Force had an identical issue to the Z97X-UD5H we reviewed previously – at 100% volume output, the system recorded heavy distortion above 1 kHz. GIGABYTE argues that this is not necessarily audible when tested by humans, though it does throw a spanner into our quantitative testing. As a result, and no apparent easy fix, we had to drop the output volume to 70%, and adjust the input volume appropriately. This leads to a quantitative reduction in the dynamic range of the audio codec, as shown by our ~100 dBA result.
USB Backup
For this benchmark, we run CrystalDiskMark to determine the ideal sequential read and write speeds for the USB port using our 240 GB OCZ Vertex3 SSD with a SATA 6 Gbps to USB 3.0 converter. Then we transfer a set size of files from the SSD to the USB drive using DiskBench, which monitors the time taken to transfer. The files transferred are a 1.52 GB set of 2867 files across 320 folders – 95% of these files are small typical website files, and the rest (90% of the size) are the videos used in the WinRAR test. In an update to pre-Z87 testing, we also run MaxCPU to load up one of the threads during the test which improves general performance up to 15% by causing all the internal pathways to run at full speed.
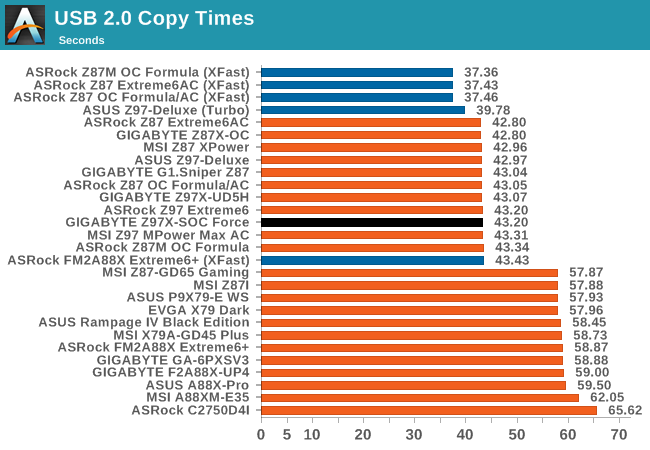
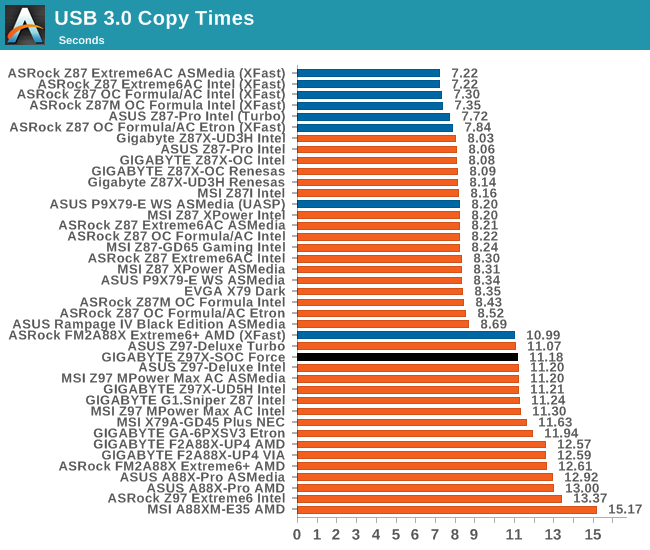
USB 2.0 speed is ballpark for Z97, however the USB 3.0 speed is currently near the top of our Z97 testing. It is still a way off from the Z87 motherboard range, suggesting that this chipset exchanges USB 3.0 performance for DPC Latency performance.
DPC Latency
Deferred Procedure Call latency is a way in which Windows handles interrupt servicing. In order to wait for a processor to acknowledge the request, the system will queue all interrupt requests by priority. Critical interrupts will be handled as soon as possible, whereas lesser priority requests, such as audio, will be further down the line. So if the audio device requires data, it will have to wait until the request is processed before the buffer is filled. If the device drivers of higher priority components in a system are poorly implemented, this can cause delays in request scheduling and process time, resulting in an empty audio buffer – this leads to characteristic audible pauses, pops and clicks. Having a bigger buffer and correctly implemented system drivers obviously helps in this regard. The DPC latency checker measures how much time is processing DPCs from driver invocation – the lower the value will result in better audio transfer at smaller buffer sizes. Results are measured in microseconds and taken as the peak latency while cycling through a series of short HD videos - less than 500 microseconds usually gets the green light, but the lower the better.

After a b run of DPC Latency results for Z97, the GIGABYTE Z97X-SOC Force performs similarly with less than 60 microseconds as a DPC peak latency.
Real World CPU Benchmarks
Readers of our motherboard review section will have noted the trend in modern motherboards to implement a form of MultiCore Enhancement / Acceleration / Turbo (read our report here) on their motherboards. This does several things – better benchmark results at stock settings (not entirely needed if overclocking is an end-user goal), at the expense of heat and temperature, but also gives in essence an automatic overclock which may be against what the user wants. Our testing methodology is ‘out-of-the-box’, with the latest public BIOS installed and XMP enabled, and thus subject to the whims of this feature. It is ultimately up to the motherboard manufacturer to take this risk – and manufacturers taking risks in the setup is something they do on every product (think C-state settings, USB priority, DPC Latency / monitoring priority, memory subtimings at JEDEC). Processor speed change is part of that risk which is clearly visible, and ultimately if no overclocking is planned, some motherboards will affect how fast that shiny new processor goes and can be an important factor in the purchase.
It should be noted that in the testing of the GIGABYTE Z97X-SOC Force, we saw a rise in the CPU IGP frequency under stock settings. Normally the HD 4600 in the i7-4770K should be at 1250 MHz when loaded, however the Z97X-SOC Force pushes this to 1300 MHz, resulting in a small (~4%) frame rate increase.
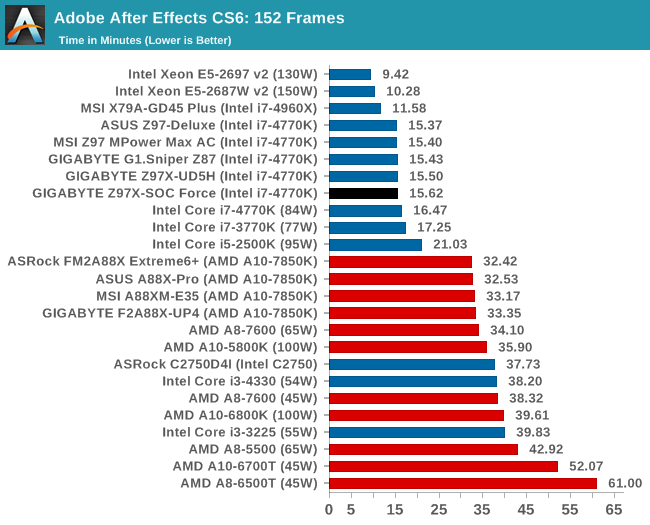
Rendering – Adobe After Effects CS6: link
Published by Adobe, After Effects is a digital motion graphics, visual effects and compositing software package used in the post-production process of filmmaking and television production. For our benchmark we downloaded a common scene in use on the AE forums for benchmarks and placed it under our own circumstances for a repeatable benchmark. We generate 152 frames of the scene and present the time to do so based purely on CPU calculations.
Compression – WinRAR 5.0.1: link
Our WinRAR test from 2013 is updated to the latest version of WinRAR at the start of 2014. We compress a set of 2867 files across 320 folders totaling 1.52 GB in size – 95% of these files are small typical website files, and the rest (90% of the size) are small 30 second 720p videos.
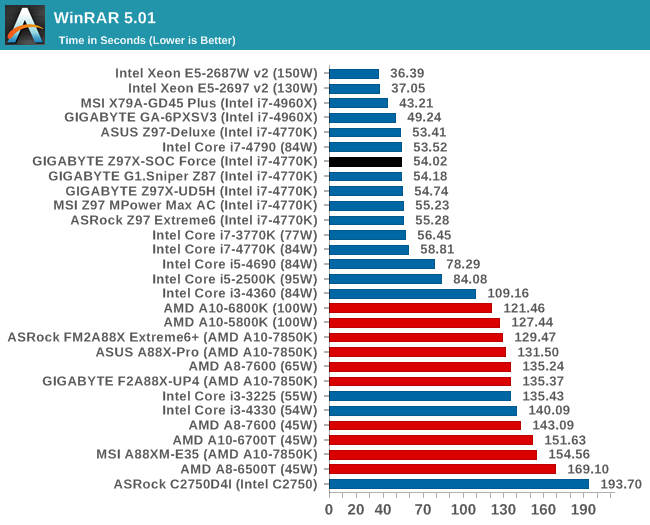
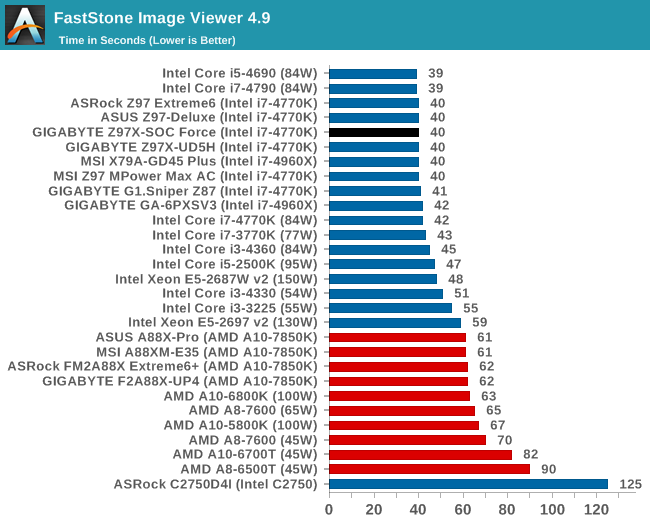
Image Manipulation – FastStone Image Viewer 4.9: link
Similarly to WinRAR, the FastStone test us updated for 2014 to the latest version. FastStone is the program I use to perform quick or bulk actions on images, such as resizing, adjusting for color and cropping. In our test we take a series of 170 images in various sizes and formats and convert them all into 640x480 .gif files, maintaining the aspect ratio. FastStone does not use multithreading for this test, and thus single threaded performance is often the winner.
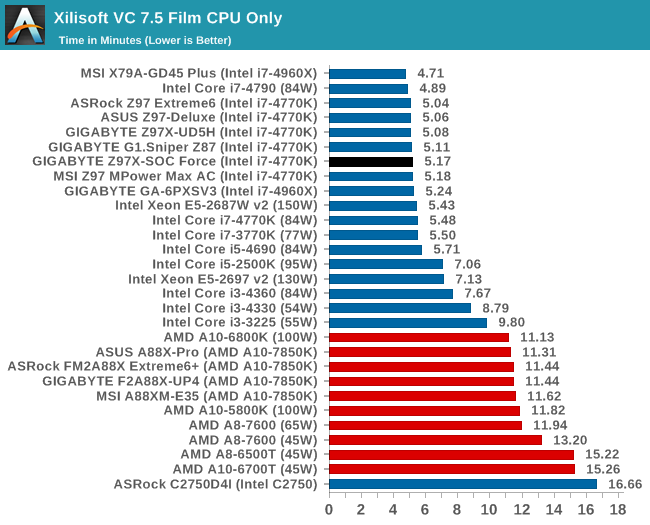
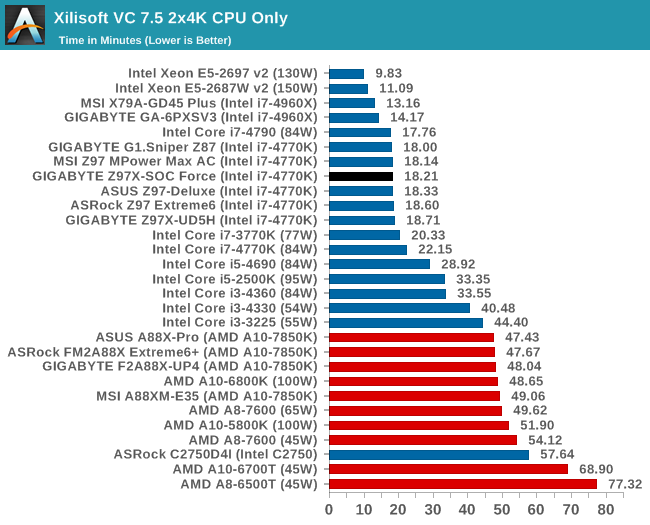
Video Conversion – Xilisoft Video Converter 7: link
The XVC test I normally do is updated to the full version of the software, and this time a different test as well. Here we take two different videos: a double UHD (3840x4320) clip of 10 minutes and a 640x266 DVD rip of a 2h20 film and convert both to iPod suitable formats. The reasoning here is simple – when frames are small enough to fit into memory, the algorithm has more chance to apply work between threads and process the video quicker. Results shown are in seconds and time taken to encode.
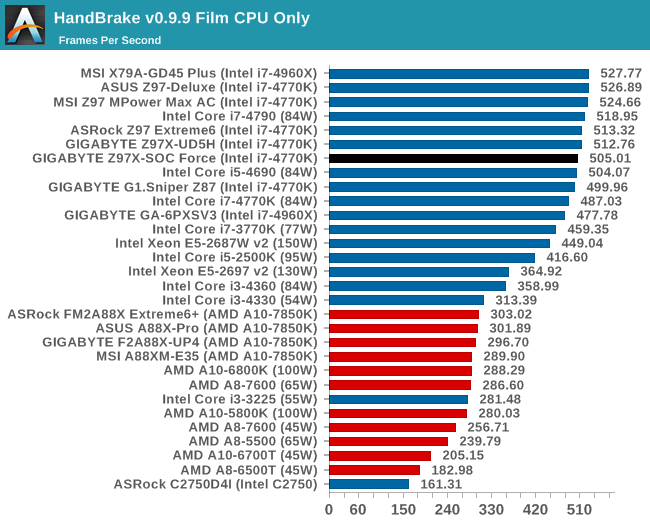
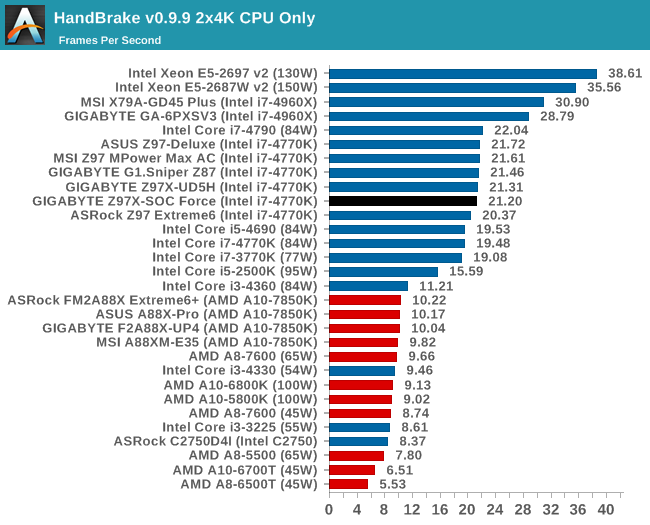
Video Conversion – Handbrake v0.9.9: link
Handbrake is a media conversion tool that was initially designed to help DVD ISOs and Video CDs into more common video formats. The principle today is still the same, primarily as an output for H.264 + AAC/MP3 audio within an MKV container. In our test we use the same videos as in the Xilisoft test, and results are given in frames per second.
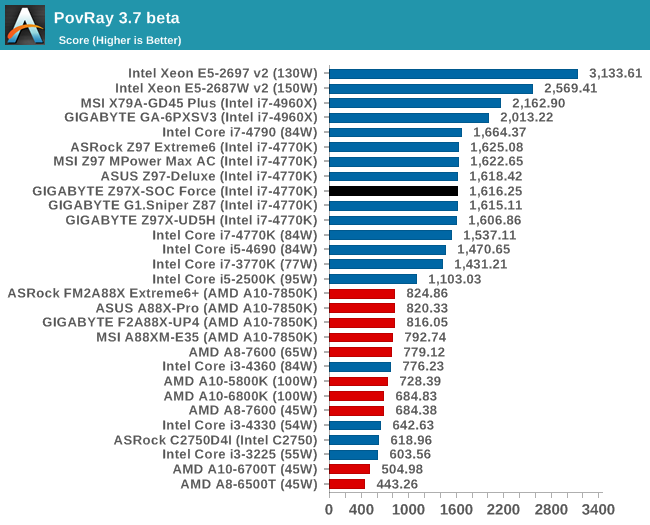
Rendering – PovRay 3.7: link
The Persistence of Vision RayTracer, or PovRay, is a freeware package for as the name suggests, ray tracing. It is a pure renderer, rather than modeling software, but the latest beta version contains a handy benchmark for stressing all processing threads on a platform. We have been using this test in motherboard reviews to test memory stability at various CPU speeds to good effect – if it passes the test, the IMC in the CPU is stable for a given CPU speed. As a CPU test, it runs for approximately 2-3 minutes on high end platforms.
Scientific and Synthetic Benchmarks
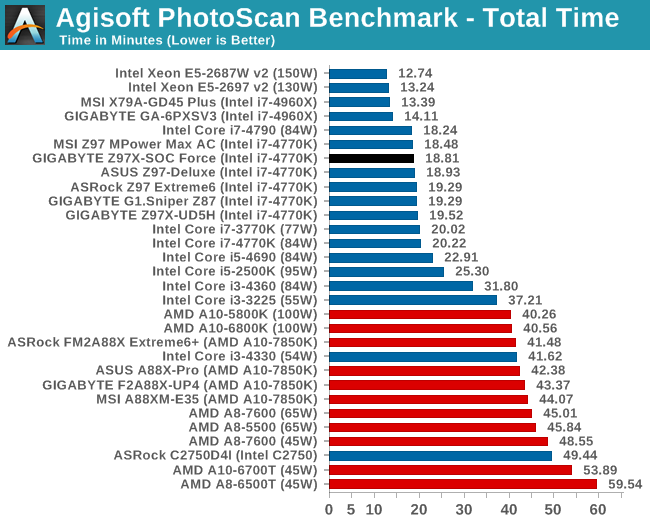
2D to 3D Rendering –Agisoft PhotoScan v1.0: link
Agisoft Photoscan creates 3D models from 2D images, a process which is very computationally expensive. The algorithm is split into four distinct phases, and different phases of the model reconstruction require either fast memory, fast IPC, more cores, or even OpenCL compute devices to hand. Agisoft supplied us with a special version of the software to script the process, where we take 50 images of a stately home and convert it into a medium quality model. This benchmark typically takes around 15-20 minutes on a high end PC on the CPU alone, with GPUs reducing the time.
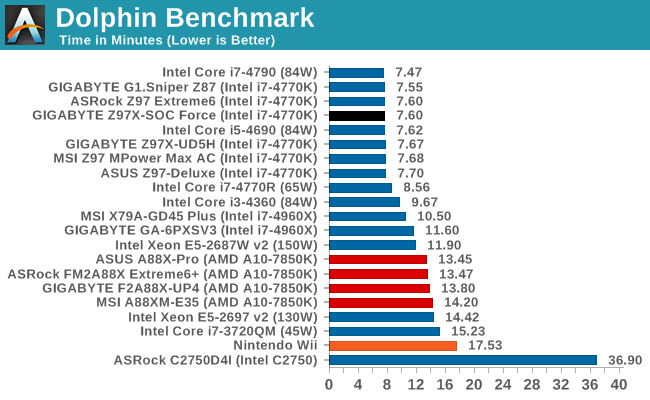
Console Emulation –Dolphin Benchmark: link
At the start of 2014 I was emailed with a link to a new emulation benchmark based on the Dolphin Emulator. The issue with emulators tends to be two-fold: game licensing and raw CPU power required for the emulation. As a result, many emulators are often bound by single thread CPU performance, and general reports tended to suggest that Haswell provided a significant boost to emulator performance. This benchmark runs a Wii program that raytraces a complex 3D scene inside the Dolphin Wii emulator. Performance on this benchmark is a good proxy of the speed of Dolphin CPU emulation, which is an intensive single core task using most aspects of a CPU. Results are given in minutes, where the Wii itself scores 17.53 minutes.
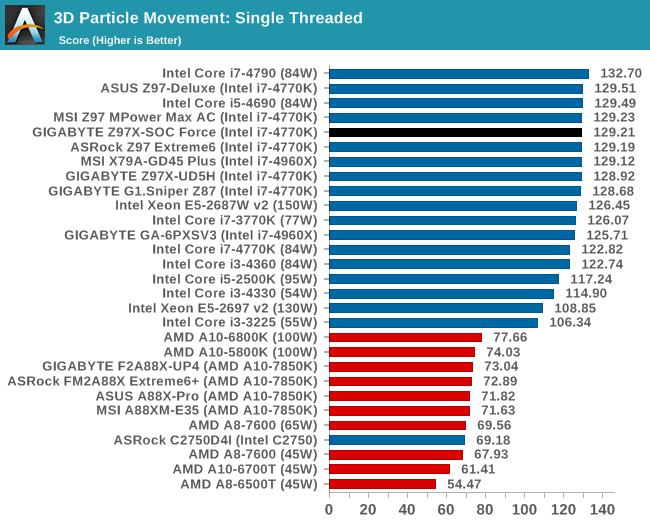
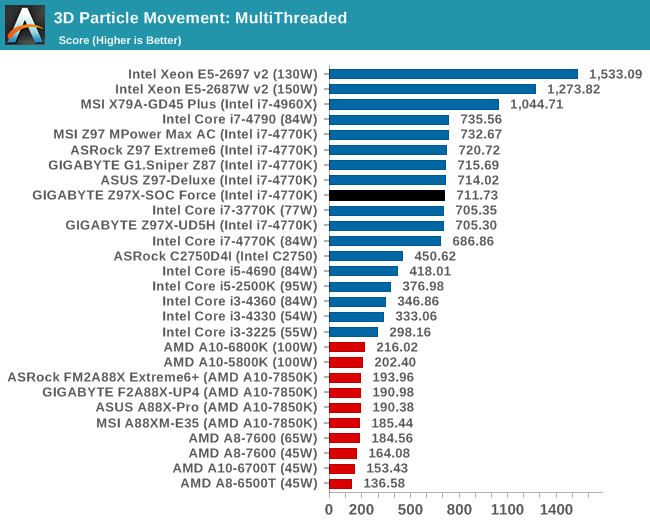
Point Calculations – 3D Movement Algorithm Test: link
3DPM is a self-penned benchmark, taking basic 3D movement algorithms used in Brownian Motion simulations and testing them for speed. High floating point performance, MHz and IPC wins in the single thread version, whereas the multithread version has to handle the threads and loves more cores.
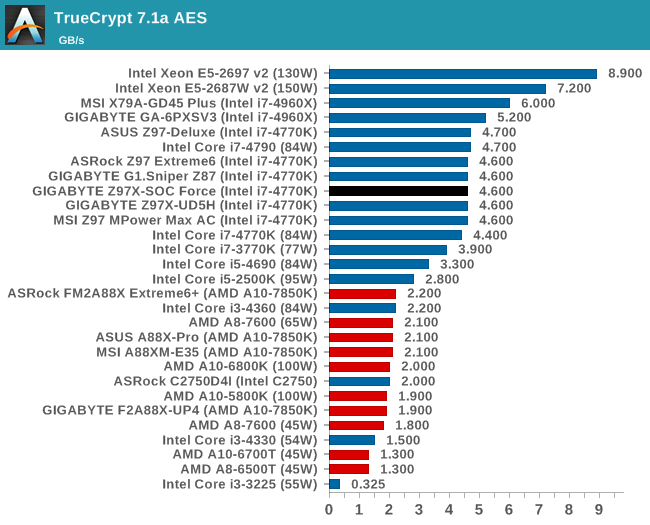
Encryption –TrueCrypt v0.7.1a: link
TrueCrypt is an off the shelf open source encryption tool for files and folders. For our test we run the benchmark mode using a 1GB buffer and take the mean result from AES encryption.
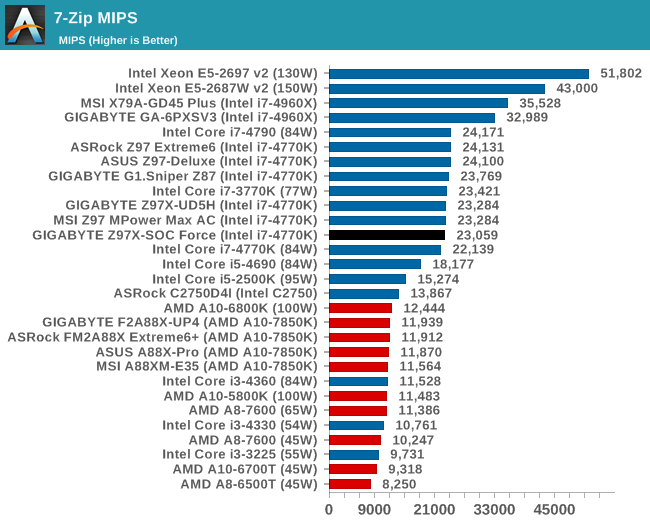
Synthetic – 7-Zip 9.2: link
As an open source compression tool, 7-Zip is a popular tool for making sets of files easier to handle and transfer. The software offers up its own benchmark, to which we report the result.
Gaming Benchmarks
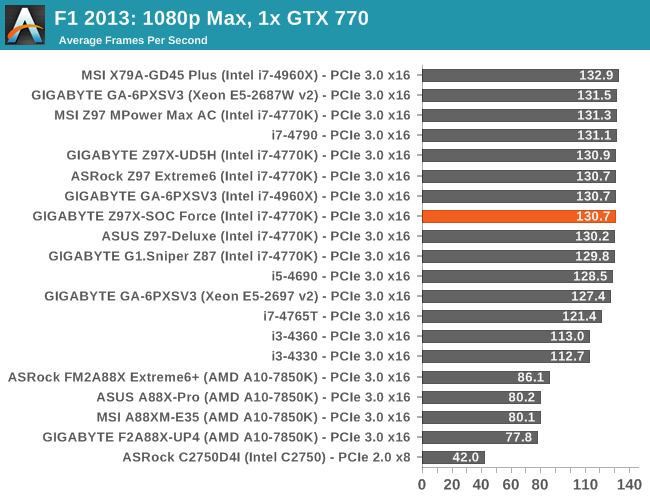
F1 2013
First up is F1 2013 by Codemasters. I am a big Formula 1 fan in my spare time, and nothing makes me happier than carving up the field in a Caterham, waving to the Red Bulls as I drive by (because I play on easy and take shortcuts). F1 2013 uses the EGO Engine, and like other Codemasters games ends up being very playable on old hardware quite easily. In order to beef up the benchmark a bit, we devised the following scenario for the benchmark mode: one lap of Spa-Francorchamps in the heavy wet, the benchmark follows Jenson Button in the McLaren who starts on the grid in 22nd place, with the field made up of 11 Williams cars, 5 Marussia and 5 Caterham in that order. This puts emphasis on the CPU to handle the AI in the wet, and allows for a good amount of overtaking during the automated benchmark. We test at 1920x1080 on Ultra graphical settings.

| F1 2013, 1080p Max | ||
| NVIDIA | AMD | |
| Average Frame Rates |
|
|
| Minimum Frame Rates |
|
|
Bioshock Infinite
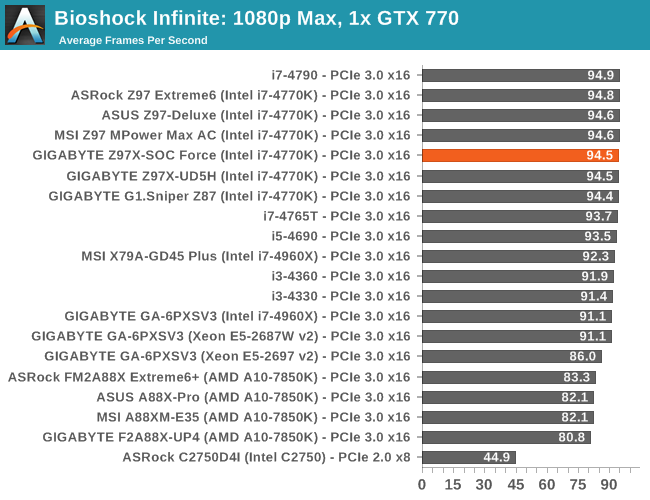
Bioshock Infinite was Zero Punctuation’s Game of the Year for 2013, uses the Unreal Engine 3, and is designed to scale with both cores and graphical prowess. We test the benchmark using the Adrenaline benchmark tool and the Xtreme (1920x1080, Maximum) performance setting, noting down the average frame rates and the minimum frame rates.

| Bioshock Infinite, 1080p Max | ||
| NVIDIA | AMD | |
| Average Frame Rates |
|
|
| Minimum Frame Rates |
|
|
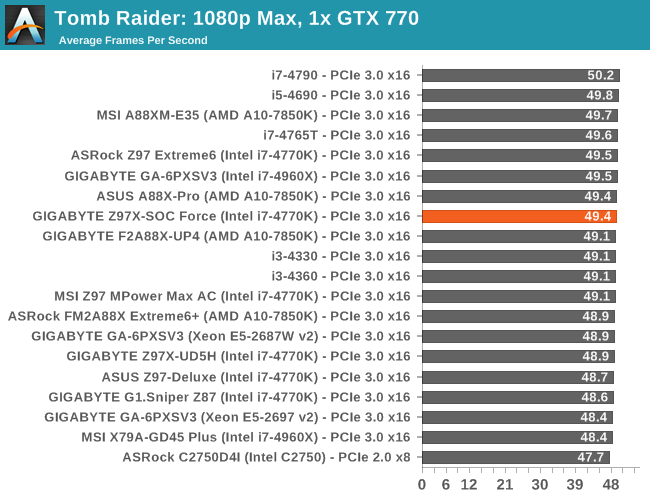
Tomb Raider
The next benchmark in our test is Tomb Raider. Tomb Raider is an AMD optimized game, lauded for its use of TressFX creating dynamic hair to increase the immersion in game. Tomb Raider uses a modified version of the Crystal Engine, and enjoys raw horsepower. We test the benchmark using the Adrenaline benchmark tool and the Xtreme (1920x1080, Maximum) performance setting, noting down the average frame rates and the minimum frame rates.

| Tomb Raider, 1080p Max | ||
| NVIDIA | AMD | |
| Average Frame Rates |
|
|
| Minimum Frame Rates |
|
|
Gaming Benchmarks
Sleeping Dogs
Sleeping Dogs is a benchmarking wet dream – a highly complex benchmark that can bring the toughest setup and high resolutions down into single figures. Having an extreme SSAO setting can do that, but at the right settings Sleeping Dogs is highly playable and enjoyable. We run the basic benchmark program laid out in the Adrenaline benchmark tool, and the Xtreme (1920x1080, Maximum) performance setting, noting down the average frame rates and the minimum frame rates.

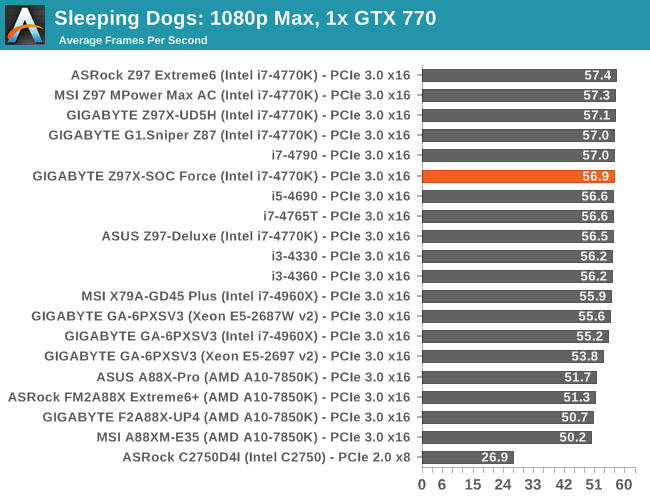
| Sleeping Dogs, 1080p Max | ||
| NVIDIA | AMD | |
| Average Frame Rates |
|
|
| Minimum Frame Rates |
|
|
Company of Heroes 2
Company of Heroes 2 also can bring a top end GPU to its knees, even at very basic benchmark settings. To get an average 30 FPS using a normal GPU is a challenge, let alone a minimum frame rate of 30 FPS. For this benchmark I use modified versions of Ryan’s batch files at 1920x1080 on High. COH2 is a little odd in that it does not scale with more GPUs with the drivers we use.

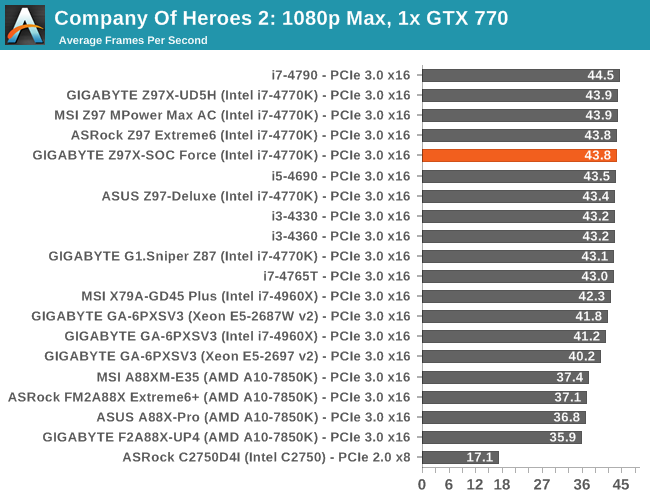
| Company of Heroes 2, 1080p Max | ||
| NVIDIA | AMD | |
| Average Frame Rates |
|
|
| Minimum Frame Rates |
|
|
Battlefield 4
The EA/DICE series that has taken countless hours of my life away is back for another iteration, using the Frostbite 3 engine. AMD is also piling its resources into BF4 with the new Mantle API for developers, designed to cut the time required for the CPU to dispatch commands to the graphical sub-system. For our test we use the in-game benchmarking tools and record the frame time for the first ~70 seconds of the Tashgar single player mission, which is an on-rails generation of and rendering of objects and textures. We test at 1920x1080 at Ultra settings.
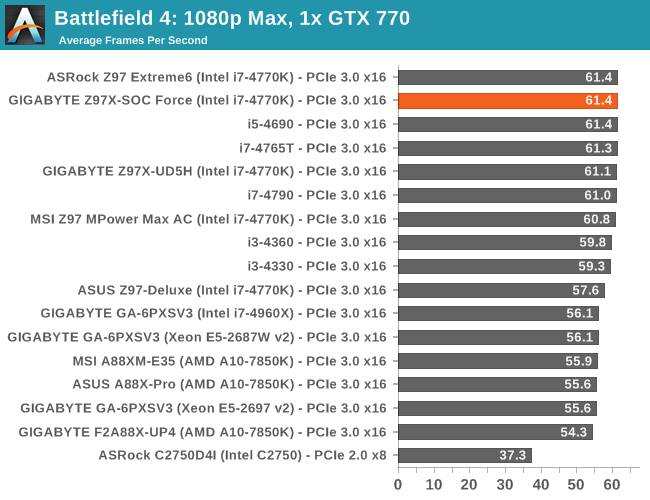
| Battlefield 4, 1080p Max | ||
| NVIDIA | AMD | |
| Average Frame Rates |
|
|
| 99th Percentile Frame Rates |
|
|
GIGABYTE Z97X-SOC Force Conclusion
After testing and examining the Z97X-SOC Force in detail, one thing is clear – in any analysis of this motherboard it helps to understand the desktop market as a whole. The biggest segment relevant to most motherboards in the $120 and up range is the gaming segment, as this is the part of the industry that is driving sustained sales after several quarters of overall decline. But other segments do exist, such as the prosumer, the enthusiast, the overclockers, HTPC, compute, storage and home server segments, sharing similar sorts of space in a Venn diagram with various features being part of two or more segments. What this means in reality is that unless the segment is large (like the gaming segment), any focused product also needs to include features of some of the other segments in order to be worth the R&D investment for the return on sales. When I interviewed GIGABYTE’s Product Management Director Jackson Hsu as part of our Computex coverage last year, the Z87X-OC had such demand it had sold the initial batches very early on in its product cycle. Due to the iterative nature of 9-series over 8-series, the loose focus on gaming it implements, and the lack of a full CPU launch alongside, it might struggle to emulate the success of the Z87 version in its entirety.
The Z97X-SOC Force functionality is heavily shifted towards the overclocking segment, especially in the overclock buttons on the motherboard.
I would hazard a guess and say that having this many buttons on the corner of an ATX product is unprecedented, especially as GIGABYTE’s main competition in the extreme overclock space has moved their OC functions into a separate overclocking panel. OC Ignition and the DIMM Switches separate the GIGABYTE motherboard from the competition, and extreme overclockers who like using onboard buttons over OS software will also find it useful. Personally I found that with so many buttons it can be difficult remembering which is which without significant experience, such as accidentally pressing the Memory Safe button when I really wanted to press the Direct to BIOS button.
The extra power delivery over the Z97X-SOC (non ‘Force’ edition) places this product even more square in the overclocking segment, although this is joined by the Killer NIC on the Force (an Atheros NIC with network management software), which is more on the gaming side of the equation. The x8/x4/x4 + x4 PCIe layout will encourage compute users that are not PCIe bandwidth limited to build pure compute systems with a high powered mainstream CPU at the core.

The onboard USB ports are also a good touch for overclocking, allowing users to plug in USB sticks without having to reach over to the rear panel and perhaps knock something and lose a score. This has the double benefit of allowing permanent USB storage inside the case, or attaching a USB license dongle for software that needs it. Case modifiers might also use the ports as a source of power for internal lightning.
Similar to my conclusion about the UD5H, the BIOS is receiving iterative updates but I am not entirely convinced that it is going in the right direction. It is more the visuals than the functionality that irks me, given that the new high-definition BIOS screen can be difficult to digest with so much data and the difficulty to dissect it due to the color scheme and background. There is a reason that seasoned overclockers move back to the classic mode, and this should be addressed by GIGABYTE. In terms of functionality, other manufacturers are starting to move on BIOS fan controls, while GIGABYTE is still behind on this front – PWM/ºC is not a nice scale to deal in unless you are an engineer and if you know the power-to-RPM profile of the fan you are working with.
The software is making steps forward over the 8-series, especially in using more windows to display specific data. Moving the fan controls apart from the overclock controls into separate foci makes the experience cleaner for sure. The automatic overclock options still need to be addressed, but our manual overclocking experience at least is where we would expect.
Power consumption and DPC Latency are both low, which is a good thing, and the USB 3.0 performance is near the top of our 9-series testing. Boot times are expected, and in terms of CPU and GPU performance throughput it matches the other 9-series motherboards we have tested. It is worth noting for IGP users that the Z97X-SOC Force implements a small overclock to the i7-4770K IGP from 1250 MHz to 1300 MHz, which gave a 4% FPS improvement at 1280x1024 on low settings.
The main comparison point for the Z97X-SOC Force has to be its smaller sibling, the Z97X-SOC. The SOC Force is $20 more, and for this we get the OC Brace, double the power delivery and the Intel NIC changes to the Atheros Killer with management software. For $20 that seems like a good deal, but consider the average overclocking gamer: the OC Brace is of no use, the power delivery will most likely not hinder an air/water overclock and many users prefer the Intel NIC. As a result I would have to recommend the SOC over the SOC Force for gamers, but for users who want to attempt to push the limits, more on sub-zero overclocking, then the batch of ~$200 motherboards are a good place to start. The GIGABYTE Z97X-SOC Force puts most of the control in the hands of the overclocker in the form of buttons, easier voltage readings and the OC Brace helps with GPU application. It is not a $400 mega-everything board, but with a good CPU the GIGABYTE Z97X-SOC Force can certainly make the extreme overclocking experience fun.
We mentioned in our Computex 2014 coverage that GIGABYTE will be releasing the Z97X-SOC Force LN2 motherboard, a version which eschews the CPU mounting holes in order to bring the memory slots closer to the CPU:

This restricts CPU cooling to the big pots used for liquid nitrogen or dry ice, but extends the tolerances for DRAM timing for better performance at the super-high end. For example, GIGABYTE took the DDR3 frequency world record at Computex this year with this motherboard, which is now set at DDR3-4560 MHz. This board only has a limited run of 100 units (at this time), so sub-zero enthusiasts should talk to their local GIGABYTE representatives about sourcing one. Personally I think this makes a good argument for better air-cooling solutions, if moving the memory slots can extend overclocking margins for day-to-day users.


